Showing posts with label colette patterns. Show all posts

Tuesday, 26 September 2017

Seven Years of Blogging!

Today my blog turns seven! Seven years since I tentatively published my first post featuring a lovely, but stiff-as-a-board Colette Sencha blouse.


A lot has happened during the past seven years. I've discovered a passion and love for sewing I never knew existed, made some lifelong friends, spent thousands of hours at the sewing machine and bought more than a few metres of fabric. This time last year I even had a book published! Blogs in general and sewing blogs in particular have also seen quite a change during that time. Sewing bloggers are publishing fewer posts and some have even stopped blogging altogether. There are several good reasons for this, but I still find it sad when a sewing blog ceases to be.

Instagram has definitely played its part and I'm as guilty as the next person. It's all too easy to 'like' something on Instagram rather than go through the rigmarole of leaving a comment on a blog. And let's face it, posting a single photo of a finished garment takes far less time than slaving over a hot computer to write a full pattern review. The thing is, I like reading the full reviews and the sewing details. I want to know how a fabric behaved and what fitting adjustments were needed. I love reading about sewing. As attractive as the quick fix will always be, I'd still rather read the longer, less glamorous version on a sewing blog.

The other area of sewing social media that seems to have suddenly sprung to life is sewing vlogs.  I can see that vlogs serve a slightly different purpose to sewing blogs, but try as I might, I just can't warm to them. Unlike Instagram, there's actually quite a time investment required to actually sit and watch them (the few I've viewed all seem to last around 15 minutes). I'd much rather spend that time reading blogs! Admittedly I'm always years behind when it comes to any form of new social media, but I'm absolutely certain I'll never start vlogging myself. I'd have to contend with the twin horrors of seeing myself on camera and listening to my own voice. No thanks!  

I'll still continue to write my blog, even if fewer people are reading them, simply because having a blog is hugely important to me. Admittedly I've been a bit quiet lately (a combination of summer holidays and back-to-school madness), but I do really enjoy the process of writing posts and reviewing the garments I make. Call me a Luddite, but that's the way I like it!

A massive thank you to everybody who has offered such unwavering support and friendship over the past seven years. I really do appreciate it. xx

I'll be back soon with something rarely seen on this blog (ha!) - a new red dress!

Sadly this is a pretend front cover!


Monday, 1 August 2016

OWOP is back!

Hands up who remembers OWOP (One Week, One Pattern)? Of course you do, it's the group sewing challenge where participants wear variations of the same pattern, every day for a week! The original challenge was created by Tilly in 2012, I resurrected it in 2014 and now Hannah from Cinderellis Sews is hosting a new challenge for 2016. Hoorah! 
My favourite part of both challenges was working out all the different mix and match combinations with my chosen pattern. In 2012 I chose the Colette Ginger skirt, a high waisted A-line skirt that proved to be endlessly versatile. For the last challenge I went for a vintage pattern - Simplicity 4238 - a 1950's button up blouse that's become a real wardrobe staple.


The big question is, what to choose this time round? You may have noticed I've been more than a little obsessed with New Look 6217 of late (I have three versions of the top and two versions of the skirt), so that's currently the strongest contender. However, I also absolutely LOVE my Sewaholic Granville shirts and although I only have two versions (here and here) they're both solid colours, so they match absolutely everything. The Granville shirt would certainly be a greater challenge, but may be a bit too similar to the last pattern, what do you think?


If you'd like to join in, One Week, One Pattern 2016 will run from Saturday 10th September until Friday 16th September. You can sign up and find out further details about OWOP on Cinderellis Sews. There will also be a series of exciting guest posts on her blog over the next few weeks (including ME on August 6th!) and fabulous giveaways for every day of the challenge. Wahay! x


Monday, 18 January 2016

A cable knit Mabel

Plans for jumper making had to be swiftly re-jigged this week on discovering that I only had a metre of Aran-style sweater knit to play with. What possessed me to only buy one measly metre?! It's nigh on impossible to cut out a jumper from one metre - those pesky long sleeved pattern pieces take up a lot of space. The thick, cabled fabric would have looked daft made into a short sleeved version, so there was only one thing for it….make a skirt instead. 


I used the Mabel pattern from Colette which I've used twice before (here and here), both times using a double knit. Although my fabric is chunky and cable-y, it's not actually as stable as a double knit, so the finished skirt is a bit roomier than my other versions. This is no bad thing though, given my current post-Christmas shape! I used scraps left over from my gingham Agnes dress for the waistband lining and they blended in perfectly. 


I sewed the whole skirt on my overlocker and it was on track to become the fastest item of clothing I'd ever sewn - until I got to the hem. I'm not sure if it was the cabling that my machine didn't like, but try as I might, I just couldn't get it to sew straight stitches on this fabric without looping. I tried every type of needle (stretch, jersey, ballpoint and double) and every combination of tension and stitch type but it wasn't having any of it. In the end I had to hand sew the hem. No great tragedy, but a bit tiresome given that it could have been hemmed in about 20 seconds with a double needle.


All's well that ends well though - my finished Mabel is all set to be a skirt version of a pair of PJ bottoms. It's so cosy and comfortable and perfect for days like yesterday when it was miserable outside and all I wanted to do was lounge on the sofa and watch TV. Happily, it's also presentable enough to wear outside the house and is a bit more interesting to look at than my previous Mabel skirts. It's not exactly what I had in mind for this fabric but it'll do fine. 

In other cold weather sewing news, my Karen dress is almost finished (now that really is a super fast sew!) and the fabrics for my White Russian sweatshirt are currently waiting to be cut out. I'll keep you updated! x


Wednesday, 30 September 2015

Handmade Jane is five!

Well I never! My blog is five years old this week! Time certainly flies when you're having fun.

I thought I'd brighten your day by posting a photo of me when I was five years old...


Ha! Pretty scary eh?! If only they were casting for Village of the Damned that day, I could have bagged myself a starring role…. 


Sorry, I digress…  I have fond memories of writing my very first post, which featured a lovely, but stiff-as-a-board Colette Sencha top. I may not have got much wear out of it (the higher than average neckline always made me feel like I was being slowly strangled), but it taught me a lot about sewing, fitting and, above all, fabric choice!


Having a blog isn't just about making things and taking photos. It's also about interacting with the sewing community and for me, that's been by far the best thing that's happened since I started writing it. I've learnt lots about sewing during my first five years and I still have a long way to go. More importantly, I've met some of the kindest, most talented and generous people ever. And the funniest… I've been on some meet-ups where I haven't stopped laughing the entire time!  In short, sewing and writing a blog have made me very happy and kept me sane - you can't ask for more really!

So to everybody who has followed my blog and supported my sewing endeavours for the past five years - THANK YOU! It means an awful lot to me.  xx


Tuesday, 5 May 2015

Finished: Arielle Skirt


As is often the case, not one but two of my favourite handmade skirts have had to be retired due to being thoroughly worn out. They were my beloved denim Ginger skirt and my navy-with-red-buttons Beignet. Both were made using Colette patterns during my first year of sewing and have been on constant rotation ever since, so they were well and truly worn to death. I needed to make replacements, and fast!


The shape and style of the Tilly and the Buttons Arielle Skirt seemed to be the perfect solution. And as there was now a denim-skirt-shaped hole in my wardrobe, I decided to make my version in denim. The fitted silhouette and cute button detail of the pattern also reminded me of my Beignet skirt, so I felt like I was channelling my two old skirts into one new one!


The instructions for the Arielle pattern are very clearIy written, with good, explanatory photos to guide you through the process. Unlike the Beignet pattern, it didn't take very long to sew at all (I made it over the course of two afternoons) and there are very few pattern pieces, especially if you make the unlined version. The side seams are contoured to fit around your waist and hips, making the skirt very close fitting - using a stretch denim was definitely a good move as it really does yank you into place! Size-wise, I made a size 3 and the only adjustment I made was to the length - I took about 10cms from the length of the longer version. I didn't adjust the waist and hips at all and the finished fit is great. I think it's an ideal pattern for a confident beginner to tackle, perhaps as a second skirt project.


The fabric I used is a stretch denim in a very dark blue from Ditto Fabrics. I pre-washed it, but it still feels quite stiff - hopefully it will soften up after a few washes. Because of this, the overlapped front edge doesn't lie completely flat, but that's just me nit picking. My version is unlined as that's what I've always done with denim skirts (I think of them a bit like jeans!) I would also normally use a lighter weight fabric for the facings to reduce bulk, especially when sewing with denim. In this case, however, I did actually use denim facings and I think the skirt benefits from the extra support. 


I'd planned to simply overlock the outer edge of the facings, but once I saw this post on finishing a facing with bias binding, I had to give my skirt a polka dot edge. I love how the inside of the skirt looks now, it has such a neat, professional finish.


Talking of polka dots, do you like my buttons?! They were given to me by Kerry a few years ago (I think!) and I couldn't resist adding them. Hopefully, the plain, functional denim stops them looking too twee. 


I have a feeling I'll be wearing the Arielle skirt a lot. It seems to be a good match with every single top half I throw at it (as evidenced by the unusual amount of costume changes in this post!), which I'm  taking as a good sign!  I'm so happy with it - I've ended up with a gorgeous, retro looking skirt that was born to live in my wardrobe.  x


Tuesday, 28 April 2015

1950's-style shoulder tie dress


Recognise this fabric? It's the one I chose from the Hemingway Designs collection, which Tracey from Trixie Lixie very kindly sent me to try out last year. I always knew I wanted to use the fabric for a summer dress, hence the delay. Well, summer's on its way and I'm ready and waiting with my new sundress!

Initially, I was going to make a shirt dress, but after seeing this pattern illustration with a similar turquoise print, I decided to make a fifties-inspired sundress with shoulder ties. I also wanted to add a bit of white somewhere as I love how the two colours look together.


To draft the bodice I used my bodice block as a starting point, together with the instructions from Casey's tutorial for a 1950's sundress (part one and part two). The tutorial worked fine for me, but if you are thinking of using it, I'd recommend reading both parts before you start. It isn't until part two that Casey advises you to use a sleeveless bodice block to make the sundress. A bodice block or pattern that's originally drafted with a sleeve (as mine is) will have more curve around the armhole. Luckily, I made a muslin first and eventually worked out why my armholes were so baggy!

Take my word for it, the neckline does lie flat when I don't have my hands on my hips!
I deviated slightly from the tutorial in a couple of areas. I lowered the neckline to slightly dip in the middle - the original straight-across design does look authentically 1950's, but it was cutting into my neck at exactly the wrong place. I also swapped the gathered skirt in the tutorial for an A-line skirt (I used the pattern from the Colette Peony dress). I reduced the A-line shape by about 1.5" at each side and added pleats rather than gathers at the top (as I did with my gingham Peony dress). The result is not as eye catching as a full, gathered skirt, but I made the dress with holidays in mind, so the less skirt to contend with, the better!


The fabric is a lovely quality, medium-weight cotton, which is a good match for a semi-structured dress as it's nice and crisp. The one I chose is Duck Egg Grid, which has now sold out unfortunately, but if you like the distinctive grid design, it does feature in the newest Hemingway Designs collection in some lovely pastel colours. I didn't even attempt to pattern match the grid design as it's so busy, but actually, when you look closely, the pattern is separated into grids by dividing white lines. By absolute FLUKE, the gridlines on the bodice and skirt match up perfectly, with no help from me whatsoever. What are the chances eh?!

Matching gridline! It's the same on the other side of the bodice too.
Making this dress wasn't without its trials and I did struggle a bit trying to draft the bodice. I always feel slightly out of my depth when it comes to drafting anything myself, I much prefer the safety net of ready drafted pattern pieces. I got there in the end though and the result is just what I was hoping for - a pretty, practical sundress with a bit of a nod to 1950's styles. I like the fact that simply adding white bias binding around the armholes results in a pair of splendid shoulder ties, such a lovely detail!


For some reason, I seemed to think that putting my hair in a pony tail and leaning ridiculously forward would show off the shoulder detail. Er no! I've included the photo anyway because it makes me laugh.

Bloody halfwit!
This dress will be perfect for my holidays and for all those hot, sunny days which I'm reliably informed are just around the corner!  x

EDIT: If you like the shoulder tie bodice, but don't fancy drafting your own, Maison Fleur have just released their Summer Blouse pattern which has a similar detail. Might be worth checking out.


Fabric was given to me free of charge for review. All views my own.


Friday, 10 April 2015

Liberty T shirt

When I say T shirt. I mean something that's very wearable and classic in style, with the added bonus that you can just pull it on over your head. I didn't want to make it from traditional T shirt fabric either, I wanted to step it up a notch, so this little number is made from Liberty Tana lawn. 


After a great deal of head scratching and pretending I knew what I was doing (I really didn't), I came up with a basic tee shape that I was happy with. Sadly, I can't give you the magical formula of how it was drafted as it's mostly a mash-up of my bodice block and the Colette Laurel top, with a bit of Simplicity 2154 thrown in for good measure. There are no zips or buttons (hoorah) so it does indeed slip on over your head like a T shirt, but there are also six darts added to give it a bit of shape. Once I'd stopped fiddling about with the pattern pieces, this was a very quick make. The hem and sleeves are simply overlocked and hemmed and the neckline is finished with bias binding (as per the Laurel top instructions).

I bought the fabric during a Liberty shopping trip with Scruffy Badger (Winnie), last summer. We both decided to make Laurel tops from our Liberty lawn (you can see Winnie's here), but she was a bit quicker off the mark than me - nearly a year quicker as it happens! Anyway, after my recent Liberty giveaway I had a mad urge to make something from a Liberty print so out it came. It's only a one metre remnant, but I was still able to get a top with sleeves out of it by folding the selvedges into the centre before cutting. The fabric design shows circles of black and cream flowers with some sort of polka dot action going on in the background. It's a very busy design which comes in handy for hiding all those darts, even I have to look carefully to find them!


I can see it becoming a real all-rounder in my wardrobe as it's such a classic style. It looks good tucked into a denim skirt, or worn loose with slim trousers and wedges.  Ah, a Liberty T shirt, the best of both worlds in my opinion!  x


Friday, 31 October 2014

Fear Fabric Challenge: Lace

What's the scariest thing you can think of? For me it's clowns, dolls coming to life and ventriloquists dummies.... I also can't stand anything round my neck, or thinking I can't breath…. or one particular scene in The Woman in Black (the old BBC version, not the Daniel Radcliffe film). If you've seen it, you'll know exactly which bit I'm talking about - TERRIFYING.  I'm a bit of a wuss generally and news of this must have made its way across the ocean, as I was asked to be a participant in this year's Fear Fabric Challenge, hosted by Beth at 110 Creations.  WOOOOOOOOO!!


For the challenge I had to choose a scary fabric and conquer my fear of it by sewing something fabulous. Now there isn't actually a fabric that scares the bejesus out of me in the same way as a talking doll or The Woman in Black would, but there are a few I've managed to avoid like the plague. One of them is silk, which I'm still giving a wide berth, the other one is lace. Ah lace, lace, lacey, lacey, lace, so pretty, but with such a dreadful reputation, all those holes! It was only after seeing this Joseph dress worn by my lovely friend Rose that I was truly inspired to give lace a go myself.  Doesn't she look BEE-OOT-IFUL?


I thought a whole dress would be a bit much to tackle on my first attempt, but liked the idea of a smart top that could be worn with fitted trousers. A bit like the Luxurious Lace Top from Boden. For fabric I used some All Over Flower Lace in navy from White Tree Fabrics. I recently joined their blogging team as an occasional guest blogger, so the lace, satin lining fabric and bias binding for finishing was kindly sent to me free of charge - thank you White Tree Fabrics! There was an almost overwhelmingly large selection of lace to choose from, so I ordered a few samples first. I'd highly recommend doing this as the samples are generously cut and you can drape them over your arm to see what they look like as sleeves.  I didn't want to go with a very expensive lace, just in case I totally bodged it, and although the lace I used was fine, with hindsight I should have taken the risk and gone for a higher quality fabric. I think it would have given the top more of a fancy finish.


The pattern I used was the Colette Laurel. What appealed to me about the pattern was the lack of zips or buttons - the top version can just be pulled over your head. Shaping is created with bust darts and back contour darts, which I was hoping would be enough. I actually made a muslin beforehand (gasp!) and cut a size 8 with a ½" FBA (full bust adjustment). Although it fitted well across the bust, it was still a little boxy for my liking, so I added contour darts to the front, checking I could still get it over my head before sewing them! I also took in the side seams a smidgen too. The only other change to the pattern was to extend the length of the sleeves from elbow length to wrist length (about six inches).


Lace is very 'on trend' (as Gok would say), which was handy as there were plenty of examples in the shops for me to inspect at close quarters. I was initially thinking of underlining the lace, but my secret lurking revealed that the majority were made with a full lining. So a full lining it was. I used a solid navy satin lining, which was actually far more of a pain in the arse to work with than the lace. It was slippery to cut out and frayed like nobody's business as soon as you even looked in its general direction. I used the shiniest side against the skin so that the top could slide on and off easily, with the duller side against the lace to give less of a bling effect. By comparison, the lace was as good as gold: it washed and dried like a dream, didn't fray and behaved itself perfectly when I was cutting it out.  Nothing scary about this fabric at all.

Working with it is time consuming though - it's almost impossible to mark lace pattern pieces in the usual way, so I used tailors tacks to mark out all the darts and notches (thank you Louise at Thread Carefully for showing me the light on that one!) Marking up the pattern pieces took ages, but it was good discipline. As the bodice is fully lined, most seams are hidden from view, for the ones that are on view (such as the sleeve seams), I used French seams. I also used this brilliant tutorial - inserting un-lined sleeves in a lined bodice - to achieve a lovely clean finish around the sleeves and armholes.


I didn't actually refer to the instructions much as I fully lined my top, which meant a lot of them were redundant (along with the bias binding). There's a lot more you can do with this pattern though: as well as the top, there are three dress options included in the pattern itself and the option to download an E-Booklet with a further nine variations.


So what's the verdict? Well, my verdict on working with lace is a pleasant surprise. Yes, it's time consuming to work with, but the fact that it's relatively easy to prepare and sew more than makes up for this. I'm still not convinced the shape of the Laurel pattern is that flattering for my shape - I made this before taking my pattern cutting course, so if I made it again, I would tweak it accordingly. I also think my decision to fully line it has made it a bit bulkier than I'd prefer. It's perfect for wearing with jeans and heels to the pub though, and in that respect, it's a super useful addition to my wardrobe. I would like to work with lace again, but I think next time I'll choose a different colour.

If you haven't quite had your fill of scary fabrics (and let's face it, this one was pretty tame!), you can check out the rest of the Fear Fabric Challenges:

Andrea from Four Square Walls
Nakisha from Sew Crafty Chemist
Shannon from Shanni Loves
Beth from 110 Creations

What's the scariest fabric you've ever worked with? x

Fabric was given to me free of charge for review. All views my own.

Thursday, 16 October 2014

Back to basics

One thing I noticed when I did my recent wardrobe changeover (from summer to autumn) was a lack of basic, functional items. By this, I mean everyday pieces in solid, neutral colours that match up with the rest of my wardrobe. To most people, a neutral colour is white, cream or black, but to me it's navy blue....or red. I addressed this a few weeks ago when I made my first Mabel skirt in red and Ultimate Trousers in navy, both of which have been on almost constant rotation from the moment they were born. Yesterday, after a particularly successful flurry of sewing, I ticked off two more items. They're both neutral (well, navy) basics so should really be classified under BORING. However, I'm pretty delighted at how well they've turned out, so I'm subjecting you to them today I'm afraid.


First up is another Bronte top (my first one's here). This one is made with a lovely cotton and lycra jersey from Ditto Fabrics. I bought the fabric intending to make the long sleeved version, but failed to take into consideration how much fabric is needed for long sleeves. I only bought a metre (duh), which isn't nearly enough for long sleeves, however adventurous a cutter you are. I do like the short sleeved version though and the fabric's light enough to wear under a cardigan. As per last time, I cut a size 12 at the bust, grading to a 10 at the waist and hips, which gives a nice tight fit.


Next up is a navy Mabel Skirt, this time cut to the same length as the pencil skirt version which is a much better length for me (just on the knee). I used a scrap of the Bronte fabric for the inside waistband and even managed to sew it on the right way round this time. The double knit fabric for both of my Mabel skirts came from Calico Laine and it's a perfect weight for the pattern. This version seems a bit roomier than the first one (in a good way), but I'm not quite sure why. I did sew the whole skirt on the overlocker and wasn't particularly vigilant about my seam allowances, so maybe that's it? 

Anyway, the total time to make both garments - from cutting out to sewing the last hem - was about four hours. It would have been even quicker, but I was distracted by a shoe delivery and had to take time off to play with them. The Mabel skirt only took about 30 minutes sewing time, I kid you not! The Bronte top takes a little while longer as there's all the shoulder binding to negotiate, but it's still easily sewn up in a morning or afternoon.

I've lightened this photo quite a bit to show the shoulder detail
They work well as separates as evidenced above, and even look cute worn together.

Look - a navy knit dress!  (sort of)
These quick and easy basics patterns have rather taken my fancy at the moment. Don't worry, I'll get back to the dresses and shiny stuff soon enough. But whilst my attention is wandering, I might as well ask, what are your favourite basics patterns to sew? Happy Thursday. x


Tuesday, 23 September 2014

Little red Mabel skirt

Earlier this month, after a long summer of reduced stitching time, I was in need of a quick make to ease me back into autumn sewing. Alice from Backstitch contacted me at about the same time to see if I'd like to review a pattern from her shop. It seemed the perfect time to try out the Colette Patterns Mabel Skirt - a simple pull on skirt designed specifically for knit fabrics. Plus, Rachel from House of Pinheiro had described wearing the Mabel skirt as being like wearing pyjamas - how could I possibly resist?!


The Mabel pattern offers three design options: a mini skirt, a variation of the mini with a button placket and a pencil skirt with vent. I went for version one, the mini skirt, but lengthened it by 1.5 inches. As it turns out, it's still less of a skirt and more of a pelmet - it's very short on me and I'm titchy. So I'll be lengthening it considerably for my next attempt - probably to the same length as the pencil skirt version. There's a broad range of sizes from XS to 3XL - for reference I made a size M (US 8-10) and apart from adding a tiny bit of length, I made no changes to the pattern.


I used leftover red double knit from my Victoria Blazer for the main skirt fabric and a few scraps of thinner red jersey from my easy elastic waist skirt for the waistband lining. And before you ask, yes I did try the skirt and blazer on together - sadly I looked like some kind of Butlins red coat nightmare…. not a good look! Medium to heavy weight stable knits are recommended for this pattern and I think double knit is a great choice. I've had trouble with hems on knit dresses going a bit wavy in the past, but there's none of that nonsense with double knit as it's so sturdy. 


The pattern envelope claims that the Mabel skirt can be made in just an hour. This would have been an accurate description if I hadn't sewn the waistband on upside down. Grrr! Easily sorted though. The instructions are well written and easy to follow and the pattern was a very good choice for me to cut my teeth onto after my sewing-deprived summer. There are no fastenings, it's quite a forgiving fit (it's designed with negative ease so stretches into position if you've eaten too many pies) and even with the waistband debacle, I managed to whip it up in no time. Apart from a tiny bit of top stitching to secure the waistband and a hem sewn with a double needle, I sewed the whole skirt on my overlocker. As it's a knit pattern, a smaller ⅜" seam allowance is used throughout, which is helpful if you're using an overlocker and worth making a note of if you're not! I also liked one particular tip in the instructions telling you to trim ⅛" from the top edge of the waistband pieces to allow for "turn of cloth". This helps the shell fabric roll to the inside - it worked splendidly on my Mabel which is always satisfying!  


This first attempt was always meant to be a practice version but it's turned out so well I'm going to wear it until it falls apart. I have some navy blue double knit waiting in the wings for my next version. I'm well aware that almost everything I make is navy and red, but I want these Mabel skirts to be everyday basics to wear with tights in the colder months (I just got away with no tights today on this fine September day but I think that was a fluke). The way I see it, a red version and a navy version will match up with about 99% of my wardrobe. Hoorah! 

And Rachel was so right, wearing a Mabel skirt is exactly like wearing your PJ's! x

The Mabel pattern was given to me free of charge for review. All views my own.


Friday, 14 February 2014

Emery dress - read all about it

I was lucky enough to be offered a pattern to review by Alice at Backstitch recently. It's a dirty job, but somebody's got to do it… Alice stocks an impressive array of independent pattern designers, but one pattern stood out for me - the Emery dress by Christine Haynes. With a neat, fitted bodice and plain lines, it's exactly what I like in a dress. It also has variations for a collar and, wait for it…. a bow!! Oh yes!

I think there are strong similarities between the Emery dress and the Colette Patterns Peony dress. I've made the Peony dress five times and wear all five versions regularly, but I'd be lying if I said it wasn't an absolute bugger to get the bodice to fit. In comparison, the fit on the Emery dress is spectacularly good, and it's not just me who thinks that - everybody who's made it seems to think so too.


Before I started work on the pattern, I pored over the reviews by other bloggers and decided to make two changes. I lengthened the bodice by an inch, influenced by the perfect fit on The Sew Convert's version, who made the same adjustment. A quick muslin (yes, you read that correctly - muslin) confirmed my instinct was right, it was a little short in its original state. I also changed the skirt from a gathered rectangle to a half circle skirt. This was after seeing The Nerdy Seamstress's version. I was impressed by how flattering the fit was on Kathy, especially as her body type is quite similar to mine. I used the By Hand London Circle Skirt App, which does all the maths for you - hoorah. They're the only changes I made though, I nearly cried when I saw what a perfect fit the bodice was!


This is the first Christine Haynes pattern I've used and I was mightily impressed. I faithfully followed the instructions for the invisible zip and it went in first time, without the slightest hint of a fight. There are also instructions for self lining the bodice to give a clean finish around the zip line. I've often struggled to work out how to finish lining around an invisible zip without resorting to hand sewing. Well this pattern shows you how in a beautifully simple way.  The sleeves also set in perfectly FIRST TIME. Just look at them?! Not a pucker or ripple in sight - these might be the best sleeves I've ever sewn, which is a massive confidence boost after the debacle of my raincoat sleeves.


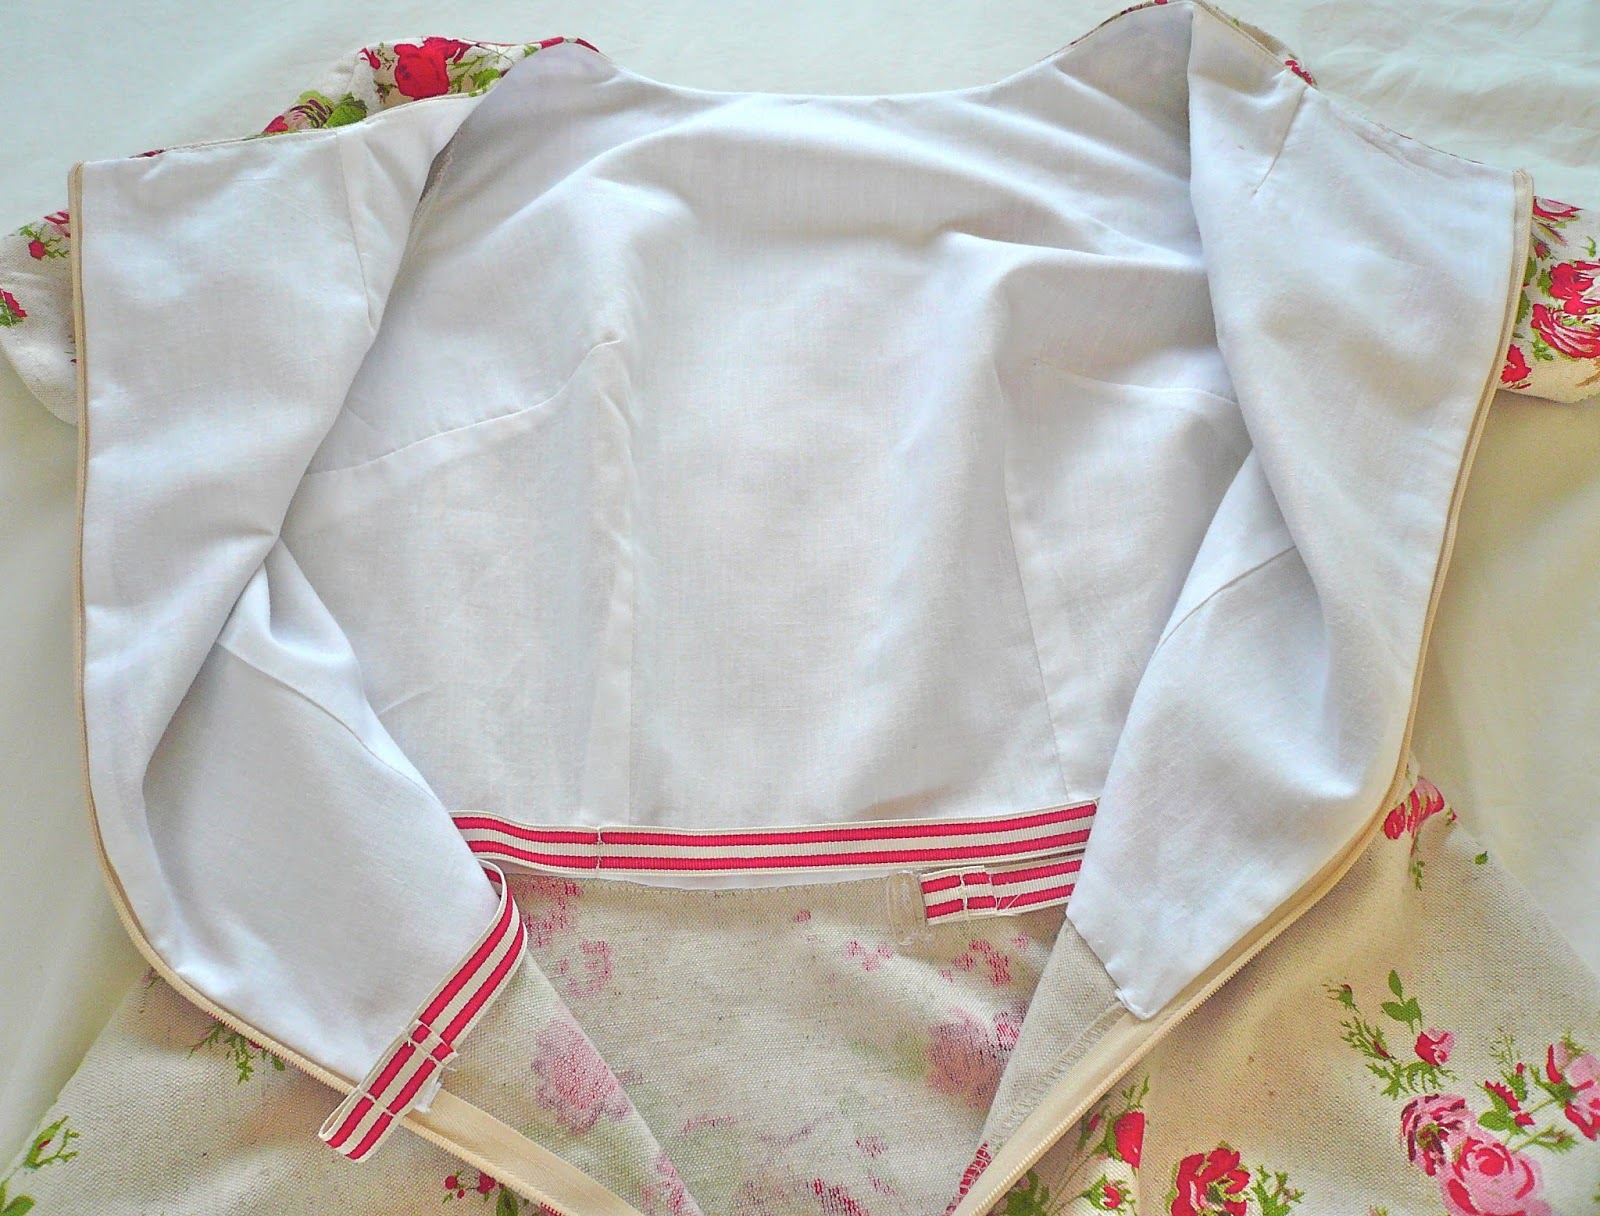
My fabric is linen - an unusual choice for a dress made in February you might think, but I couldn't resist it. I saw it on a recent Spoolettes visit to the Goldhawk Road but didn't buy it. I kept thinking about it though, (how sad am I?!), and had to make a second emergency visit to claim it as my own.  It's a biscuit coloured background with red and pink roses, probably not the best choice with my pale colouring but do I care? No. I did plan to self line the bodice but the rose print was clearly visible from the front, so settled for plain white cotton instead. I underlined the sleeves in the same fabric but left the skirt as it was. I added a waist stay to keep that lovely waistline anchored into place and I think this helps give the dress the neat, fitted look I like. Adding the waist stay was easy peasy by the way - look out for a tutorial soon!


Even though this dress is linen, it can be worn in colder months with tights and a cardigan and I can't wait to wear it in summer with wedges. It's a wonderful pattern and I'll definitely be making more versions, probably using a plain fabric and adding one of the embellishments next time. I don't think I've ever enjoyed making a dress as much as I enjoyed making this one!


Thank you Backstitch for sending me this wonderful pattern and thank you Christine Haynes, the Emery dress is a definite YES from me! x

The Emery pattern was given to me free of charge for review. All views my own.

LinkWithin

Related Posts Plugin for WordPress, Blogger...