Showing posts with label Scruffy Badger. Show all posts

Friday, 12 February 2016

Liberty trim cardigan refashion

My favourite piece of knitwear is a fitted, red John Smedley cardigan. It was a birthday present from my husband about five years ago and I LOVE it.

First outing of my beloved cardigan in 2011,  pictured with my gingham twin
and long time sewing pal Scruffy Badger

Being red, it goes with almost everything in my wardrobe and being from John Smedley, the quality is excellent. After almost daily wear, the wool isn't the slightest bit bobbled, but sadly the poor old cuffs have suffered. I don't know what's happened to them, maybe somebody fancied a nibble or they caught on something in the washing machine (most likely scenario), but they're basically knackered. I've tried to repair the damage a few times but it still looks a bit ratty and I don't wear it out of the house any longer.

It's been at the back of my mind to try to rescue the cuffs in some way, but nothing really struck me until my recent visit to Liberty. On display was a selection of cashmere jumpers and cardigans with Liberty print cuffs, oooh!


When I saw them I could almost hear the lightbulb pinging on in my head! I set to work…


I'm pretty good at donating small, scraps of fabric to my children's schools, but Liberty scraps I keep, so  I had a fair few designs to choose from. A navy Glenjade print left over from my Liberty Afternoon Blouse was the perfect contrast against the red. I didn't need much fabric either, just 29cms x 10cms for each cuff. 


I looked at a few tutorials online and read various cuff instructions before coming up with my own simple method of making and attaching them. Once constructed, I sewed the cuffs to the sleeves with a zigzag stitch and finished the seams with my overlocker. I then top stitched the edge of the cuff to the seam allowance to anchor it in place.


Oooh Liberty cuffs!
Yes, my long sleeved cardigan now has three quarter length sleeves, but just look at how awesome they are!


I'm so pleased I was able to rescue my beloved cardigan with style! Obviously you could use any fabric, but Liberty fabric is so timeless and classic, I think it really adds a certain something. I'm now tempted to give a few boring jumpers the same treatment just to spruce them up a bit!

Have a great weekend. x


Tuesday, 2 February 2016

A colour block White Russian

Today I made a sweatshirt. Not the most exciting garment to talk about I'll admit, but this one turned out way better than I was expecting, so it gets its own blog post!


My plans for sewing a sweatshirt were hatched after I was sent some rather lovely Andover Jersey samples by the Village Haberdashery. I wanted to see what two different colours would look like used together and the idea for a colour block sweatshirt was born. The pattern I used was the White Russian from Capital Chic, which I've sewn up once before here. I made a few adjustments last time for a closer fit and made some further tweaks for this version: 

- Increased the sleeve length by 5cms. 
- Lengthened the front and back pieces by 6cms.
- Added 1.5cms to the side seams.


Looking at these photos there's one other adjustment I'll made next time round - reduce the size of the neck band. At the moment, there's a slight hint of Vicar's Dog Collar going on! Apart from that I'm pleased with the final fit - the additional bit of room means I can wear an extra layer underneath without everything becoming too tight for comfort.  


The pattern specifics sweatshirt fabric, but the 100% cotton Andover Jersey knit I used was a perfectly good substitute. It's a medium weight knit fabric with a decent amount of stretch and good recovery. There was a bit of curling up after I'd cut the pieces, but nothing a good press couldn't sort out and overall it was a lovely quality fabric to work with. It's obviously not as cosy as a sweatshirt knit, but it still has a good weight to it and feels pretty warm and toasty too! It's worth noting that the fabric is wider than average (178cms), so I only needed 75cms of each colour and still had plenty left.


The Andover collection includes some gorgeous bright colours, but me being me, I was drawn to two of the more subdued ones for my sweatshirt: Cypress for the body (it appears to be out of stock at the moment) and Celadon for the arms and neckband. Both colours are a bit greener in real life than they appear in these photos and I really like the two together, they're very serene!

I think for my next version I'll be brave and mix up prints and solids together. Here are a few gorgeous versions that have inspired me:

Rachel's super classy Geneva sweatshirt 

Winnie's cool floral Linden sweatshirt

Josie's amazing faux leather Linden sweatshirt
They make me want to sew another one immediately!

This is the last thing on my cold weather sewing list to be completed and I'm amazed I've actually made everything on it. I suppose the threat of not being warm enough is a pretty good incentive to get sewing. Now that all my practical, cold weather basics are out of the way, I might just have to start thinking about summer dresses…! x


Fabric was given to me free of charge for review. All views my own.


Tuesday, 3 November 2015

Walkley in stripes

Behold my latest stripey top, made from the Walkley pattern from Wendy Ward's MIY Collection.


I have to be honest, some of the MIY Collection patterns are a little too unstructured for my taste, but this one caught my eye after seeing Scruffy Badger's deliberately mismatched striped version. I'm not edgy enough to go for mismatched stripes myself, but I liked the fact that the top looked both contemporary and smart, so into the basket it went. 


The Walkley is a very simple pattern for a sleeveless vest or dress. The PDF version tiles together using just eight sheets of A4. And if, like me, you don't go down the different fabrics/colour blocking route, there's only one front and one back piece to cut out, yay! The only thing I was wary of was the boat neck. I can't tolerate very high necks and this one looked a bit borderline. I always seem to end up with gaping too, especially if the boat neck is very wide. I compared the pattern piece to other boat necked patterns I own and it did seem wide, so I removed a 1" wedge from the neckline using this tutorial. That was the only adjustment I made.

The pattern comes in three sizes depending on your bust measurement. My measurements corresponded with the middle size, but I cut the smallest size as I wanted a closer fit. The style is supposed to skim, not be skin tight. The finished vest is quite fitted, but that's the result I was after and I'm pleased. If I was using a lighter, more clingy fabric, or making the dress version, then I'd definitely cut a larger size!


Constructing the top couldn't have been easier, not surprising really as the front and back are cut from the same piece. I sewed the whole thing on my regular sewing machine for a change. I used a jersey needle and sewed the shoulder seams and side seams with a tricot stitch, which is one of the stretch stitch options on my machine. I only discovered this stitch recently when I was looking through my instruction manual for something else and it's great! It has lots of stretch but is very strong. The only downside is that it takes ages to sew. The neckline, armholes and hem were turned under and hemmed with a double needle. These areas are all drafted with additional shaping so that they lie flat when folded, which I thought was a nice touch. 


Part of the general pattern instructions is a Working with Knit Fabrics section which gives some useful tips, including stabilising shoulder seams with tape. A tiny gripe, but I would have preferred this tip to have been in the step-by-step instructions instead - it's the sort of thing that can easily be overlooked in a general section. There was also no instruction to stay stitch or stabilise the neckline, which I think is especially important for a wide boat neck. Having suffered from baggy necklines in the past I wasn't taking any chances and zig-zagged standard stay tape to my neckline, about 1cm from the edge. This, coupled with the wedge I removed from the pattern piece definitely made the neckline feel more stable. Apart from these two points, I found the instructions were well explained with clear illustrations.

The fabric I used was a Kitt waffle knit from Fabric Godmother, which tragically they seem to have sold out of since I bought it. It's a lovely ponte de roma knit with an unusual waffle texture on the right side and a soft, fleecy texture on the inside. It has a decent amount of stretch but is still quite a stable knit - there was no rippling on the hems. I think it works particularly well with this pattern.


I'm pleasantly surprised how much I like the Walkley vest! Although it's simple, it feels like a cut above lots of my other striped tops (of which there are many). I'll almost certainly be making other versions, especially as it's so quick to put together. Happy Tuesday! x


Monday, 21 September 2015

My weekend in sewing

And what a fab weekend it was! On Friday I went along to the Handmade Fair at Hampton Court - this is on my side of London, so an easy one for me to get to. I was delighted to hook up with Jenny from Cashmerette and her lovely mum almost as soon as I walked through the door and we were joined a bit later by Rachel from House of Pinheiro. Look at the ridiculous differences in height - remind me to take a box to stand on next time! 

These girls are ACE!
I really should have booked into a workshop or gone to see a demonstration, instead I spent most of my time eating, drinking tea and chatting, I have no regrets. I still managed to pick up some lovely pieces of fabric from the fabulous shopping village. All of them are very summery and totally inappropriate for winter sewing - I'm sensible like that!


The top piece is a length of vintage gingham from Simply Vintage Designs. This stand was a complete treasure trove and I spent ages rummaging around.


The other two fabrics are vintage chambrays from the Fabric Godmother which I can't wait to sew into cool, summery shirts. Despite drooling over her fabrics for years, I'd never actually met Josie from Fabric Godmother in person, so it was lovely to have a quick chat with her.

I might have to make a direct copy of her Linden sweatshirt!

Absolutely GORGEOUS wools
My pledge for next year is to arrive super early and have a thorough look round the stands before I get distracted! It's probably just as well I didn't have more time this year as there were some seriously talented makers exhibiting. 

The fun didn't stop there though. On Sunday I legged it over to Islington with Winnie from Scruffy Badger Time to attend a one day Trouser Fitting course at Ray Stitch. Ah I'd been looking forward to this course for ages and it didn't disappoint. It was based on the same principles as the pattern cutting weekend I blogged about here, where we made bodice and skirt blocks based on our measurements. Our teacher - Alice Prier - is extremely knowledgeable about pattern cutting and was a great advert for the course in her perfectly fitted trousers! She'd also brought along several pairs of her own trousers to show different ways of finishing waistbands etc. This gave me lots of ideas for trouser construction, my favourite being the hidden elastic waistband! 

Everybody concentrating hard...
…and smiling, yay they look like trousers!
The aim of the course is to create a basic trouser block that can then be used on its own and/or as a starting point to adapt other trouser patterns. After taking measurements, working out our front and back pattern pieces and sewing them in calico, in no time at all we each had a pair of trousers to try on. 

Alice, adjusting the fit on Zoey's toile
I don't have any photos of my own toile (I'm useless, sorry!), but I can tell you that the fit wasn't too bad at all for a first attempt. I had to take a wedge out of the back thigh as there was a bit of excess fabric, and add an extra wedge to the top of my back piece to accommodate the curves around my 'ahem' arse area. The trouser block was for quite a straight leg so I also made amendments to the pattern for a narrower fit as that's the style I think works best on me. I'll be making my first trousers using my new block very soon and I promise to take lots of photos this time. 

Trousers really aren't that difficult to construct, it's getting the fit right that's the tricky bit. If you're keen to make trousers then I'd definitely recommend this course next time it's running. I thoroughly enjoyed it and am filled with confidence for future trouser making. Thank you Alice!  x


Friday, 10 April 2015

Liberty T shirt

When I say T shirt. I mean something that's very wearable and classic in style, with the added bonus that you can just pull it on over your head. I didn't want to make it from traditional T shirt fabric either, I wanted to step it up a notch, so this little number is made from Liberty Tana lawn. 


After a great deal of head scratching and pretending I knew what I was doing (I really didn't), I came up with a basic tee shape that I was happy with. Sadly, I can't give you the magical formula of how it was drafted as it's mostly a mash-up of my bodice block and the Colette Laurel top, with a bit of Simplicity 2154 thrown in for good measure. There are no zips or buttons (hoorah) so it does indeed slip on over your head like a T shirt, but there are also six darts added to give it a bit of shape. Once I'd stopped fiddling about with the pattern pieces, this was a very quick make. The hem and sleeves are simply overlocked and hemmed and the neckline is finished with bias binding (as per the Laurel top instructions).

I bought the fabric during a Liberty shopping trip with Scruffy Badger (Winnie), last summer. We both decided to make Laurel tops from our Liberty lawn (you can see Winnie's here), but she was a bit quicker off the mark than me - nearly a year quicker as it happens! Anyway, after my recent Liberty giveaway I had a mad urge to make something from a Liberty print so out it came. It's only a one metre remnant, but I was still able to get a top with sleeves out of it by folding the selvedges into the centre before cutting. The fabric design shows circles of black and cream flowers with some sort of polka dot action going on in the background. It's a very busy design which comes in handy for hiding all those darts, even I have to look carefully to find them!


I can see it becoming a real all-rounder in my wardrobe as it's such a classic style. It looks good tucked into a denim skirt, or worn loose with slim trousers and wedges.  Ah, a Liberty T shirt, the best of both worlds in my opinion!  x


Wednesday, 7 January 2015

Boiled Wool Coat Plans

Let's talk about boiled wool shall we?! I've been interested in this fabric for a while, primarily because sewing with it allows many shortcuts for the lazy amongst us (of which I am queen!) For those of you who aren't familiar with boiled wool, it's a wool fabric that's pre-shrunk by boiling at high temperatures (the clue's in the name!) This process causes the fibres to compress and interlock, resulting in a soft, springy felt-like fabric. Because of the tightly woven fibres, boiled wool is impressively resistant to wind and rain, making it perfect for outdoor garments such as coats, jackets and hats. From a sewing point of view, it has two major advantages:

- Because of the tightly woven fibres, it doesn't fray when cut, so no need to finish seams. Hoorah!

- If you're after a winter coat, you don't need to add underlining or interlining for extra warmth. In fact, if you're after a very simple coat or jacket, you don't even need to line it at all if you don't want to (more on this in a minute).


With this in mind, I thought boiled wool would be a perfect choice for my next project: a casual coat/cardigan. Design-wise I had a very simple shape in my head: above the knee and slim fitting with no collar. I was initially thinking of drafting my own, but I've come to the conclusion that I need to practice my drafting skills on a few simple garments first before unleashing them on a coat! I'm getting there though, I've almost finished drafting my first dress so look out for that soon. 

As far as inspiration goes, I was rather taken with the Named Patterns Andy Coat. When I met up with Scruffy Badger recently, I was able to inspect her beautiful version at close quarters and was mightily impressed with the tailoring details: bound buttonholes, welt pockets, fully lined, two piece sleeves etc. I was sorely tempted, but to be honest the pattern involved a bit more work than I was willing to put in (I told you I was lazy!) But then I came across this Collarless Open Coat pattern from Burda (03/2012 #110).


It's a very simple design with princess seams, two-piece sleeves, centre back seam and no collar. It's also an edge-to-edge style, which means no buttons. I'm not sure how I feel about this - on the one hand it's a casual coat for spring time, so it probably won't need buttoning up, but then again, it might drive me mad not having any. It's a tricky one… it's not totally edge-to-edge, there is a slight overlap, so I may sew on a few covered snaps as contingency. I'll have a think about it and let you know what I decide. Any thoughts?


I actually made a muslin of the coat (gasp) - I cut a Burda size 40 which looks just a tad too big all over (obviously the sleeves will need about half a foot chopping off). So I think I'm going to size down all over, take a tiny bit more off the shoulders and shape it in very slightly at the waist. I'll also need to shorten the whole thing by about six inches to get the length I want. Nothing too dramatic, and after that I'll be ready to start working with my boiled wool, eek!

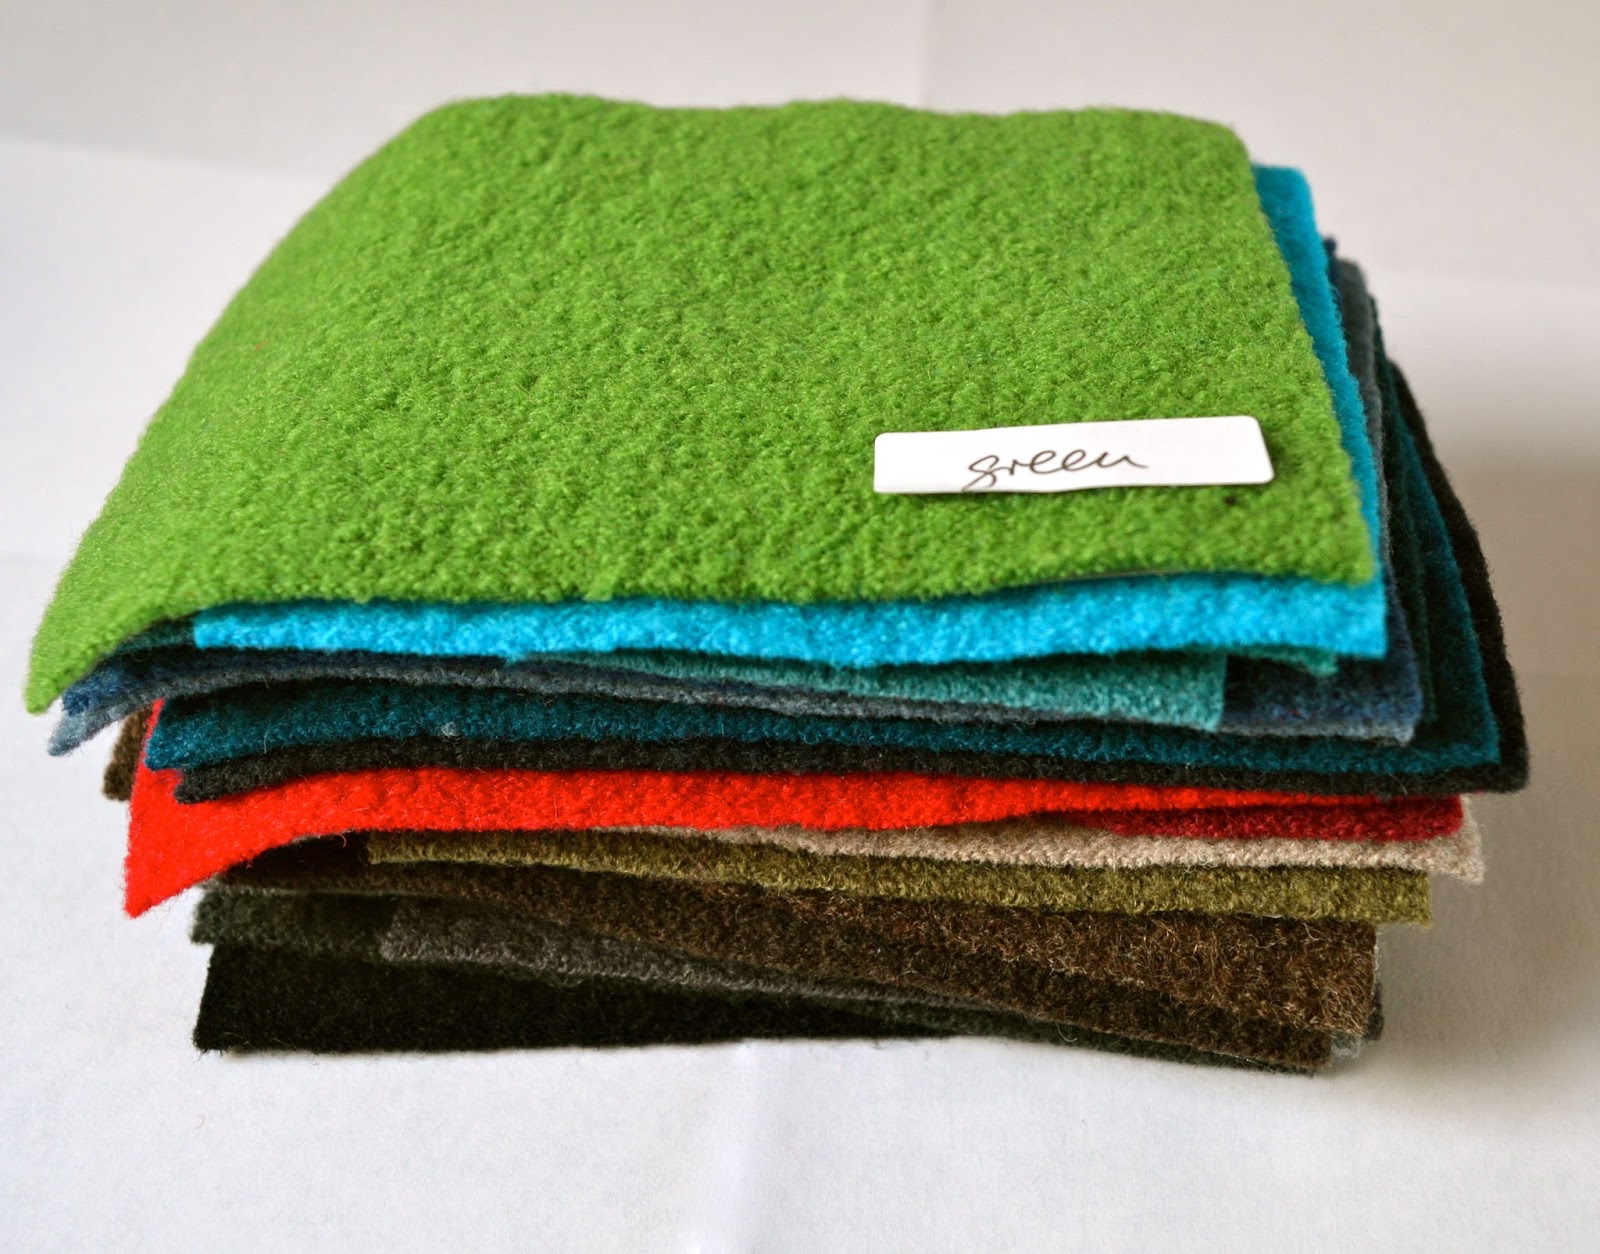
The boiled wool I'll be using is from Dragonfly Fabrics who stock a wonderful selection of colours (see first picture) The choice is almost overwhelming so I requested lots of samples to play with beforehand, eventually settling for Light Grey Blue


This photo isn't really a true representation of the fabric colour - it's much more saturated in real life, a lovely airforce blue. Dragonfly Fabrics are very kindly giving me two metres of boiled wool for my coat, so I hope I can do it justice. I haven't worked with boiled wool before, so asked Dorte at Dragonfly Fabrics for advice on pre-washing. She advised against pre-washing for a coat (I'll probably get it dry cleaned in the future if it needs it) but if I was making a dress or skirt from boiled wool then it can be pre-washed. It should be washed on a wool cycle and dried flat, but be prepared for around 10% shrinkage. 

Although I could probably get away with not adding a lining, I've decided to add one to give the coat more of a professional finish. Having done a bit of detective work in the shops, all the boiled wool coats I saw had lovely, shiny contrast linings, so that's what I'm planning. 

So there you have my boiled wool plans to date. If you've worked with boiled wool before and have any other tips or advice to share, please jump in. My fabric should arrive next week and then the fun begins! Have a good day. x


Thursday, 1 January 2015

2014 - A Year in Sewing

Happy New Year! I'm rather pleased with my sewing output for 2014, there were a few stumbling blocks along the way (more on that later…), but by and large it was a great sewing year. My favourite make of the year has got to be my Dotted Chambray Bow Blouse.


You all know I love bow blouses, I love Mrs Slocombe, I love polka dots and I love chambray, so the amalgamation of all these things almost finished me off. It's not just my favourite make of the year, it's my favourite make OF ALL TIME! I always receive compliments when I wear it too, the bow seems to be particularly impressive for some reason! Coming in at a close equal second are two dresses I made in the summer: my Kate Spade-inspired Lemon dress….


and my Anna 6696.


They were both inspired by pictures I found on Pinterest (see here and here) and I feel ridiculously pleased that I was able to use the original inspiration pictures to make dresses that were very individual to me. They both fit really well, and although they're quite different in design, I feel they're a good indicator of my style. Plus the lemon dress is yellow - one of the few rogue pieces to step out of line from my strict red, white and blue colour dictatorship this year! 


The most useful item I sewed this year was my raincoat. I won't lie, it did give me grief during the making of it, but that was all forgotten as soon as I donned my vision in navy blue waterproof loveliness! This year I also discovered the joy of sewing my own basic items of clothing (mostly Bronte T shirts and Mabel skirts). As wonderful and useful as they are, I find them deeply boring to blog about, so if any further versions pop up, I'll just mention them in passing!

As mentioned earlier, I did have a couple of misses this year: despite my best intentions, the Cressida skirt I pattern tested for Jennifer Lauren Vintage just didn't work. My first Afternoon blouse has also been shown the door, purely down to the fact that it doesn't fit. It's a real shame as I love the red shirting fabric I made it from, but there's no getting away from the fact that I cut a size too small. That'll teach me eh! And finally, the darts on my vintage red dress defeated me in the end and it's now languishing, dart-less with side seams ripped open in frustration. Maybe I'll come back to it, if I can ever be arsed. 

I think this year was the year I finally learnt to say no to every single sewing challenge I heard about. It's still a bit of a struggle as my natural inclination is to immediately scream "me too, ME TOO" but life's just too short. I did participate in the Vintage Sewing Pattern Pledge run by Marie at A Stitching Odyssey but deliberately set myself a low target (to sew up three vintage patterns in 2014). The other reason I didn't commit to everything under the sun was because I found myself hosting a sewing challenge of my own - the return of One Week, One Pattern 2014!


Although it was a lot of work, I really did enjoy organising and participating in OWOP and was overwhelmed by how many people joined in and embraced the challenge themselves - thank you so much everyone! I loved giving my beloved 1950's Simplicity pattern its place in the spotlight for a week, if anything, it's made me even fonder of the pattern than I was before!


As for my sewing plans for 2015, I'm really keen to use the skills I learnt during my pattern cutting weekend to create a well fitting bodice. This kind of thing doesn't come naturally to me, but I would like to get my dart positioning right and conquer the bloody things once and for all. With this in mind, I've got plans to make a simple, collarless coat in the early part of the year. I do have a pattern in mind but I may have a go at self drafting (ahem!) I think it will probably end up as a combination of the two. Other than that I'm going to just sew where the mood takes me,  Exciting!

My favourite picture of the year: with Rachel and Winnie at Goldhawk Road

I've had so much pleasure from sewing this year and met up with some amazingly talented and generous people (both old and new). All I want for next year is more of the same! Thank you again for your support and friendship this year and Happy Sewing, wherever you are! x 


Tuesday, 7 October 2014

Musings on exercise gear

I used to have a terrible habit of jumping straight onto the sewing band wagon. Whatever people happened to post on their blogs I immediately wanted one the same, even if I'd had no intention of making it previously. Shiny new patterns piled up in my shopping basket at an alarming rate. Over time I've learnt to temper this mad "gimme, gimme, gimme" attitude, but there are definite traces still lurking. A recent sewing category I was almost lured in by was sewing my own exercise gear.

Mr Bolt, even faster than the Bionic Man

As you probably know, Winnie from Scruffy Badger Time is a fine, accomplished runner. Running is a passion for her and a huge part of her life, so, quite rightly, she makes her own running kit. In true Badger style, her creations are brightly coloured and stylish, mostly using patterns from Fehr Trade (I think). After seeing her VNA Top in the summer I had the pattern in my shopping basket faster than the speed of light, finger hovering over the "Purchase" button. But for once, I hesitated, did I really want to devote my precious sewing time to making exercise gear? To answer that, I need to explain the role exercise plays in my life.

Until recently, it played no role whatsoever. Apart from a bit of sporadic hoola hooping, and going on walks with the family, I did no formal exercise at all. Why? Because I'm lazy of course, there's no point beating about the bush, I simply Couldn't. Be. Arsed. I'm also in the lucky position of being happy with the size I am - a slim(ish), medium-sized UK 12. The problem is, I'm also a middle aged woman (45 years of age and counting) and the sorry fact is that the older you get, the harder it is to stuff your face with pies and still remain the same size. Plus a close family member recently had a fatal heart attack, and the shock and heartbreak that followed his death was like nothing I've ever known. I needed to do some exercise, if nothing else, just to stay fit and healthy.

So for the past few months, I've been running twice, sometimes thrice, a week. Now there are two things you should know about me and running:

1. I'm rubbish at it, and although it is getting a bit easier, I'll never be able to run further than 5K.

2. I hate running. HATE. IT. I do it because it's fast, easy(ish) and free. I have the time and I have a park at the end of my road - that's all. 

In case you're wondering, that smile is forced.

But I started to think that because I run (ha!), I should also make my own gear. Currently I wear basic, black exercise gear from Marks and Spencer that fulfils its purpose masterfully. It's sort of flattering (as much as skin tight lycra can ever be), it's relatively cheap, it's black and it's anonymous. I know lots of people are driven to making their own running gear purely because they're fed up of only having boring black to choose from, but for me that's exactly what I want. I want to be anonymous and I certainly DON'T want to draw attention to myself. Plus, there's quite a skill involved in sewing your own stretch gear. There's a lot of negative ease to contend with and I just don't have those skills, I can't even make a decent pair of knickers for goodness sake. If I was making exercise gear I'd want it to look like this…


But I'm reasonably certain that any exercise gear I ever made would turn out like Mrs Overall's:


Sometimes you just have to accept when an area of sewing is not for you. And sewing exercise gear, swimsuits, knickers or anything of that ilk is just not for me.  The very rambling moral of my story is, just sew what makes you happy. Running doesn't really make me happy, it's a necessary evil, so I don't want to invest time and effort into sewing running gear. Sewing dresses makes me happy, sewing multiple versions of favourite patterns makes me happy and sewing quick, easy, flattering knits makes me happy. I'll carry on wearing my boring, black kit and leave the sewing of beautiful, stylish exercise gear to the true experts! 

So tell me, which sewing categories do you like or dislike sewing? I'm all ears! x


Thursday, 14 August 2014

OWOP Guest Post from Scruffy Badger Time

Today is the first of three guest posts written by sewing bloggers especially for One Week, One Pattern. We kick off with Winnie from Scruffy Badger Timewoop, woop! Winnie is an amazing seamstress. with a colourful and classy hand-stitched wardrobe to match her warm and vibrant personality. I'm lucky enough to have met her countless times over the years and now consider her a true friend (amazing fact: my husband Jon use to deliver the paper to Winnie's house as a teenage paperboy!!!!) When she's not running marathons or trying out a new wig, Winnie is a dab hand at accessorising with scarves. Here's what she has to say on the subject.

Have Scarves Will Style
When Jane asked me to write a guest post on style as part of OWOP I didn’t flounder on the concept of articulating my own personal style, which is haphazard to say the least and subject to all sorts of whims, occasions and functionalities...no!  I immediately thought  accessorise".  I mean if you want to get more mileage out of an outfit during OWOP, accessories can be a lifesaver. And for me that means accessorizing with scarves primarily.  There have been so many style icons and stylists along the way that have extolled the virtues of the right accessories to transform an otherwise sad outfit into one that is starlet fit, or just plain classy.  So it is nothing new. But this is about One Week, One Pattern and as with many of our online challenges this can often bring insights and new ways to looks at things you’ve made.  And if there’s a message through this post, it is to say “don’t forget about your accessories! 

So I’ve put a few combinations together to show how I use scarves, Scruffy Badger-style through lots of snaps of clothes I’ve made carefully arranged on my bedroom floor, hopefully having smoothed out any storage creases!!   (But not all – oops!)
I choose to wear scarves to:

- Bring some pep to an outfit that is made up of a lot of solid neutral colours


- Pick out colours in the pattern of a skirt to ‘finish’ an outfit


-       Add some jauntiness & interest – it’s amazing what a polka dot scarf can do when paired with some nautical stripes;

-       The right scarf (with a more solid pattern) can also bring a touch of harmony to combining prints even;


·      
      - Raise a neckline that is a bit low or chilly;

- Change the shape of a neckline to suit my face shape – eg a boatneck / slash neckline doesn’t suit me so well, but creating a focus on a scarf to draw a round neckline suits my face shape much better.


I like to wear a scarf around my neck, primarily, but from there it varies.  Depending on the neckline of the garment I am wearing, I might:

-       Tie it around my neck, as a strip/band – almost like a very wide choker;


   - Tie it as above but with a cute bow to the side;

-     Folded into a triangle then tied into a knot at the front of the garment’s neck edge;


I do not like too much volume though and I tend to take larger scarves, fold them into a triangle, then roll along the long edge (a bit like a cub scout scarf!) to get the volume of fabric under control and therefore able to be tied in a bow, or wrapped around itself. 

I’ve messed around with different combinations in these photos, but look here at how different scarves look with the same outfit


Most of these scarves are RTW – some vintage even, but I have made my own too, using precious fabric leftovers and extending their appearance and wear in another form.  I have made a couple of Brigitte scarves from Tilly’s “Love at First Stitch”- one of these and its many ways to wear shown here.  But jumped on this opportunity and quickly posted a tutorial on my blog for using your overlocker’s rolled hem to make a natty scarf.  So if you like the idea of accessorizing, why not have a go at making your own? 


Wow Winnie, I think that must be the definite guide to accessorising with scarves, THANK YOU! I love how the outfits are styled too, and have to agree - a polka dot scarf paired with nautical stripes really is a winning combo!  I hope Winnie's words of scarf-wearing wisdom have given you some pointers for OWOP and using scarves as a wonder accessory. Look out for another OWOP styling instalment next week. x


LinkWithin

Related Posts Plugin for WordPress, Blogger...