Friday, 27 May 2016

Tutorial - how to insert underarm reinforcement squares

Morning! As promised in my Big Vintage Sewalong post, I've put together a tutorial for inserting the underarm reinforcement squares on Vogue 8875. Of course, when I looked through the muslin construction photos, I realised I hadn't sewn the final dress in exactly the same way, but never fear, everything is fully explained in the written instructions. 

There are a couple of things I should point out.
1. I'd highly recommend making a bodice muslin before cutting into your precious fabric. This is time   well spent as it will allow you to check the fit and practice the technique.
2. This tutorial shows one side of the back bodice as it was smaller and easier to photograph, but the principles are the same for both back and front pieces.
3. Don't be despondent if it isn't perfect on your first try - of the four reinforcement squares I sewed, two went in without a fight first time and two had to be unpicked and redone.
4. Take your time…and make sure you have a stiff drink poured for when you've finished!

Are you sitting comfortably? Then I'll begin!

For each underarm seam you'll need a two inch square of bias cut fabric (the same as your dress fabric).
On the RIGHT side of the fabric, mark the stitching line as shown.


Centre the bias square over the tip of the stitching line and pin in place. Now mark the stitching lines on your bias square so they join up with the original ones.


Sew along the stitching line on the square and slash up to the tip.


Press the bias square first to one side of the stitching, then the other and fold it through to the WRONG side of the bodice. 


This step is not at all clear in the instructions, but believe me, that square needs to be hidden on the WRONG side! It's a bit tricky to get it to turn through neatly but it will. I'd recommend using a press cloth at this stage.

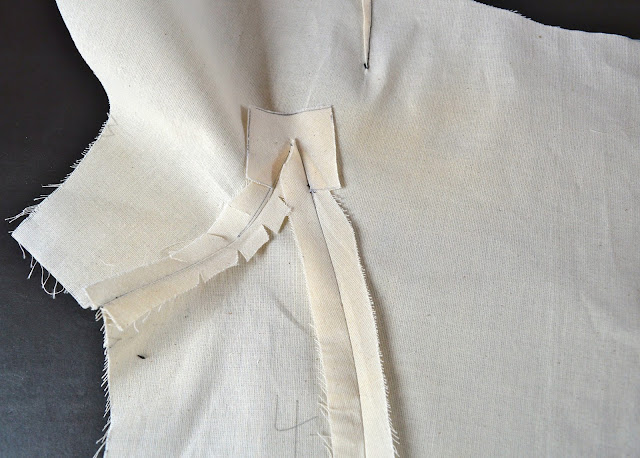
This is how it should look when it's all pressed through to the wrong side. 


And from the right side.


Your two back bodice pieces should now be stay stitched at this point as shown in the diagram below. Hmmm, guess who forgot to stay stitch her pieces for this tutorial?! Don't you forget please - as well as preventing the edges of the pattern pieces from stretching, the stay stitching will provide a stitching line for later on.

Yes, those bias squares should not be shown flapping about on the right side of the bodice, grrrr
You're now going to pin the bodice side back to the bodice back at the side and armhole edges, right sides together. Just imagine a nice line of stay stitching underneath those pins!


What I should have done at this stage is baste the pieces in place and I'd recommend you do too, it will save lots of heartache further down the line! I also found a good tip for this step on A Stitching Odyssey. Marie slits the top of the side back piece up to the seam allowance (or up to the stay stitching in your case), enabling the pieces to manoeuvre into position more easily. 

See the slit, at the top of the black piece?
Now, take a deep breath and stitch into position, sewing just outside the line of stay stitching to keep it hidden. Remember:

1. Don't feel you have to sew the whole section in one go. If you sew one seam at a time it will give you more control and hopefully minimise unruly fabric getting caught in your stitching. Talking of which…
2.  You're sewing round a very sharp corner so you need to be aware of folds of fabric potentially getting in your way. Go slowly and keep re-positioning your fabric out of the way of your needle. 

Here are the pieces stitched together. In an ideal world, the top of the side back piece would have been slashed down to where the stitching begins.


Press seams open and clip into your curves where necessary.


This is how it should look from the right side.


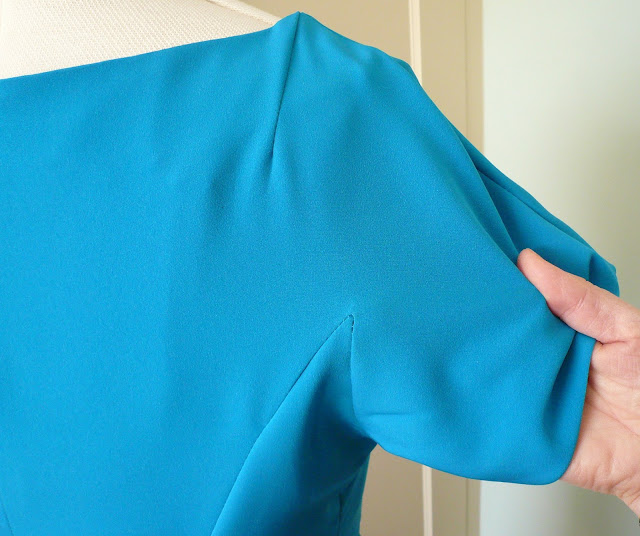
And here's the same seam on the finished dress. The reinforcement square is completely hidden and will add strength to the inner corner of the seam line.


If you're at all worried about the neatness of your underarm seams it may help to use a busy, patterned fabric. Nobody will ever notice the odd wonky stitch!

I hope this tutorial provides a bit of extra guidance if you're tackling this pattern. And as always, if there's anything you don't understand or that doesn't make sense, please let me know in the comments.  Have a good weekend! x


Monday, 23 May 2016

A Tale of Two Walkleys

Remember the striped Walkley top by Wendy Ward I made last year? It's been such a favourite of mine (I wear it at least once a week, often twice) that I knew a dress version for summer was on the cards. I like the fit, it's quick and easy to sew and you only need a metre of fabric.


The fabric I used was a lovely cherry blossom jersey from Girl Charlee - a light cotton blend with a good stretch to it. I originally ordered one metre but ended up with two, as a 'print smear' was discovered on the original batch and I was sent a replacement. It took me ages to actually find the tiny print fault and I'm sure I'd never have even noticed it amidst all that cherry blossom. I appreciate the gesture though and I did end up with two metres to play with, so thanks Girl Charlee!

When I first made the top, I deliberately cut the smallest of the three sizes offered as I wanted a closer fit. This time round I cut the next size up as I didn't want the dress version to be too clingy. Apart from removing a 1" wedge from the neckline, I made no other changes to the pattern. It really is an easy sew: shoulder seams and side seams sewn with an overlocker, then neck, armholes and hem turned under and sewn with a double needle. That should have been the end of it, but alas, I sewed the side seams with a 1.5cm seam allowance instead of the specified 1cm. Doh! The resulting fit was a bit clingy for a dress, but perfect for a top… so I chopped the bottom off and hemmed it accordingly. I then cut and sewed a second dress, making sure I used the correct seam allowance this time. Lucky for me I had that extra metre to fall back on!

Top version….
…and dress version!
The Walkley pattern is a very simple shape, but it really works for me. The neckline's just the right height (and I'm fussy about anything too high) and the cut of the capped sleeves gives it a youthful edge without making me feel too mutton-like.


I now have two garments from the same fabric and I couldn't be happier with them. The dress is slightly fitted but still roomy enough for a few ice creams. It's also easy to dress up or down with flip flops or clogs. And the top is perfect for jazzing up a pair of jeans or a denim skirt. I'll be packing both of these for my holidays this summer.  x


Tuesday, 17 May 2016

Custom Printed Fabric at Contrado

Last Saturday I was lucky enough to visit the Contrado fabric printing factory in sunny Harlesden, along with fellow bloggers Marie, Janene, Katie, Elena and Charlotte. The visit was kindly organised by Rachel and Kate at The Fold Line. If you haven't come across Contrado before (and I hadn't) they're a family run, UK-based company (hoorah) offering a facility to design and print your own fabric.


There are over 75 different fabric types to choose from, which made picking just one a bit of a nightmare. We were sent swatch packs of fabric beforehand, which are full colour printed to give an idea of how light or bright the final fabrics will look - this was really helpful. At the factory, there were giant swatch packs to play with - even more helpful as you could really feel the fabrics.


I was completely torn between 100% silk satin or (bizarrely) polycotton sheeting. As unsexy as it sounds, the polycotton sheeting was a lovely quality and had an amazing drape. In the end I couldn't pass up the opportunity to own a piece of super luxurious fabric and went for the silk. Here's a tip: check out the care instructions of your chosen fabric type beforehand! Yep, you guessed it, the silk is dry clean only, with strict instructions not to let steam anywhere near it. I'm guessing the polycotton sheeting would have been a lot less hassle! I stand by my choice though, the silk is absolutely beautiful.


The one area I totally struggled with was the design process. Once you've chosen your fabric, there's software on the website for you to lay it out and tile it. This all sounds simple enough, but I have zero technical expertise, and although I had lots of ideas for fabric designs, I had no idea where to start. In the end, Rachel kindly came to my rescue and created my design for me, based on a piece of original 1940's fabric I'd found on Pinterest. Some of the bloggers are experienced designers and even they found some of the software a little confusing, so it was good to have technical staff on hand to make sure everything was the right size and scale. There's an option on the website to print out a test piece of fabric before committing to your design which I'd strongly recommend you utilise. This is not the sort of thing you want to get wrong!

Once we'd sent our designs off to be printed we were given a tour of the factory by owner Chris.


You don't have to print massive quantities of fabric, you can print just a small panel if that's all you need. The full width of the fabric is used for different orders, so there's very little waste.


Custom fabric printing is just one side of the Contrado business, the company also prints designs or images of your choice onto a wide range of homeware or clothing products. Imagine my delight when I came across these custom printed espadrilles!


Finally we were able to see our designs printed hot off the press. This was Charlotte's....


Elena split her order into two different fabrics....


Here's mine on the press!


And on the bolt....


My design was very faithfully reproduced, although the flowers did look a bit darker than I was expecting. I'm not complaining though, this is the only fabric of its kind in the world, and it's all mine! I'll now have to think very, very carefully about what I make with it. Any ideas?!


Thank you very much to Rachel and Kate at The Fold Line for organising such a fabulous day - I found every aspect of it really interesting. Thank you also to Chris and the rest of the Contrado team for giving up your Saturday to accommodate us and for generously allowing us to print our fabric designs for free. x


Friday, 13 May 2016

Big Vintage Sewalong Dress Reveal!

May I present Vogue 8875 - my chosen pattern for the Big Vintage Sewalong blogger tour!


The pattern is for a fitted dress and matching coat, but it was only ever the dress I was interested in - I love the style lines on the bodice and the apparent simplicity of its design. Key word here: apparent! When the pattern arrived and I scrutinised the instructions I discovered things weren't quite so simple - but more on that in a minute!
The pattern originally dates from 1955 and has some fab mid-50's details, including kimono sleeves, unusual princess/underarm seams and tucks instead of darts on the skirt front. There are also instructions for adding a self fabric belt and waist stay, neither of which I did, but I think they're nice touches.


What I didn't like about this pattern were the instructions for the princess/underarm seams. These seams are reinforced with bias squares of fabric which are sewn to the outside of the bodice, then slashed and pressed to the inside. This crucial step really isn't very clear at all. It's not actually that difficult a technique once you know how to do it, but you do need a bit more guidance than the pattern offers. I took some step-by-step photos and will be putting together a tutorial soon, which hopefully will make the step a bit clearer. As for the rest of the dress, it was very straight forward to sew, so don't let me put you off!


Because of the shape of the bodice, it's difficult to get an accurate idea of fit without making a muslin. I actually made two muslins (gasp) as I was determined to get the fit right before my fabric was even in the same room as my scissors. I cut a size 12, which was a pretty good fit everywhere except the upper arms and the waist, so I added more room to those areas (see below). I also made the following changes:

- Changed the side zip to a centred zip (no surprise there). There's already a centre back bodice seam so no alterations to the pattern were required, yay!

- Shortened the skirt by a gigantic nine inches!! Mid-50's straight skirts are typically worn well below the knee, but the original skirt pattern was almost maxi length on me.

- The bodice is actually supposed to drape over the waistband in a blousey fashion rather than fit in a smooth line - this isn't apparent in the line drawings and envelope artwork. My first muslin confirmed that this did me no favours at all, so I shortened the bodice by ¾".


- Widened the kimono sleeves very slightly as they were a bit restrictive.

- Added a total of 1" to the waist, divided between the various seams. The dress fabric has more give than the muslin fabric (calico) so the waist did end up a little roomy. I'm not changing it though - it's nice to be able to bend over without stopping my circulation!

- I also tried to reduce the height of the bust darts, but this resulted in a baggy upper chest so I left them as they were!

Fabric suggestions are brief: crepe, shantung or tissue taffeta, but I think anything with a nice drape would be suitable. I went for a luxury crepe in a beautiful teal/turquoise colour from Sew Over It - the colour is a bit of a departure for me but I love it! I first saw the fabric at the Knitting and Stitching Show, which was an advantage as it meant I could play with it a bit before deciding if it was suitable. It certainly was! It doesn't have that weird spongey feel you get on a wool crepe, instead it's smooth and silky and quite weighty. If you're looking for a special occasion fabric this is definitely one to consider, I think it's lovely. The dress isn't lined (I couldn't bear the idea of sewing those reinforcement squares all over again) and the skirt does cling to your legs a bit without a lining, so I'll be wearing it with a slip,


I'm so pleased with the finished dress, it has a chic 1950's feel but at the same time, looks quite contemporary. The fabric instantly elevates it to something special and I can see this becoming a popular going-out dress this year. 

I wouldn't recommend the pattern to an absolute beginner, but if you like 1950's styles and fancy a challenge, then go for it. McCall's UK have kindly offered an extra giveaway copy of Vogue 8875 to one of my blog readers. If you'd like to be in with a chance of winning it, simply leave a comment on this blog post, including your email address if it's not linked to your Blogger profile. The giveaway is open worldwide and closes at midnight GMT on Thursday 19th May. The winner will be chosen at random.

You can find out more about the Big Vintage Sewalong on my previous post here, including details of the 20 selected vintage patterns and the other bloggers taking part in the Blogger Tour. Remember, money raised from the sale of each pattern will go directly to the Eve Appeal cancer charity, so you'll be directly supporting a great cause.  Right, that's all folks, have a great weekend! x

I'll be wearing it like this after a few drinks...

The pattern and a fabric allowance were kindly provided by The McCall Pattern Company. All views my own.   


Saturday, 7 May 2016

Two Rescued Skirts...

Last September I made a knit dress which was a mash up of the Tilly and Buttons Agnes pattern (bodice) and the Lady Skater pattern (skirt). Alas, the bodice section was cut too short and the skirt started too high up, making the dress look quite empire line. And an empire line on me is not a good look!

I didn't want to scrap it as the fabric (a grey cotton jersey gingham from Girl Charlee) was lovely, so I chopped the bodice off and made it into a skirt instead! Well, I put slightly more thought into it than that, but not much. I cut the bodice three inches above the waistline, folded the top edge in half and sewed the bottom edge to the waist seam (leaving a small gap). I then cut a piece of elastic to fit my waist, threaded it through the gap and ta-da: a new skirt!


The skirt sits just below my natural waist and is soooo comfortable. The cotton jersey is nice and lightweight for summer too - it will get a lot more wear as a skirt than it ever would have as a dress.

The skirt has been ironed, I promise you

As I was on such a triumphant skirt-making roll, I decided to rescue another one... this next skirt started life as the fitted, high waisted Megan dress from Love at First Stitch. Sadly I cut a size too small and the bodice looked so skin tight and dreadful on me that it never saw the light of day.

I didn't need to do much to rescue it. I removed the long back zip and cut the bodice off, leaving the darts exactly as they were originally sewn. I then inserted a smaller invisible zip into the back seam and finished the waistband with wide bias tape. That's it!


I didn't make the waistband as fitted as I could have which was intentional, but the darts still give it a nice shape. I now have a lovely, stretchy fitted skirt - not as super-casual as the Lady Skater skirt, but still really comfortable. Yay! 

In other news… my Big Vintage Sewalong dress is finished!! Don't forget to check in on Friday 13th May for the big reveal! x


Tuesday, 3 May 2016

Giveaway winner and Saturday Sew In at John Lewis

Big thanks to everybody who entered my giveaway to win a Sew Over It Doris pattern. It was great to read all your comments regarding side zips - definitely one of those sewing features you either love or hate! Anyway, without further ado, the winner of the Doris pattern is…. Joanne from Sew Little Time!!! Congratulations Joanne, please email me your address and I'll get the pattern sent out to you ASAP.


In other news, I'll be part of a Saturday Sew In at John Lewis Oxford Street on Saturday 21st May. John Lewis is now a stockist of Tilly and the Buttons patterns, so I'll be joining Tilly, Marie and Freya for a day's sewing to celebrate this exciting news. If you're in the area, come and say hello whilst we sew, we'll be in the Haberdashery dept from 11am to 5pm!  Have a good day! x


LinkWithin

Related Posts Plugin for WordPress, Blogger...