Showing posts with label luxury crepe. Show all posts

Friday, 6 July 2018

Lemon print skirt

I've had this gorgeous Dolce and Gabbana-style cotton (from Pigeon Wishes but no longer in stock) squirrelled away for over a year and have really taken my time deciding what to use it for. I already have a lemon print dress, which I wear quite a lot and is wildly popular with members of the public (I'm complimented on it virtually every time I wear it, which is lovely!) Because of this I figured separates would get a bit more wear than another dress, so decided to make a statement skirt. 


The pattern is the skirt section of the Mortmain dress by Gather, which is the same pattern I used for my first lemon dress. I think a large, bold print like this works particularly well with box pleats. Handily for me, Gather Kits have a blog post on how to make a Mortmain skirt from the dress pattern pieces, which is totally fool proof. The only thing I did differently was to swap the exposed zip for an invisible one. As you can probably see from the photos, I deliberately made the waistband more of a relaxed fit. I decided I'd rather forego the very neat, nipped in look of a perfectly fitted waistband for the comfort factor and ability to eat my dinner without feeling like I'm about to explode.


The skirt is fully lined with Venezia lining fabric which was a perfect colour match to the navy background. It was given to me as a gift from Jo Sews ages ago and is the loveliest lining fabric I've ever sewn with. I'm truly lamenting the fact that it doesn't seem to be available in the UK* (Jo lives in Brussels). Lining the skirt gives it a really nice weight and a bit of structure which I think is good with a pleated skirt. *EDIT: Hoorah, I've now discovered that Venezia lining IS available in the UK from here (Stone Fabrics) in tons of colours. Thank you so much to the readers who pointed this out.


As the print on this skirt is full on lemony, I made a new plain top specifically to wear with it. New Look 6217 is the pattern that keeps on giving and yet again it didn't fail me. I think this is now my sixth version of this top - I've given up blogging about them as I don't want to bore you all to death! You only need half a metre of 150cm wide fabric to make it and I used luxury crepe from Sew Over It which has a lovely drape. 

I really like the whole outfit, which works just as easily for daytime as it does for evening. I was actually wearing flip flops and heels to demonstrate this in the photos below, but my son didn't think to include my feet when he was taking them!

Daytime 
Evening
The skirt (and top) gets its first outing tomorrow at a party...I'll report back! x

Monday, 2 October 2017

Tie Belt Dress

Hellooo!  I'm back and what better place to start than with a new, red dress...


I first decided to make this dress after spying a stunning red tie-belt number in a department store. Lovely as it was, the price tag was over £200 and I convinced myself I could make my own version. Coincidentally Laura from Sew Different had recently contacted me to see if I was interested in reviewing a pattern, and by great good fortune the Tie Belt Dress was very close to the shape and style I was after. Although I did struggle with some aspects of the pattern and instructions, the end result is just what I was hoping for.

Original inspiration dress
My version
The dress is a softly fitting A-line shape, with darts to the back, a waist tie belt for definition and a high/low hem. There are no finished measurements given, so I chose the size closest to my actual measurements - a UK size 12 - which fits me reasonably well. The instructions are quite basic, but that wasn't a problem for me as as the dress is a very simple shape. 


There were one or two parts that did have me scratching my head though. Firstly, the grain line arrows are shown going in two different directions. I checked this with Laura and apparently this is to indicate the weft and the warp, but I still found them confusing. Secondly the cutting layouts show the pattern pieces cut on an unfolded, single layer of fabric, even though all pieces are cut on the fold - bizarre!

Once I'd clarified what was what, I made a few style changes:

- Levelled off the hemline (I'm not a fan of dramatic high/low hems)
- Tapered in the side seams to reduce the A-line shape
- Shortened the dress by 2.5cms

I decided to sew the sleeves as drafted before making a decision on length. As it turned out, they were too long on my short arms with the trim attached. Rather than shorten them, I simply turned the trim to the inside to act as a facing and top stitched it down, easy!


Construction was very straight forward - the only thing I'd say is to keep an eye on the position of the black dots for attaching the tie belt. The dot positions are for guidance only and may need moving up or down to align with your waist (I needed to move mine up). The instructions also have you attach the tie belt quite early in the proceedings, but I'd recommend waiting until the whole dress is constructed before pinning them into place. That way you get a more accurate idea of your natural waistline.

For fabric I went against the recommendations (light denim, needlecord, heavy cotton etc) and chose a luxury crepe from Sew Over It with a nice drape. I think the original shape of the dress in a weightier fabric would have looked too sack-like on me. The drapier fabric worked well and was close to the fabric from the original inspiration dress. At £14 a metre it worked out much cheaper to make my own version too! 


I can always find room in my wardrobe for a red dress, and although this one is a little different to my usual style, it's growing on me. I just need to get used to the dropped shoulders and oversized silhouette. It's a really easy dress to wear and I can see myself wearing it with tights and boots once the weather turns fully autumnal. Have a good day! x

A copy of the Tie Belt Dress pattern was given to me free of charge for review. All opinions my own.


Friday, 13 May 2016

Big Vintage Sewalong Dress Reveal!

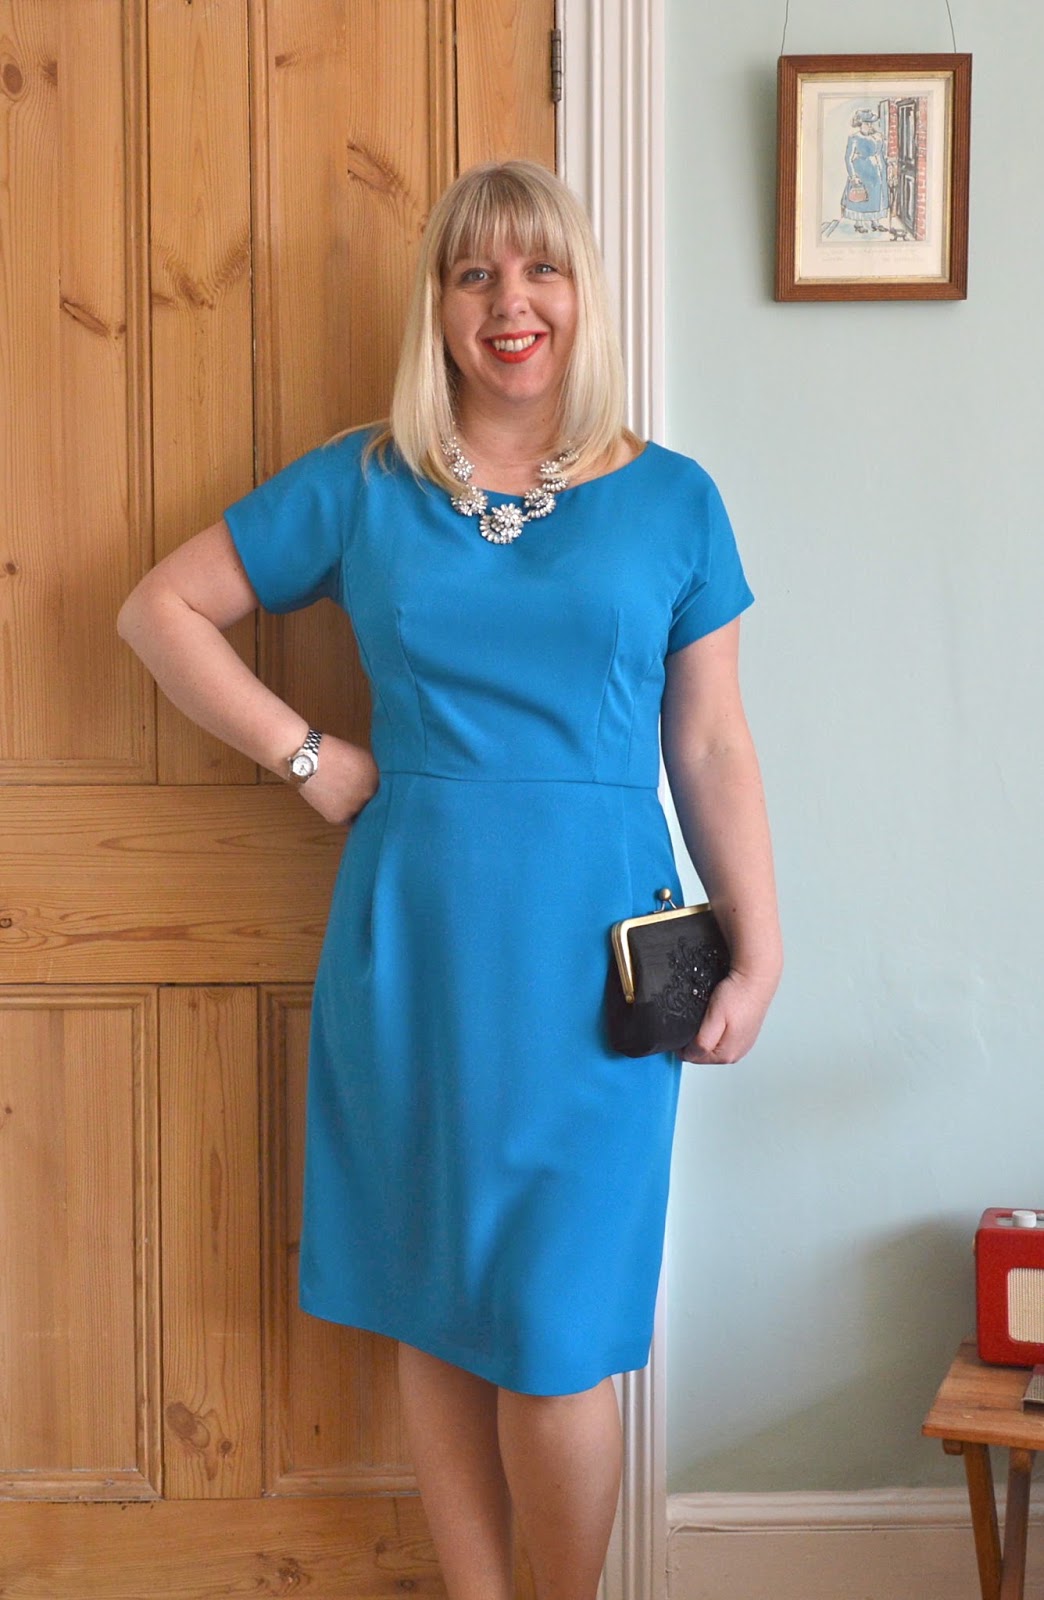
May I present Vogue 8875 - my chosen pattern for the Big Vintage Sewalong blogger tour!


The pattern is for a fitted dress and matching coat, but it was only ever the dress I was interested in - I love the style lines on the bodice and the apparent simplicity of its design. Key word here: apparent! When the pattern arrived and I scrutinised the instructions I discovered things weren't quite so simple - but more on that in a minute!
The pattern originally dates from 1955 and has some fab mid-50's details, including kimono sleeves, unusual princess/underarm seams and tucks instead of darts on the skirt front. There are also instructions for adding a self fabric belt and waist stay, neither of which I did, but I think they're nice touches.


What I didn't like about this pattern were the instructions for the princess/underarm seams. These seams are reinforced with bias squares of fabric which are sewn to the outside of the bodice, then slashed and pressed to the inside. This crucial step really isn't very clear at all. It's not actually that difficult a technique once you know how to do it, but you do need a bit more guidance than the pattern offers. I took some step-by-step photos and will be putting together a tutorial soon, which hopefully will make the step a bit clearer. As for the rest of the dress, it was very straight forward to sew, so don't let me put you off!


Because of the shape of the bodice, it's difficult to get an accurate idea of fit without making a muslin. I actually made two muslins (gasp) as I was determined to get the fit right before my fabric was even in the same room as my scissors. I cut a size 12, which was a pretty good fit everywhere except the upper arms and the waist, so I added more room to those areas (see below). I also made the following changes:

- Changed the side zip to a centred zip (no surprise there). There's already a centre back bodice seam so no alterations to the pattern were required, yay!

- Shortened the skirt by a gigantic nine inches!! Mid-50's straight skirts are typically worn well below the knee, but the original skirt pattern was almost maxi length on me.

- The bodice is actually supposed to drape over the waistband in a blousey fashion rather than fit in a smooth line - this isn't apparent in the line drawings and envelope artwork. My first muslin confirmed that this did me no favours at all, so I shortened the bodice by ¾".


- Widened the kimono sleeves very slightly as they were a bit restrictive.

- Added a total of 1" to the waist, divided between the various seams. The dress fabric has more give than the muslin fabric (calico) so the waist did end up a little roomy. I'm not changing it though - it's nice to be able to bend over without stopping my circulation!

- I also tried to reduce the height of the bust darts, but this resulted in a baggy upper chest so I left them as they were!

Fabric suggestions are brief: crepe, shantung or tissue taffeta, but I think anything with a nice drape would be suitable. I went for a luxury crepe in a beautiful teal/turquoise colour from Sew Over It - the colour is a bit of a departure for me but I love it! I first saw the fabric at the Knitting and Stitching Show, which was an advantage as it meant I could play with it a bit before deciding if it was suitable. It certainly was! It doesn't have that weird spongey feel you get on a wool crepe, instead it's smooth and silky and quite weighty. If you're looking for a special occasion fabric this is definitely one to consider, I think it's lovely. The dress isn't lined (I couldn't bear the idea of sewing those reinforcement squares all over again) and the skirt does cling to your legs a bit without a lining, so I'll be wearing it with a slip,


I'm so pleased with the finished dress, it has a chic 1950's feel but at the same time, looks quite contemporary. The fabric instantly elevates it to something special and I can see this becoming a popular going-out dress this year. 

I wouldn't recommend the pattern to an absolute beginner, but if you like 1950's styles and fancy a challenge, then go for it. McCall's UK have kindly offered an extra giveaway copy of Vogue 8875 to one of my blog readers. If you'd like to be in with a chance of winning it, simply leave a comment on this blog post, including your email address if it's not linked to your Blogger profile. The giveaway is open worldwide and closes at midnight GMT on Thursday 19th May. The winner will be chosen at random.

You can find out more about the Big Vintage Sewalong on my previous post here, including details of the 20 selected vintage patterns and the other bloggers taking part in the Blogger Tour. Remember, money raised from the sale of each pattern will go directly to the Eve Appeal cancer charity, so you'll be directly supporting a great cause.  Right, that's all folks, have a great weekend! x

I'll be wearing it like this after a few drinks...

The pattern and a fabric allowance were kindly provided by The McCall Pattern Company. All views my own.   


LinkWithin

Related Posts Plugin for WordPress, Blogger...