Showing posts with label sewaholic. Show all posts

Sunday, 16 April 2017

Nautical print Granville shirt

My lightweight #2017makenine pledge is actually going rather well (lightweight in the sense that mine is actually #2017makesix...). I've made the Capital Chic Sangria dress and two versions of the Sew Over It Heather dress. My latest finished garment takes the tally up to three, although it's a slight deviation from the original idea. I'd planned to make a Deer and Doe Melilot Shirt using some nautical viscose twill from my stash. Well, the stash fabric got used, but I decided to use an old favourite rather than starting from scratch with a new-to-me pattern. The pattern I used was the Sewaholic Granville shirt which I've sewn three times before (here, here and here). It was already adjusted to fit, so my plan was to just cut out the fabric and start sewing. It didn't quite work out that way though...


I have no qualms with the pattern: I love using it and always get good results. No, the baddie in this particular saga happened to be the fabric - it was an absolute nightmare. The culprit was a viscose twill with a lovely drape and slight sheen from Fabric Godmother (no longer in stock). The problem was it had so much drape it was barely usable. The first sign that all was not well was when I tried to iron it after pre-washing - it wouldn't stay on the ironing board and kept sliding off. I then sprayed it to within an inch of its life with spray starch. This stiffened the fabric sufficiently for me to cut the pattern pieces out, but it was still slippery as hell. The texture was horrible to work with too, a bit like having an entire garment made from grosgrain ribbon. I put the finished shirt through a rinse cycle in the washing machine, but I'm not entirely convinced all the starch has been removed as the texture is still a bit weird. Hopefully it will settle down after another wash.

Spot the sailor boys...
The reason I'd fallen for the fabric in the first place was the design: from afar it looks like a ditsy floral, but it's actually a nautical theme. Anchors, yachts, flags and, wait for it... sailor boys! Adorable as those sailor boys are, they're not cute enough to make me want to work with this fabric ever again. I was actually quite resentful of it by the time I'd finished, which was a shame as I loved it when I first bought it and it certainly wasn't cheap (£17 a metre).

On a brighter note, having made it several times before, construction was a breeze. The only time I ventured away from the instructions was to construct the collar - I used the Four Square Walls method which I prefer. If I were to make this shirt again (highly likely), the one thing I'd change would be to increase the size of the full bust adjustment as it's a tiny bit snug across the bust.


After grappling with the fabric for what felt like months, I knew any kind of buttonhole mishap would nudge me over the edge, so I got the buttonholes made at D M Buttons in Soho. I added a couple more (well why not, if somebody else is making them?!) which was a sensible move. All my other versions have had to have secret buttons added to the inside to prevent gaping but this one seems to be fine so far. I personally don't think there are enough buttons specified in the pattern, so if you're thinking of making it I'd recommend adding a couple more. The buttons are lovely metal ones from the button shop in Berlin - I like how they pop against all the red, white and blue.

The shirt has already had its first full day's outing: a meeting with sewing pals to welcome Tasha and partner Mel to London last weekend.

Outside Sew Over It

With beautiful Roisin
Looking slightly crazed with a cocktail
It was the perfect choice for walking around visiting fabric shops and sitting in the pub, but still felt just about dressy enough for cocktails later. I almost forgave the fabric for being such a bitch to work with. Almost. Happy Sunday! x


Tuesday, 13 September 2016

Gingham Granville Shirt

Behold a new gingham shirt - my last minute entry into the Did You Make That? Ginghamalong. It's simple, classic and very wearable and I don't need a crystal ball to predict that this will be a much loved item in my wardrobe for its entire life. I made just the one gigantic error during construction (see below for the full blood and guts horror story), which I'm hoping will fade from my memory over time... Other than that, everything went to plan!


The gingham I used was 100% yarn dyed cotton which I snapped up for the bargain price of £6.50 a metre from this eBay seller. The seller advises a cool hand wash, which I promptly ignored (the only fabric that's ever hand washed in this house is silk) and it washed beautifully in the washing machine at 30 degrees. It presses well and is lovely to work with - a really nice quality cotton.


Because of school holidays I knew I wouldn't have long to make this shirt, so I used a pattern that's already been adjusted to fit me well - the Sewaholic Granville shirt (previous versions here and here). The thought of trying to pattern match the gingham didn't exactly fill me with joy, but I did want the checks on both sides of the bodice and the button bands to line up horizontally, so that's where I concentrated my efforts. It worked! I used a combination of Tasia's tutorial and just simply lining up all the underarm seams as shown here. The gingham on the collar seems to line up with the bodice gingham too, but I can't really take any credit for that one, pure fluke!


To further save time (and also because my buttonhole foot is still playing up), I used snaps on the front button band instead of buttons. If you have a pair of Prym pliers, snaps are super quick to apply, but I still find positioning them a little nerve wracking. They're almost impossible to remove without damaging the fabric, so if you get the position wrong you've well and truly pissed on your chips. The relief when they were all in (and the right way round!) was pretty huge. I do like the look of snaps on this shirt, they give it a cool, ready-to-wear feel.

Anyway, about that gigantic error… As per last time, I used this tutorial from Four Square Walls to attach the collar and under collar as I prefer the construction order Andrea uses to the pattern instructions. All was going swimmingly until I realised there was a massive amount of ease in the collar. Now I know there should be some ease in that area to allow the collar to be turned back easily, but this was ridiculous. I eventually resorted to easing the collar in with gathering stitches like a sleeve, but I wasn't happy and was gutted that my planned classy shirt was going to make me look like Harry Hill. Luckily, I had a sewing epiphany... in my sleep! I literally woke bolt upright one night after sub consciously working out what the problem was. Yes, your friendly neighbourhood sewing moron had only gone and attached the collar to the shirt upside down. Ahem. God I felt stupid, but at least I actually worked out what was wrong before wearing it out in public! I promptly cut out another set of collars/ under collars and attached them the right way round. It took about an hour to sew the collar and this time everything matched up perfectly, making me realise just how well drafted Sewaholic patterns actually are.


After all the eleventh hour drama, I couldn't be more pleased with my new gingham shirt. Yes, I know it's a sleeveless shirt and we're heading into autumn, but I can guarantee it will get plenty of outings underneath cardigans and jackets. In fact I think I'd like to wear it forever.


Thanks to Karen for hosting such a fun sew along. Let's face it, she was never going to have do much arm twisting to get me to join in, but I'm glad I did nevertheless. My gingham Granville is officially my new favourite thing! x


Sunday, 28 August 2016

Thoughts on Gingham


Hoorah for gingham! It's so fresh, so crisp, so perfectly ordered, it's definitely one of my favourite fabric patterns. I've always loved it, so when Karen announced she was running a Ginghamalong at Did You Make That? I was onto it like a shot.

The big question is, what kind of gingham masterpiece shall I attempt to make? I have a gingham board on Pinterest which is chock-a-block with inspiration. I've also sewn a lot with it over the years, making tops and blouses (here, here and here), dresses (here, here and here) and skirts (here and here). But the gingham item I've worn most by a million miles is my 1950's sleeveless blouse, now sadly deceased. 


I loved that top and it had a good life - I literally wore it until it fell to bits! There's just something about navy gingham that seems to work for me. 

With my gingham twin Scruffy Badger
I've been making a concerted effort recently to only sew things I know I'll actually wear, so a classic navy gingham shirt seems to be the way forward. It's not the most exciting choice in the world but it's certainly chic.

Image from Pinterest


Image from Pinterest
I love the fit on the Sewaholic Granville Shirt, so that's the pattern I'll be using. I'll probably keep the sleeves short or even go sleeveless as I find long sleeved shirts are a massive pain under fitted cardigans. I've ordered my fabric (½' yarn dyed cotton) and can't wait to get started!

That's what I'm up to gingham-wise, how about you? Are you taking part in the Ginghamalong? And, more importantly, what are you making?!! x


Monday, 1 August 2016

OWOP is back!

Hands up who remembers OWOP (One Week, One Pattern)? Of course you do, it's the group sewing challenge where participants wear variations of the same pattern, every day for a week! The original challenge was created by Tilly in 2012, I resurrected it in 2014 and now Hannah from Cinderellis Sews is hosting a new challenge for 2016. Hoorah! 
My favourite part of both challenges was working out all the different mix and match combinations with my chosen pattern. In 2012 I chose the Colette Ginger skirt, a high waisted A-line skirt that proved to be endlessly versatile. For the last challenge I went for a vintage pattern - Simplicity 4238 - a 1950's button up blouse that's become a real wardrobe staple.


The big question is, what to choose this time round? You may have noticed I've been more than a little obsessed with New Look 6217 of late (I have three versions of the top and two versions of the skirt), so that's currently the strongest contender. However, I also absolutely LOVE my Sewaholic Granville shirts and although I only have two versions (here and here) they're both solid colours, so they match absolutely everything. The Granville shirt would certainly be a greater challenge, but may be a bit too similar to the last pattern, what do you think?


If you'd like to join in, One Week, One Pattern 2016 will run from Saturday 10th September until Friday 16th September. You can sign up and find out further details about OWOP on Cinderellis Sews. There will also be a series of exciting guest posts on her blog over the next few weeks (including ME on August 6th!) and fabulous giveaways for every day of the challenge. Wahay! x


Wednesday, 15 July 2015

A Summertime Granville

My springtime Granville shirt has become a real wardrobe staple these past few weeks - it's such a classic style and I really like the fitted, yet comfortable shape. Key word here - comfortable! Everybody knows I'm a giant fan of a super-fitted, collared shirt (if you need proof, see my five versions of Simplicity 4238), but I have to admit, the trillions of darts around the waist do feel a bit restrictive as the day moves on and more and more cakes are consumed. The advantage of the Granville pattern is that there are no waist darts (as opposed to eight in Simplicity 4238!) but you can still achieve a lovely fitted silhouette thanks to the shaped side seams and princess seams on the back bodice. So I decided to make a lightweight, sleeveless version of the Granville shirt to wear during hot, summer days.


The fabric I used was a white Swiss Dot Cotton from Fabric Godmother, which Josie kindly sent me to review. I deliberately chose a very lightweight fabric as I wanted this version to be suitable for hot weather. The fabric is beautifully light, but the flip side is that it's also totally transparent. I'm not a camisole wearer and don't like having a visible bra on display so I knew I'd have to underline the whole shirt. Initially I planned to underline it with silk cotton, but the white silk cotton in my stash is just slightly off white. The Swiss Dot fabric is a bright, brilliant white, so I underlined it with a layer of light cotton muslin which was exactly the same shade. 

The bottom yoke piece is underlined, the top one isn't
You can see from the photo above what a difference there is between a regular pattern piece and one that's been underlined. This solves the transparency issue and because both fabrics are so light, the garment still feels very drapey and breathable.

My scissors struggled a tiny bit cutting through some of the raised 'dots', so make sure yours are nice and sharp if you're working with this fabric. I could also feel the needle going over the dots as I was sewing, but the stitches didn't distort which I was pleased about. I used Entomology Pins throughout, which are great when working with fine fabrics. They are quite long and sharp though, so be careful you don't prick your finger and drip blood! I'm only saying this because as I was completing the final few stitches on this shirt and congratulating myself on avoiding a pricked finger mishap, I realised to my horror that I was having a nosebleed. A nosebleed!! The last time I had a nosebleed was about forty years ago for goodness sake! By an absolute miracle, I managed to avoid dripping blood all over the shirt but I'm not quite sure how. I know it's only a matter of time before I spill a whole plate of tomato sauce right down my front - just you wait!


Back to the sewing - if you're planning a sleeveless Granville yourself, you'll need to make some slight modifications to the armhole and yoke pieces to convert the original pattern to a sleeveless version. This was very simple to do and I used this excellent tutorial from Grainline Studio, which Tasia recommended when she made her own sleeveless version. Sewing this shirt was pretty straight forward and I took my time sewing it which was a good thing - sewing shirts shouldn't be rushed! The step that really flummoxed me last time was sewing the collar, so this time round I tried a different approach and followed Andrea's collar tutorial at Four Square Walls. She constructs the collar in a different order to the instructions, and for me personally, it made a lot more sense and gave a neater, more professional look to the collar. Thanks Andrea!


As the fabric is so lightweight, I spent a bit of time making sure the finish of this shirt was really neat. The side seams and princess seams are French seamed and the armholes are finished with vintage white bias binding - no raw seams on display! I even slip stitched the armhole binding to the underlining so there was no show through on the right side of the shirt. Yep, you read that correctly, hand stitching, through choice! I think the heat was getting to me by this point!

Inside view

Easy to tuck in - yay!
The eagle eyed amongst you will have noticed that this version of the sleeveless 1950's shirt is also white, so why did I need another? For a start, the two fabrics couldn't be more different - I used a thickish cotton pique for the Simplicity version, which is as stiff as a board. It's a nightmare to launder and get creases out off and is really bulky to tuck in - I noticed this especially during OWOP last September when I was trying to pair it with different garments. I did note then that I needed another white sleeveless shirt in a different fabric, well here it is! I love it - and it's turned out exactly as I hoped.  Happy Wednesday! x


Fabric was given to me free of charge for review. All views my own.


Tuesday, 30 June 2015

Magic button sewing tip - it works!

I first came across this simple tip a couple of weeks ago via Emmie on My Oh So Vintage Life and it's now my favourite sewing tip EVER! It's a trick to eliminate gaping between buttons on shirt dresses, specifically at the waist. This is at its most noticeable when you sit down and invariably end up displaying the two inches of flesh you'd rather never saw the light of day again. 

Emmie's tip is sew an inward facing button in the offending area - the trick is to sew it on the inside of the button band so it's invisible from the front. Gahhh!!! Such a simple tip, but so effective! 

Secret button sewn on the inside of the button band (LHS), with buttonhole on the opposite side
I can also confirm that it works for the dreaded boob gape - as soon as I discovered this tip I put it to the test on my Granville Shirt. I absolutely love this shirt, but thanks to my own slapdash methods of button placement (trying to eyeball them rather than measuring properly), it's always gaped at the bust point. It hasn't stopped me wearing it and it's not actually that noticeable, but it is a pain to keep fiddling and pulling the front of my shirt.

Here I am, helpfully pointing to the offending area….


Here's the BEFORE picture…


And here's the AFTER picture….


Yay, no gaping!


When the shirt is buttoned up, the internal button and buttonhole are completely invisible from the front. Just to remind you, the hidden button is between the second and third button down.


 And here's what it looks like from the inside….


This solution may be blindingly obvious to lots of you, but it certainly wasn't to me, so please indulge me! Sorting out a dreaded waist or bust gape is just so satisfying! Two further shirt dresses have also been given the same treatment at the waist with great results. Thank you Emmie, for showing me the light! 

What were the sewing tips that changed your life? Please share, I'd love to know! x


Friday, 27 February 2015

A springtime Granville

If you were looking forward to reading a long blog post all about Granville - Arkwright's long suffering nephew from Open All Hours - then I'm sorry to disappoint you. This post is all about shirt making, and one shirt in particular, the Granville pattern from Sewaholic. I couldn't resist adding a picture of Granville though, look at his little face! And his Fair Isle tank top!


Despite admiring Sewaholic's patterns from the sidelines, I've only sewn a couple of them (the Pendrell, Renfrew and Alma). There always seems to be some little detail about their patterns that I don't like, or I don't think will suit me and I haven't actually bought one for ages. The latest releases were an exception - as soon as I saw the Granville pattern I knew it had my name on it. A classic, fitted shirt with princess seams to the back and shaping to the waist to give it the fitted look I'm always after. I bought the Granville as soon as it was released.

Alice at Backstitch had also recently asked if I'd like to review some fabric, so I saw this as a good opportunity to try out a nice, crisp cotton. I settled on one of the Timeless Treasures Sketch fabrics in Red. I love a crosshatch design and this particular colour has a really subtle, crosshatch finish. If you like your crosshatch a bit bolder, then Cherry might be a better choice - it's a bit more obvious.  The fabric is a good match for this pattern. I wanted something lightweight enough for a shirt, but crisp enough to hold the shape of the collar and stand. It's just the right weight and washes and presses perfectly. I also like the fact that it looks like a plain red fabric, until you get closer and notice the crosshatch detail - fancy!


I found the clear buttons in my button box and couldn't work out where they'd come from (maybe the sewing ghost put them there?!) Then I remembered - they were from an old duvet I'd thrown out. Not quite the classy lineage I'd imagined!

When I've made Sewaholic patterns before, the fit has always seemed pretty good on me initially. I'm the opposite of the pear shape that Sewaholic patterns are drafted for, so I've always used my bust size and graded down at the waist and hips. When I'm wearing the tops, I've noticed that the bust often feels a bit tight and constricting. So this time round I took a tip from Mary over at the Curvy Sewing Collective and altered the front bodice piece accordingly. I traced a size 8 for my bust and waist, grading down to a size 6 at the hips and added a one inch FBA (full bust adjustment) using Mary's excellent tutorial. This gives more room in the bust but retains the lovely shaping at the waist and hips. I also shortened the whole pattern by an inch.


The other change I made was to convert the sleeves from long, cuffed ones, to short. A bit drastic, but I just don't wear long sleeved shirts. Ever. Short sleeves are much more practical for me and the fact that I made mine without a cuff or sleeve band means I can still just about get away with wearing them underneath a cardigan. 


As far as construction goes, I found some areas a little challenging. I should point out that I've never actually made a proper shirt with a collar and collar stand before, I've made plenty of shirts with notched collars and flat collars, but not this sort - so it was a bit of a departure for me. The written instructions were adequate, but I would have liked a bit more direction in a few places, notably when you add the button bands and sew the collar and collar stand. I felt that the diagrams weren't that clear, and once or twice I actually found them misleading. I figured it out in the end, but it wasn't an easy process! Putting together the basic shirt, yoke and buttonbands was pretty quick once I'd worked out where to fold the front bands. The collar on the other hand, took almost an entire day to get right! Maybe it will be an easier process next time round when I know what I'm doing?!


The inside yoke has a lovely clean finish - luckily I found the instructions for that bit to be perfectly clear! All the seams are pressed together and overlocked before being topstitched. It's worth taking a bit of time with your topstitching as it does give a professional finish to the shirt. especially round the pesky button bands and collar areas.


Fit-wise, I'm pleased to report that the FBA was a complete success, there's plenty of room across the bust but the shirt still remains fitted because of the shaped waist. I could kick myself for not paying more attention to the button placement though. I usually use this tutorial, but decided I knew better this time round. Clearly I didn't, as there's still a bit of gaping. Gah, so annoying, especially as the rest of the shirt is near perfect! The one fitting change I'd make next time would be to move the bust dart up by about an inch. I did measure it before I did the FBA, but something obviously got lost in translation as it ended up a bit low.


Whingeing aside, I do like the shirt a lot and I would definitely recommend the pattern. It's beautifully drafted and I think the classic style would work with lots of different body shapes. Believe it or not, I lack a plain, red top in my wardrobe, so this simple shirt will go with everything: jeans, skirts, shorts, trousers. I love how it looks untucked too, it's just the right length! I'm so pleased to have kicked off my summer sewing with such a wearable shirt! Next up, something in barkcloth I think...

Fabric was given to me free of charge for review. All views my own.


Tuesday, 18 February 2014

Tutorial: How to Make a Waist Stay

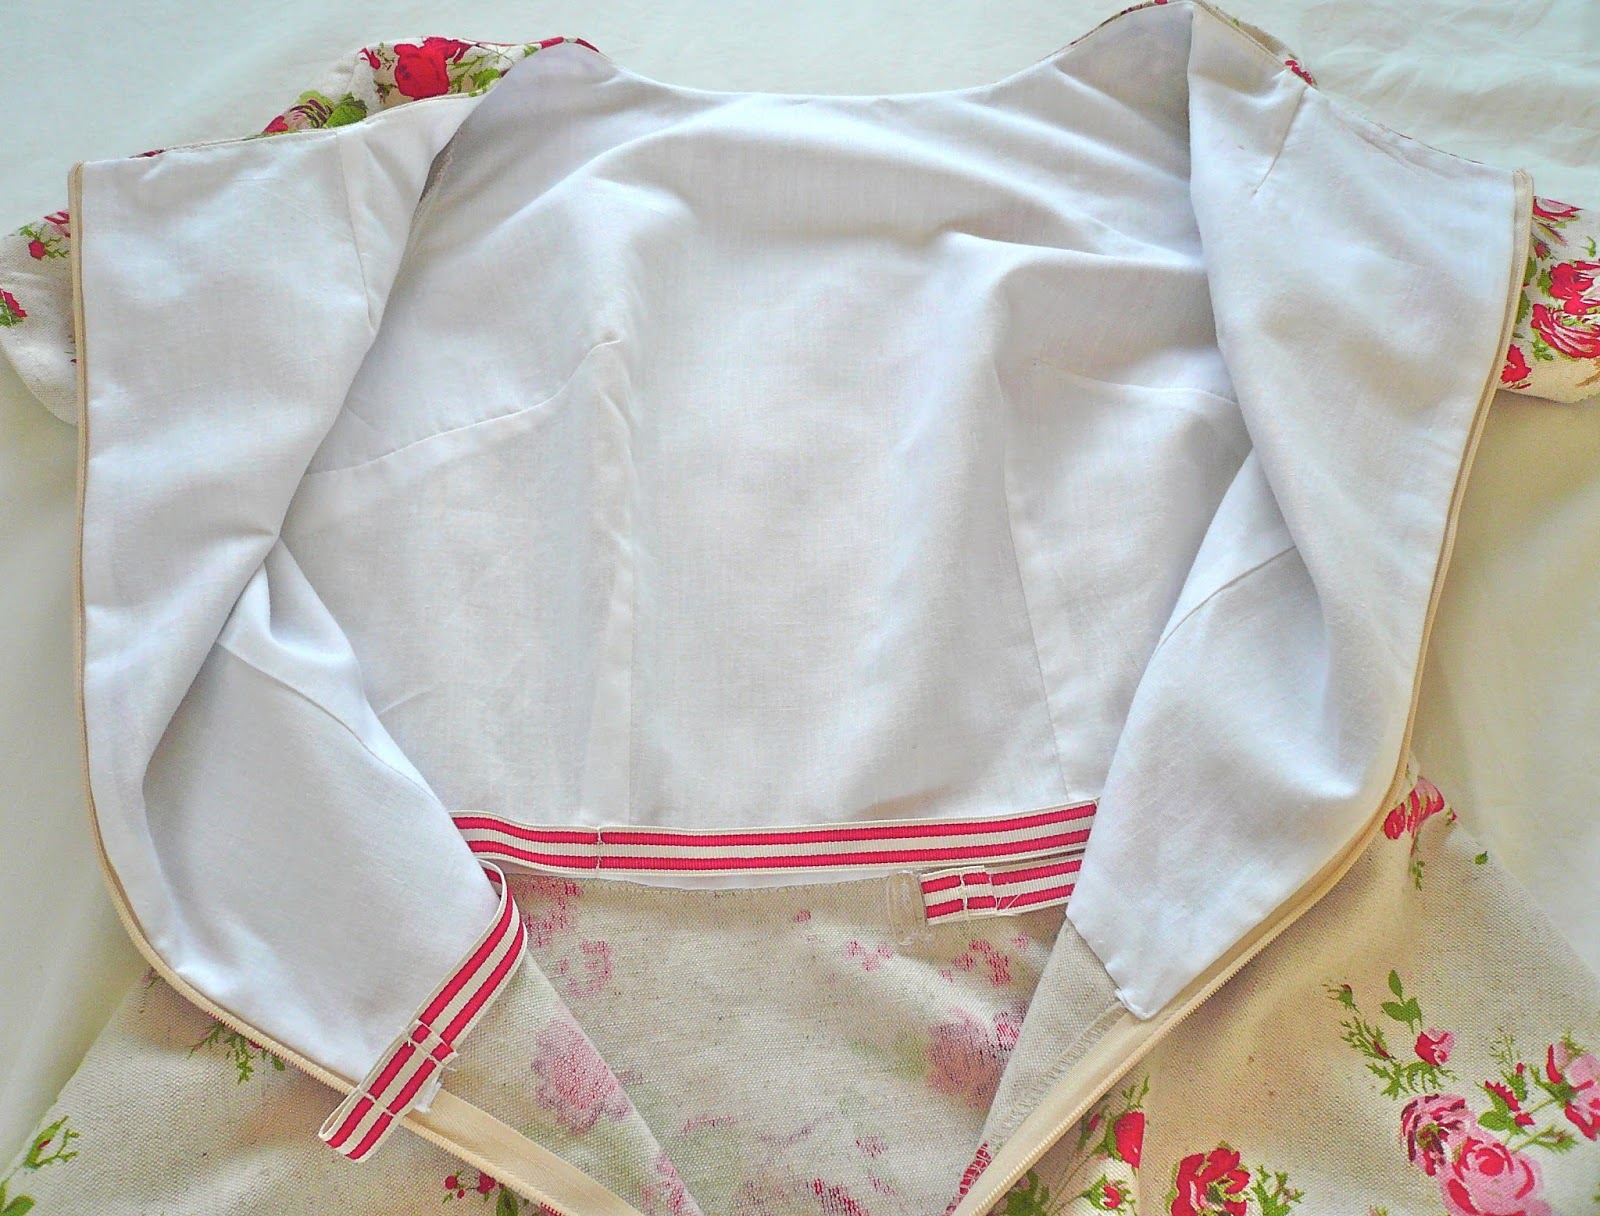
Today I want to show you how I made the waist stay for my Emery dress. There are many reasons for adding a waist stay: they can stabilise the waist seam and prevent it from stretching, they can support the weight of a full and/or heavy skirt and reduce strain on the zip. They're also there to ensure your garment 'stays' (there's a clue in the name!) in the correct position. Unlike your garment, there is no ease in a waist stay, it's designed to allow the wearer to move around comfortably whilst anchoring the waist in position and preventing the dress from riding up or down.


After a fair bit of research, I came to the conclusion that there are two methods for attaching a waist stay to a dress. The first way is to machine stitch the ribbon or stay to the waistband seam which supports the weight of a full skirt (see the Sewaholic tutorial for this method). The second way is to tack it to the lining (or seams if your dress is unlined) at regular intervals, which is the method described on the Gorgeous Fabrics blog. I've taken elements from each one to make it work for my particular garment, but would like to give both tutorials the credit they deserve for showing me how it's done!

I chose to use the second method of tacking the waist stay to the seams of the dress. This seems like the easiest method for the Emery dress as the bodice is fully lined. It's simple to make too, barely taking me half an hour from start to finish.

You will need
A length of grosgrain or Petersham ribbon ⅝"to 1"wide, whatever width is most comfortable for you. I can't remember where my ribbon came from (probably to tie up a fabric purchase) but happily, it's the exact colours of my dress.
The ribbon should measure the exact length of your waist plus at least 6" for fiddling about with.


A set of waistband hooks and eyes. My preference was the kind of hook used on a bra or swimsuit.


1. Fold your ribbon in half and mark it with a pin. Pin this to the centre of the waistline on your dress, (usually equidistant between the front bodice darts if you have them.)


2. Continue pinning the ribbon to the waistline seams and darts. Pin it to the zip openings as well, just to hold it in place.


3. Now hand tack the ribbon to the seams/darts, backstitching a few times for security. I attached mine to both front and back darts for extra anchorage. Don't tack it to the zip as you need the few inches around the opening to float free.


4. Make a loop at one end of the grosgrain ribbon, thread your hook through and pin.


5. At the other end, make a loop with your ribbon and pin.


6. You now need to try the dress on and adjust the pins so that the waist stay fits securely around your waist. I used Tasia's recommendation of trying the dress on back to front - it works!

7. If, like me, you find you have a very different waist measurement pre- and post-lunch, then you may wish to add an extra hook/row of stitches for this eventuality. This genius idea came from Claire at Sew, Incidentally (is there anything that woman doesn't know?!) Simply add add two rows of stitches instead of one: the one furthest away from the end is for your actual waist measurement and the one nearer the end is the looser fitting one to accommodate your stomach after lunch. Here's Claire's diagram which explains it perfectly.


As a dedicated eater of pies, I went for the two loop option. You may need to fiddle with your pins to get them in the right positions, just make sure that your actual waist measurement is the pin furthest from the end. 

8. The final stage is to simply stitch where your pins where to create the loops for hooking. Make sure you backstitch a few times to keep them secure.


And there you have it, a waist stay! Now you can go dancing, eat pies, or do both at once and your dress will stay securely anchored at the waist. 
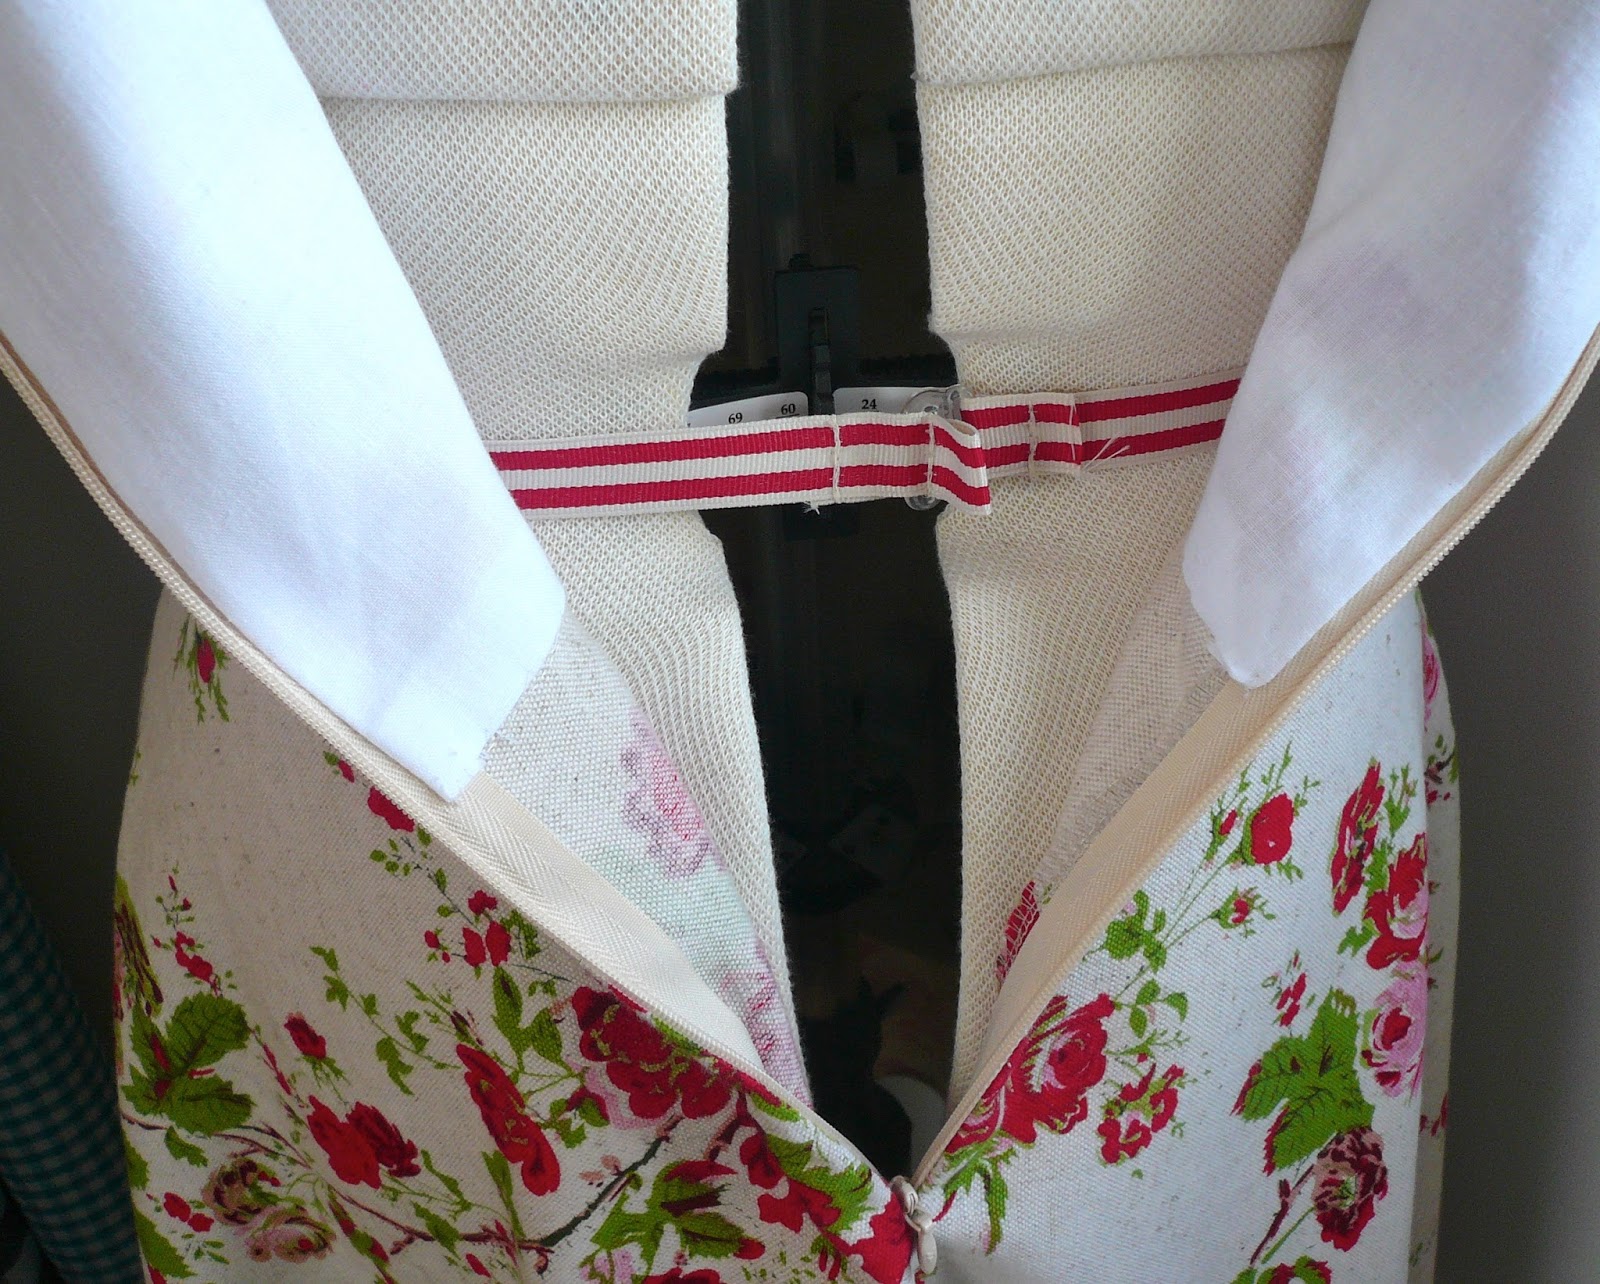
Angie modelling the waist stay on the Emery dress
I hope you found this tutorial helpful and as always, please let me know if there's anything that isn't clear. x




LinkWithin

Related Posts Plugin for WordPress, Blogger...