Showing posts with label Emery dress. Show all posts

Wednesday, 27 January 2016

Emery Class at Badger & Earl

For the past two Saturdays I've been helping two lovely ladies - Julia and Michaela - to sew the Emery Dress as part of a dressmaking class. The class was held at Badger & Earl in Chiswick (the finest sewing cafe in west London!) and it was an absolute pleasure from beginning to end. The whole class was 10 hours in total, spread over two weeks, so we spent the first week cutting out the pattern and fabric and constructing the basic shell of the dress. We were then able to dedicate the second week to trickier areas such as inserting zips, setting in sleeves and adding the bodice lining. 


Both students had some prior experience of dressmaking and just needed extra guidance with specific techniques, which made things a lot easier. As did the awesomeness of the pattern, in particular the well drafted sleeves and excellent instructions. The pockets were fab too, the method for attaching them was one I'd never used before and I'm now a convert!  Neither dress was hemmed as one had to be  shortened and the other needed trying on with proper shoes before deciding on the final length. But still, I think cutting the dresses out from scratch and sewing them up in just two sessions was pretty amazing. 

That zip is well and truly invisible!


It was such a delight to help Julia and Michaela create such beautiful dresses - needless to say I felt VERY proud!

Proud!
Badger & Earl is a lovely place to learn a new skill, classes are small and friendly and the tea and cake is exemplary! They've just signed up two new sewing tutors (Margaret and Krystel) and are busy putting together ideas for additional dressmaking and fitting classes. This will hopefully include a trouser fitting class, which I think will be a popular one. If you have any suggestions for future classes, do let me know in the comments and I'll happily pass them on. 

Thanks to Julia for kindly forwarding the above photos for me to use - guess who forgot her camera?! x

Wednesday, 5 August 2015

An Emery for Emily

Long time readers of this blog will know that unselfish sewing is not normal behaviour for me. I find fitting and sewing for others far more stressful than sewing for myself and avoid it like the plague. But I couldn't say no to my latest project - a dress for my friend's daughter Emily. I first met Emily's mum Sophie when our children were just a few weeks old and she's since become one of my closest friends. Because of this I have a real soft spot for Em and when Sophie asked if I could make her a dress, I agreed at once.


Emily was inspired by the dress below, worn by Clara from Dr Who. She wanted to keep the fitted bodice and full skirt, but preferred plain, short sleeves rather than the gathered ones in the photo. She also decided against the collar. After a consultation with my Twitter pals regarding pattern choice, the general consensus seemed to be the Christine Haynes Emery dress. Emily liked the look of the pattern too, so we got to work.


For fabric, Emily chose this unusual navy and red firework print from Island Batik. We found it after researching 'firework prints' online and she fell for it immediately, preferring the navy and red colourway to Clara's original red. I couldn't find any UK stockists, so had to order from Fabric.com in the US. They've since sold out, but there's still some available here, if anybody's interested. The fabric is a medium weight quilting cotton and quite crisp to to the touch, even after a pre-wash. This actually worked in our favour and was a good match for a structured pattern like the Emery dress. The bodice is lined with a navy cotton muslin. 


The biggest challenge on this project was the fit. Emily is only 13 and very slender, so I knew I'd have to make a few adjustments. I cut a size 0 bodice and size 2 skirt and we had two fittings in all. After making an initial muslin I made the following changes:

- Increased the back shoulder darts 
- Made a ½" front neck adjustment 
- Made a 1" tuck right across the upper chest, together with a small bust adjustment


There's still a fair bit of wiggle room built in, to allow for growth spurts! I also left a generous three inch hem on the skirt for the same reason.


I'm absolutely delighted with the finished dress and, more importantly, so is Emily! The dress has a very simple shape but I think the unusual fabric really elevates it into something special. She looks so pretty and elegant in it and so grown up! It doesn't seem that long ago that Sophie and I were taking her and Louis on their first walk - they were so SLOW, nearly an hour to walk from one end of the road and back! 

Beautiful Emily, I hope you enjoy wearing your dress, I certainly enjoyed making it for you. x


Tuesday, 18 February 2014

Tutorial: How to Make a Waist Stay

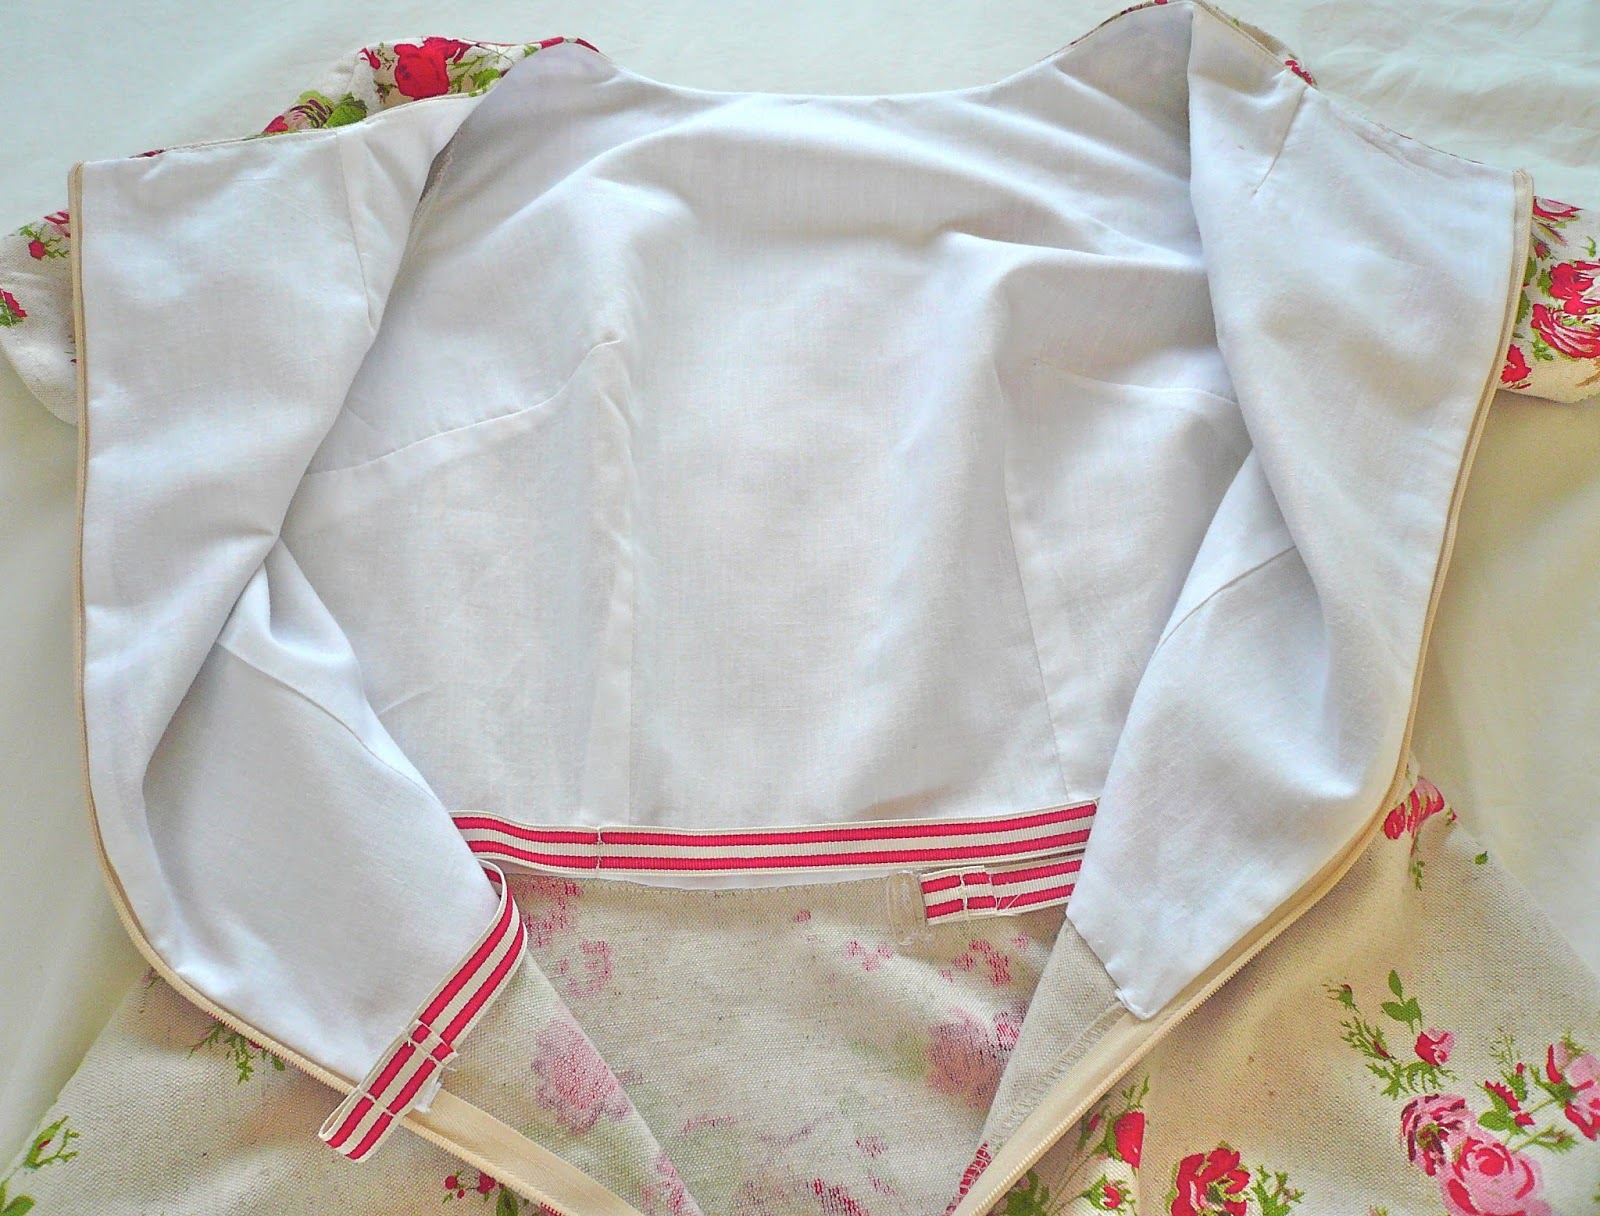
Today I want to show you how I made the waist stay for my Emery dress. There are many reasons for adding a waist stay: they can stabilise the waist seam and prevent it from stretching, they can support the weight of a full and/or heavy skirt and reduce strain on the zip. They're also there to ensure your garment 'stays' (there's a clue in the name!) in the correct position. Unlike your garment, there is no ease in a waist stay, it's designed to allow the wearer to move around comfortably whilst anchoring the waist in position and preventing the dress from riding up or down.


After a fair bit of research, I came to the conclusion that there are two methods for attaching a waist stay to a dress. The first way is to machine stitch the ribbon or stay to the waistband seam which supports the weight of a full skirt (see the Sewaholic tutorial for this method). The second way is to tack it to the lining (or seams if your dress is unlined) at regular intervals, which is the method described on the Gorgeous Fabrics blog. I've taken elements from each one to make it work for my particular garment, but would like to give both tutorials the credit they deserve for showing me how it's done!

I chose to use the second method of tacking the waist stay to the seams of the dress. This seems like the easiest method for the Emery dress as the bodice is fully lined. It's simple to make too, barely taking me half an hour from start to finish.

You will need
A length of grosgrain or Petersham ribbon ⅝"to 1"wide, whatever width is most comfortable for you. I can't remember where my ribbon came from (probably to tie up a fabric purchase) but happily, it's the exact colours of my dress.
The ribbon should measure the exact length of your waist plus at least 6" for fiddling about with.


A set of waistband hooks and eyes. My preference was the kind of hook used on a bra or swimsuit.


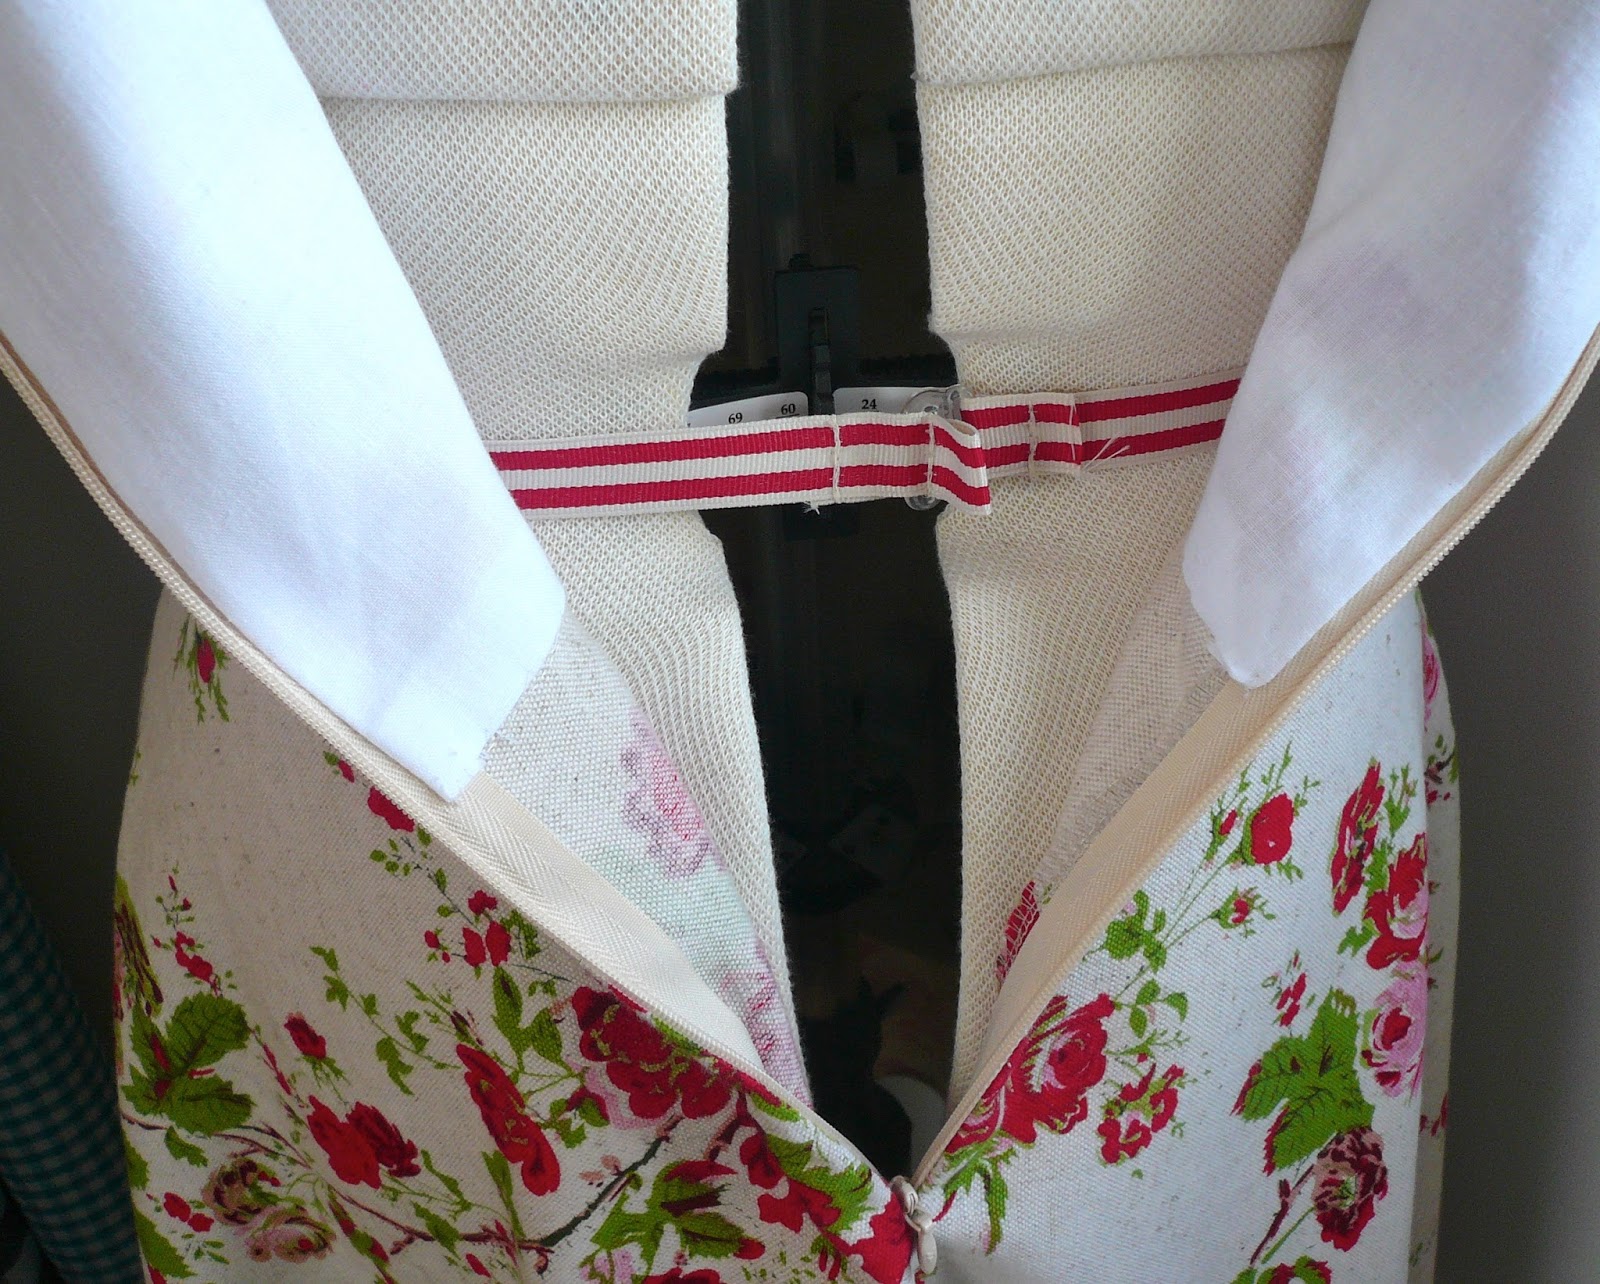
1. Fold your ribbon in half and mark it with a pin. Pin this to the centre of the waistline on your dress, (usually equidistant between the front bodice darts if you have them.)


2. Continue pinning the ribbon to the waistline seams and darts. Pin it to the zip openings as well, just to hold it in place.


3. Now hand tack the ribbon to the seams/darts, backstitching a few times for security. I attached mine to both front and back darts for extra anchorage. Don't tack it to the zip as you need the few inches around the opening to float free.


4. Make a loop at one end of the grosgrain ribbon, thread your hook through and pin.


5. At the other end, make a loop with your ribbon and pin.


6. You now need to try the dress on and adjust the pins so that the waist stay fits securely around your waist. I used Tasia's recommendation of trying the dress on back to front - it works!

7. If, like me, you find you have a very different waist measurement pre- and post-lunch, then you may wish to add an extra hook/row of stitches for this eventuality. This genius idea came from Claire at Sew, Incidentally (is there anything that woman doesn't know?!) Simply add add two rows of stitches instead of one: the one furthest away from the end is for your actual waist measurement and the one nearer the end is the looser fitting one to accommodate your stomach after lunch. Here's Claire's diagram which explains it perfectly.


As a dedicated eater of pies, I went for the two loop option. You may need to fiddle with your pins to get them in the right positions, just make sure that your actual waist measurement is the pin furthest from the end. 

8. The final stage is to simply stitch where your pins where to create the loops for hooking. Make sure you backstitch a few times to keep them secure.


And there you have it, a waist stay! Now you can go dancing, eat pies, or do both at once and your dress will stay securely anchored at the waist. 
Angie modelling the waist stay on the Emery dress
I hope you found this tutorial helpful and as always, please let me know if there's anything that isn't clear. x




Friday, 14 February 2014

Emery dress - read all about it

I was lucky enough to be offered a pattern to review by Alice at Backstitch recently. It's a dirty job, but somebody's got to do it… Alice stocks an impressive array of independent pattern designers, but one pattern stood out for me - the Emery dress by Christine Haynes. With a neat, fitted bodice and plain lines, it's exactly what I like in a dress. It also has variations for a collar and, wait for it…. a bow!! Oh yes!

I think there are strong similarities between the Emery dress and the Colette Patterns Peony dress. I've made the Peony dress five times and wear all five versions regularly, but I'd be lying if I said it wasn't an absolute bugger to get the bodice to fit. In comparison, the fit on the Emery dress is spectacularly good, and it's not just me who thinks that - everybody who's made it seems to think so too.


Before I started work on the pattern, I pored over the reviews by other bloggers and decided to make two changes. I lengthened the bodice by an inch, influenced by the perfect fit on The Sew Convert's version, who made the same adjustment. A quick muslin (yes, you read that correctly - muslin) confirmed my instinct was right, it was a little short in its original state. I also changed the skirt from a gathered rectangle to a half circle skirt. This was after seeing The Nerdy Seamstress's version. I was impressed by how flattering the fit was on Kathy, especially as her body type is quite similar to mine. I used the By Hand London Circle Skirt App, which does all the maths for you - hoorah. They're the only changes I made though, I nearly cried when I saw what a perfect fit the bodice was!


This is the first Christine Haynes pattern I've used and I was mightily impressed. I faithfully followed the instructions for the invisible zip and it went in first time, without the slightest hint of a fight. There are also instructions for self lining the bodice to give a clean finish around the zip line. I've often struggled to work out how to finish lining around an invisible zip without resorting to hand sewing. Well this pattern shows you how in a beautifully simple way.  The sleeves also set in perfectly FIRST TIME. Just look at them?! Not a pucker or ripple in sight - these might be the best sleeves I've ever sewn, which is a massive confidence boost after the debacle of my raincoat sleeves.


My fabric is linen - an unusual choice for a dress made in February you might think, but I couldn't resist it. I saw it on a recent Spoolettes visit to the Goldhawk Road but didn't buy it. I kept thinking about it though, (how sad am I?!), and had to make a second emergency visit to claim it as my own.  It's a biscuit coloured background with red and pink roses, probably not the best choice with my pale colouring but do I care? No. I did plan to self line the bodice but the rose print was clearly visible from the front, so settled for plain white cotton instead. I underlined the sleeves in the same fabric but left the skirt as it was. I added a waist stay to keep that lovely waistline anchored into place and I think this helps give the dress the neat, fitted look I like. Adding the waist stay was easy peasy by the way - look out for a tutorial soon!


Even though this dress is linen, it can be worn in colder months with tights and a cardigan and I can't wait to wear it in summer with wedges. It's a wonderful pattern and I'll definitely be making more versions, probably using a plain fabric and adding one of the embellishments next time. I don't think I've ever enjoyed making a dress as much as I enjoyed making this one!


Thank you Backstitch for sending me this wonderful pattern and thank you Christine Haynes, the Emery dress is a definite YES from me! x

The Emery pattern was given to me free of charge for review. All views my own.

Friday, 3 January 2014

2014: the Year of More Dresses

Every year I seem to get more and more enamoured with dresses. For my New Year post last year, I had just one main resolution - to sew more dresses. I think I only actually managed to sew one more dress than the previous year, but the quantity doesn't interest me. The important thing is that I loved making them and loved wearing them throughout the year. So much so that I'm going to keep exactly the same resolution for 2014.  Is that boring? Yes. Do I care? No! I already have no fewer than four new dress patterns to tantalise me for the time being, one for every occasion...


The girly dress

After the success of my last Peony dress I'm hoping the Emery dress by Christine Haynes will produce a similar shape.  Ooh look, a bow! And a collar!!


The knit dress

The Penny Pinafore is a fab looking princess seamed knit dress and the second pattern release from Kitschy Coo. I've been living in knit dresses over Christmas so this will be a perfect new addition, maybe in a brightly coloured double knit?

The slinky party dress
There's hardly any occasion (actually change that to no occasion) where I would be required to wear a slinky party dress, but how can I not make the Georgia dress from By Hand London?!


The denim dress
I have a cunning plan to make a dress version of a pair of jeans, which for me would be a denim shirt dress. I can't believe I haven't made one already actually as I love shirt dresses and I love denim skirts. The combination of the two almost has me passing out with glee! McCall's 6696 is my pattern of choice.

So they're my first four dresses of the year, with many more to come I'm sure. As far as improving my dressmaking skills go, I have just the one thing on my list - master the full bust adjustment. Or to be more accurate, actually do a FBA, the only reason I haven't done one before now is pure laziness so there's no excuse really!

Sewing my own clothes really does keep me sane, so as long as I continue to sew clothes, enjoy making them and actually wear them, I'll be happy. If I manage to get to a few meet-ups with fellow stitchers in 2014, I'll be even happier!  Here's to a happy, healthy and successful sewing year to you all, wherever you are. Happy New Year! xx


LinkWithin

Related Posts Plugin for WordPress, Blogger...