Thursday 27 February 2014

Liberty lawn spring giveaway

Remember my Betty Draper blouse I made last summer? I used floral Liberty Tana lawn fabric which was soooo easy to work with and lovely to wear. I've always been a big fan of Liberty lawn, especially the classic floral prints, so I'm itching to make another one for late spring.


This time I've decided to use the Peter Pan Collar Blouse by Simple Sew Patterns.


This is a very simple, button-back blouse that would really showcase a busy floral fabric. If you're curious as to how it looks made up, Marie has made a knockout leopard print version here, along with a full pattern review. I'm going to add bust darts to my version, but even with this adjustment, I think it will be an easy make and a lovely, fun blouse for the spring.

As for fabric, I've been given the tiresome chore (NOT!) of choosing one of the Liberty lawns from Sewbox. This is my shortlist:

Glenjade

Ellie Ruth
Betsy in Aqua

Capel in Turquoise

Poppy and Honesty
That should give me a few sleepless nights... In the meantime, Susan from Sewbox, has very kindly offered a metre of any Liberty fabric from her shop as a giveaway to one of my readers, wahay! It doesn't have to be Liberty Lawn, she also stocks Liberty Jersey, Cord and Poplin - the full range can be found here. To enter, just leave a comment on this post telling me which Liberty fabric from Sewbox you'd choose if you're the winner. The giveaway is open worldwide and closes at midnight GMT on Thursday 6th March. The winner will be chosen at random.

Thank you to Susan at Sewbox for such a generous giveaway and good luck everybody! x


Tuesday 25 February 2014

Social media dinosaur inches forward

When it comes to social media I'm well aware that I'm about five years behind everybody else - all the hip young gunslingers have moved onto something else by the time I catch up. But indulge me please, it would make me happy!  When I got together with some fellow stitchers last week to watch the first episode of The Great British Sewing Bee, I was the only one not Tweeting throughout the show. The others mercilessly bullied gently encouraged me to set up a Twitter account, which I promptly did, and I'm now delighted to have joined the 21st century. My Twitter name is @Janehandmade and you can follow me here.


But wait, that's not all, I've also set up a Facebook page for my blog!!! So if Facebook's your thing, you can find all my blog posts plus any other sewing snippets that take my fancy by liking me here. You'll also find beautiful new Facebook and Twitter buttons in the right hand column of my blog.

Right, that's it for now, join me for an update in five years time, who knows, I'll probably have an Instagram account by then!  x


Sunday 23 February 2014

Coco round two: the dress

I told you I had another Coco up my sleeve and here it is: a dress version with slash neck and long sleeves!


If anything, this was even quicker to make than my first Coco top, probably because I'd been through the whole process once before. Even allowing for matching up the stripes on the side seams, it can't have taken longer than 20-30 minutes to whip up once it was cut out. Definitely my kind of sewing! The original dress length is quite short and flirty so I lengthened it by just one inch, and that's the only change I made to the pattern. Once it was sewn up, I did have to take the arm seams in (about 1cm all the way down from underarm to wrist), which I didn't have to do for my Coco top. I think this was simply due to the double knit I used for the Coco top being thicker.


The fabric I used for the dress version is a very lovely striped Campan Jersey, kindly gifted to me by Dragonfly Fabrics. It's not cheap, but the quality absolutely shines through - it's gorgeous and feels very luxurious to wear. It comes in every conceivable colour/stripe combination, but in the end I played it safe and went for a classic navy with narrow beige stripes. Photographing narrow stripes is a nightmare, so here's a close up to give you a better idea of the colour.


Campan Jersey isn't strictly speaking the stable knit that the pattern specifies. Even though it's only 3% lycra, it has slightly more stretch than a truly stable knit, but I think it just manages to sneak through the net as suitable for the Coco pattern. It's not overly clingy, just clingy enough to pull you in, in all the right places. For the dress version especially, it gives a slightly drapey effect which I really like.


I love this dress, the simple cut and classic stripes make it an effortless outfit. It looks great with tights and a cardigan and I can see it being equally easy to wear in the summer with clogs or flip flops. Another Coco win! Happy Sunday. x

Fabric was given to me free of charge for review. All views my own.


Thursday 20 February 2014

Coco revealed

Have you seen Coco - the latest pattern release from Tilly and the Buttons? It's Tilly's third pattern but the first that's available printed and I was lucky enough to be a pattern tester, wahay! Let's talk about Coco.


Coco is a Breton-style top or dress, designed especially for knit fabrics with lots of style options. Top or dress? Three quarter length sleeves or full length? Traditional slashed neck or sixties style funnel neck? Oh the decisions. To test it, I decided to go for a plain necked top with full length sleeves.


The pattern is intended for stable knits fabrics such as double knit, interlock knit or ponte knit. I chose a red double knit from an eBay seller which is a nice quality, but a bit on the raspberry side of red for my liking. Despite this, it sews up perfectly and washes well. Yes, it's been washed many times already because it's hardly ever off my back. The pattern is sized from 1 to 8, for reference I'm generally a UK10-12 for tops and I made a size 3. It's very flattering and comfortable and a great fit - I didn't have to make any changes to the pattern at all. The fit around the waist and hips does a great job of accentuating your shape whilst still being comfortable enough to do a bit of hoola hooping in, if you so wish.


The top version of Coco only has three pattern pieces and it was super simple to put together.  The sleeves are constructed flat i.e. the sleeve head is attached to the underarm whilst it's flat, then sewn up the side seams and arm seams in one go. Easy! I sewed the main seams on my overlocker and used a double needle for the hems and a zigzag stitch for the neckline, so no fiddling with neckbands. Don't worry if you don't have an overlocker, you'll be able to whip this up on a regular machine in no time.


The weight of my double knit is quite thick and the top actually looks much better untucked. The side splits give it that ohh la la French look, especially when worn with unseasonal cropped jeans and wedges. I know, I know, it's freezing outside but I couldn't resist ('why are you wearing shorts?' my son asked me...) Tilly gives plenty of suggestions for adding your own individual touches to Coco. Naturally, I chose to add a row of nautical buttons to the shoulders, just because.


And finally, we come to the packaging and instructions. In a word (or a few words), the packaging is to die for. I'm easily won over by packaging and the design on the front has polka dots as a background for goodness sake, what's not to like?! The instructions are clear as a bell and come in a full colour instruction booklet with step by step photographs!! Yes, really! And if you still get stuck, Tilly has blog posts a-plenty on sewing with knits etc scheduled over the next few weeks.


I think the Coco pattern is a really important new kid on the block. It's an excellent introductory pattern for newbie sewists and a well drafted, well fitting pattern for those with a bit more experience under their belts. Congratulations Tilly, I know that an incredible amount of hard work has gone into creating this pattern - and it shows.  Coco deserves to do well and I'm sure it will. If you haven't yet bought a copy, you can get one here.


I was so pleased with my Coco top that I made a dress version as well, but you'll have to wait for another post to see that. Spoiler alert: it's fab! x

The Coco pattern was given to me free of charge for pattern testing. All views my own.


Tuesday 18 February 2014

Tutorial: How to Make a Waist Stay

Today I want to show you how I made the waist stay for my Emery dress. There are many reasons for adding a waist stay: they can stabilise the waist seam and prevent it from stretching, they can support the weight of a full and/or heavy skirt and reduce strain on the zip. They're also there to ensure your garment 'stays' (there's a clue in the name!) in the correct position. Unlike your garment, there is no ease in a waist stay, it's designed to allow the wearer to move around comfortably whilst anchoring the waist in position and preventing the dress from riding up or down.


After a fair bit of research, I came to the conclusion that there are two methods for attaching a waist stay to a dress. The first way is to machine stitch the ribbon or stay to the waistband seam which supports the weight of a full skirt (see the Sewaholic tutorial for this method). The second way is to tack it to the lining (or seams if your dress is unlined) at regular intervals, which is the method described on the Gorgeous Fabrics blog. I've taken elements from each one to make it work for my particular garment, but would like to give both tutorials the credit they deserve for showing me how it's done!

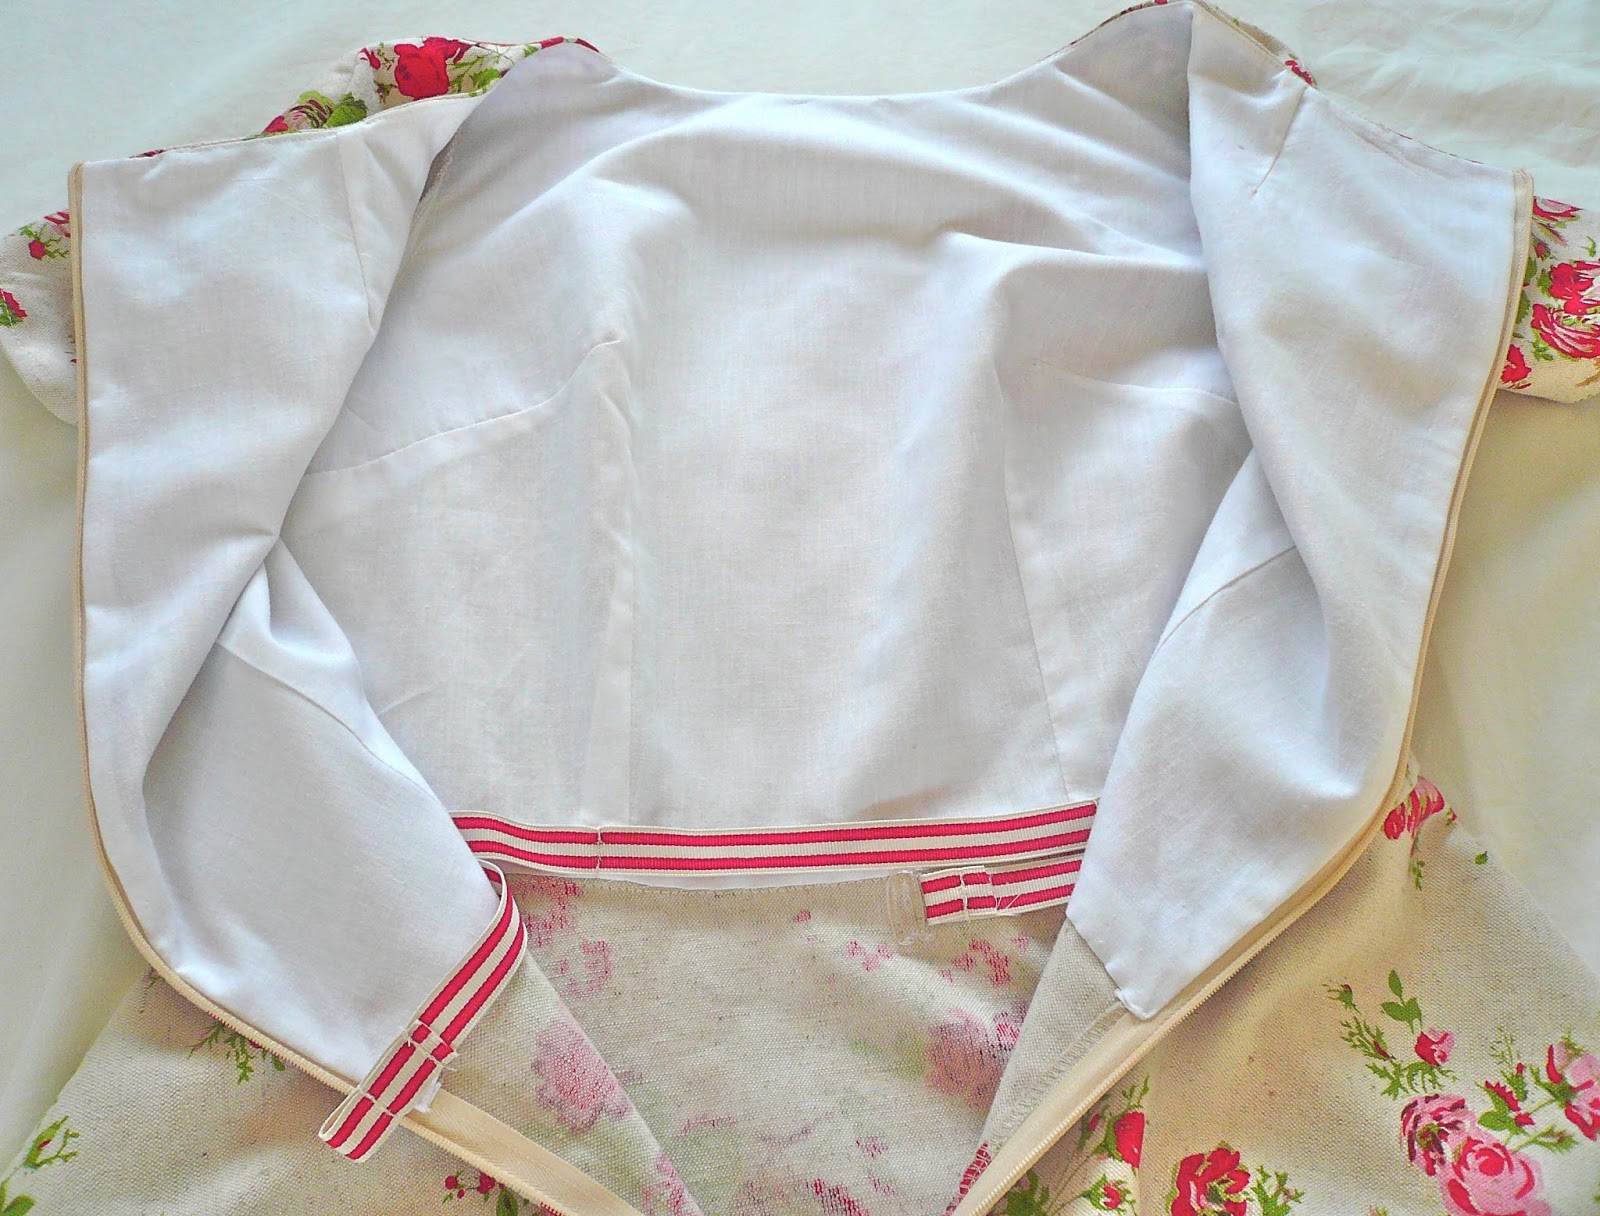
I chose to use the second method of tacking the waist stay to the seams of the dress. This seems like the easiest method for the Emery dress as the bodice is fully lined. It's simple to make too, barely taking me half an hour from start to finish.

You will need
A length of grosgrain or Petersham ribbon ⅝"to 1"wide, whatever width is most comfortable for you. I can't remember where my ribbon came from (probably to tie up a fabric purchase) but happily, it's the exact colours of my dress.
The ribbon should measure the exact length of your waist plus at least 6" for fiddling about with.


A set of waistband hooks and eyes. My preference was the kind of hook used on a bra or swimsuit.


1. Fold your ribbon in half and mark it with a pin. Pin this to the centre of the waistline on your dress, (usually equidistant between the front bodice darts if you have them.)


2. Continue pinning the ribbon to the waistline seams and darts. Pin it to the zip openings as well, just to hold it in place.


3. Now hand tack the ribbon to the seams/darts, backstitching a few times for security. I attached mine to both front and back darts for extra anchorage. Don't tack it to the zip as you need the few inches around the opening to float free.


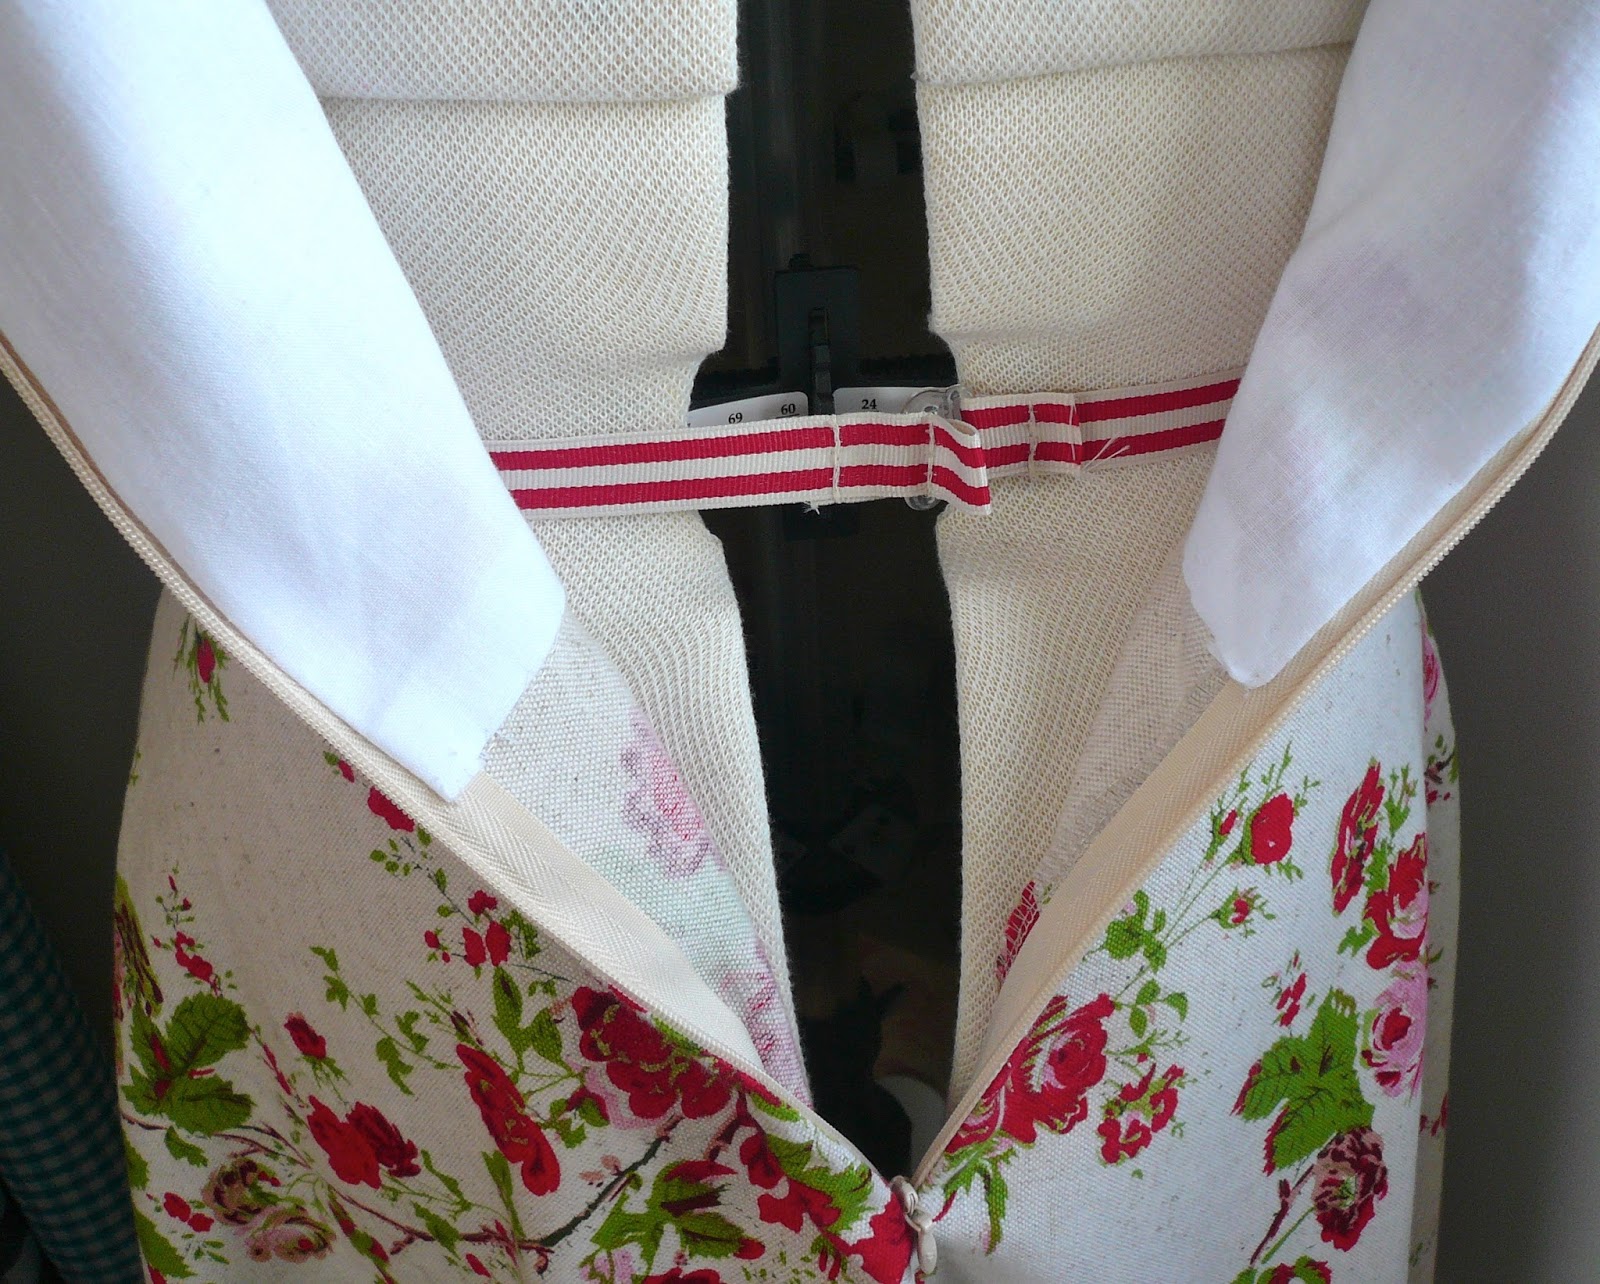
4. Make a loop at one end of the grosgrain ribbon, thread your hook through and pin.


5. At the other end, make a loop with your ribbon and pin.


6. You now need to try the dress on and adjust the pins so that the waist stay fits securely around your waist. I used Tasia's recommendation of trying the dress on back to front - it works!

7. If, like me, you find you have a very different waist measurement pre- and post-lunch, then you may wish to add an extra hook/row of stitches for this eventuality. This genius idea came from Claire at Sew, Incidentally (is there anything that woman doesn't know?!) Simply add add two rows of stitches instead of one: the one furthest away from the end is for your actual waist measurement and the one nearer the end is the looser fitting one to accommodate your stomach after lunch. Here's Claire's diagram which explains it perfectly.


As a dedicated eater of pies, I went for the two loop option. You may need to fiddle with your pins to get them in the right positions, just make sure that your actual waist measurement is the pin furthest from the end. 

8. The final stage is to simply stitch where your pins where to create the loops for hooking. Make sure you backstitch a few times to keep them secure.


And there you have it, a waist stay! Now you can go dancing, eat pies, or do both at once and your dress will stay securely anchored at the waist. 

Angie modelling the waist stay on the Emery dress
I hope you found this tutorial helpful and as always, please let me know if there's anything that isn't clear. x


Friday 14 February 2014

Emery dress - read all about it

I was lucky enough to be offered a pattern to review by Alice at Backstitch recently. It's a dirty job, but somebody's got to do it… Alice stocks an impressive array of independent pattern designers, but one pattern stood out for me - the Emery dress by Christine Haynes. With a neat, fitted bodice and plain lines, it's exactly what I like in a dress. It also has variations for a collar and, wait for it…. a bow!! Oh yes!

I think there are strong similarities between the Emery dress and the Colette Patterns Peony dress. I've made the Peony dress five times and wear all five versions regularly, but I'd be lying if I said it wasn't an absolute bugger to get the bodice to fit. In comparison, the fit on the Emery dress is spectacularly good, and it's not just me who thinks that - everybody who's made it seems to think so too.


Before I started work on the pattern, I pored over the reviews by other bloggers and decided to make two changes. I lengthened the bodice by an inch, influenced by the perfect fit on The Sew Convert's version, who made the same adjustment. A quick muslin (yes, you read that correctly - muslin) confirmed my instinct was right, it was a little short in its original state. I also changed the skirt from a gathered rectangle to a half circle skirt. This was after seeing The Nerdy Seamstress's version. I was impressed by how flattering the fit was on Kathy, especially as her body type is quite similar to mine. I used the By Hand London Circle Skirt App, which does all the maths for you - hoorah. They're the only changes I made though, I nearly cried when I saw what a perfect fit the bodice was!


This is the first Christine Haynes pattern I've used and I was mightily impressed. I faithfully followed the instructions for the invisible zip and it went in first time, without the slightest hint of a fight. There are also instructions for self lining the bodice to give a clean finish around the zip line. I've often struggled to work out how to finish lining around an invisible zip without resorting to hand sewing. Well this pattern shows you how in a beautifully simple way.  The sleeves also set in perfectly FIRST TIME. Just look at them?! Not a pucker or ripple in sight - these might be the best sleeves I've ever sewn, which is a massive confidence boost after the debacle of my raincoat sleeves.


My fabric is linen - an unusual choice for a dress made in February you might think, but I couldn't resist it. I saw it on a recent Spoolettes visit to the Goldhawk Road but didn't buy it. I kept thinking about it though, (how sad am I?!), and had to make a second emergency visit to claim it as my own.  It's a biscuit coloured background with red and pink roses, probably not the best choice with my pale colouring but do I care? No. I did plan to self line the bodice but the rose print was clearly visible from the front, so settled for plain white cotton instead. I underlined the sleeves in the same fabric but left the skirt as it was. I added a waist stay to keep that lovely waistline anchored into place and I think this helps give the dress the neat, fitted look I like. Adding the waist stay was easy peasy by the way - look out for a tutorial soon!


Even though this dress is linen, it can be worn in colder months with tights and a cardigan and I can't wait to wear it in summer with wedges. It's a wonderful pattern and I'll definitely be making more versions, probably using a plain fabric and adding one of the embellishments next time. I don't think I've ever enjoyed making a dress as much as I enjoyed making this one!


Thank you Backstitch for sending me this wonderful pattern and thank you Christine Haynes, the Emery dress is a definite YES from me! x

The Emery pattern was given to me free of charge for review. All views my own.

Tuesday 11 February 2014

Vintage Sewing Pattern Pledge

Marie at A Stitching Odyssey has pledged to sew up at least five of her vintage sewing patterns during 2014 and wants us to join her. What a great idea!


There are no strict rules and you don't even have to set yourself a numerical target. It's just your own personal pledge outlining your plans for your vintage sewing patterns. I'm definitely in...

"I, Jane Marland, will sew up at least three of my vintage sewing patterns during 2014."

Last year I made four garments from three vintage sewing patterns (I used one of them twice), so I think my pledge for 2014 is pretty realistic and do-able. These are the patterns I used:

Butterick Bow Blouse

Sew for Victory Dress

1950's sleeveless blouses, here and here
So, which ones will be sewn up this year? Well, very handily, I'm already one down (my vintage raincoat) and have plans to make yet another version of Simplicity 4238. Deciding which other patterns are in the running however, has been taking much longer than I thought. There are quite a few I know I'll never sew up - ever - I just have to have them in my possession. Of the ones left over, I whittled down the following as possibles ….

Slinky vintage PJ's anyone?


These Bermuda shorts are adorable but the pattern would need quite a bit of grading up in size.


This next bunch are definitely the A listers….


The halter neck top is almost a dead cert - I've been a bit obsessed with halter necks recently as evidenced here, and the Vogue pattern I found is perfect, especially view B. It's still a toss up between the Vogue shirt dress (sooooo chic) or the more basic Anne Adams shirt dress. I can see both of them fitting into my wardrobe so it may come down to time and difficulty of pattern. Any preferences?

Is anybody else signed up for the Vintage Sewing Pattern Pledge? I'd love to know your plans and what patterns you have in mind. Happy Tuesday. x


Thursday 6 February 2014

Finished raincoat….at last!

Well, it's been a long time coming but I'm pleased to announce that my vintage raincoat is now finished.  THANK GOD! This coat has been a true test of my powers of perseverance and let me tell you, they were well and truly tested.


I started thinking about making a raincoat back in October in this post, and was lucky enough to find a pattern that was exactly what I was looking for (vintage Simplicity 5928). On this occasion it was Amy of Sylkotwist who came to my rescue, very generously gifting me the pattern. Thanks Amy, you're a doll!  The pattern is from 1973 and although the instructions are clear, there is a presumption that the user has a good deal of dressmaking knowledge and experience (which was probably standard in those days to be fair). They're also pretty sparse, so it's lucky I decided to embark on this project a few years into my sewing life - if I'd tried to decipher them as a newbie I'd have given up within the hour.


I don't want to bore you to death with a catalogue of disasters but there were two bits of the coat construction that just didn't work. The coat originally came with two piece sleeves which gave it a lovely elegant, tailored look. Sadly, they weren't to be - despite six (six!!) tries, and me mercilessly slicing off quite a bit of ease, I just couldn't get the sleeves to fit in the armholes. I still can't work out why this was, but I'm not going to dwell on it. I ended up ordering extra fabric and drafting one piece sleeves. They set in like a dream and although they don't have the tailored look of the original sleeves, they're absolutely fine.  The other part of the construction that I had to totally improvise was the lining. The lining itself sewed together perfectly, there just wasn't enough ease in it when it was joined to the coat. In fact the bottom of the coat looked just like a puffball skirt, which wasn't really the look I was going for.


My only solution at this late stage was to let the lining hang free at the hem like a skirt lining (it's attached to the facings and neckline in the usual way.)


This seems to work fine and it actually makes the coat a bit less restrictive to wear. I covered the raw edge of the coat hem with bias binding as this would ordinarily have been concealed inside the lining.


Right, that's my whingeing over, let's be positive folks, everything else about this coat is PERFECT. It's exactly what I wanted in a raincoat and I love the look of it, I think it's very me! There are lots of details about the pattern that I really love: the collar shape, the princess seams, the slight flared, flouncy bits around the bottom of the coat and the concealed seam pockets. The pockets are positioned just a bit too far down for my stumpy arms (ahem), but I can reach them which is the main thing! 


I can just reach those pesky pockets!
I used a waterproof coated micro fibre fabric which I haven't had the chance to test in any real rain yet, but this is the UK, so I won't have to wait long. The lining is a gorgeous red floral fabric that I found stuffed at the bottom of a box on a stall on Portobello market. There wasn't enough to cut sleeve pieces from it so the sleeves are cut from a plain red lining fabric which turned out really well. I like knowing that beneath my functional navy raincoat, I can thrill passers by with a subtle flash of red floral fabulousness! 


Ta-da 
And here's another one with an even madder face….


I utilised Scruffy Badger's excellent tips for working with this fabric (you don't need a teflon needle to work with this fabric, use weights when cutting it out and use a longer stitch length). The only tip I blatantly disregarded was the one about pins. Her advice was to use hair grips to hold seams together and not to use pins. Well, I heeded this advice for about five seconds and then lost the will to live - soz Winnie! I discovered that pins don't leave a mark on the fabric, even unpicking actual stitching from six sleeve attempts didn't cause a problem. Yes, there were stitch marks on the inside of the fabric, but absolutely nothing was visible on the right side of the coat and any rogue unpicking marks are all hidden by the lining anyway. Once I'd finished the coat I sent it to the dry cleaners for a professional press, which gave all the seams and hems a nice, crisp look.


I'm pleased with myself for gritting my teeth and finishing this coat, as it's one of the few items of clothing I've made that I actually need! Next up is a dress pattern I've fallen for hard - I bet you can guess which one it is! x


LinkWithin

Related Posts Plugin for WordPress, Blogger...