Showing posts with label Peony. Show all posts

Tuesday, 28 April 2015

1950's-style shoulder tie dress


Recognise this fabric? It's the one I chose from the Hemingway Designs collection, which Tracey from Trixie Lixie very kindly sent me to try out last year. I always knew I wanted to use the fabric for a summer dress, hence the delay. Well, summer's on its way and I'm ready and waiting with my new sundress!

Initially, I was going to make a shirt dress, but after seeing this pattern illustration with a similar turquoise print, I decided to make a fifties-inspired sundress with shoulder ties. I also wanted to add a bit of white somewhere as I love how the two colours look together.


To draft the bodice I used my bodice block as a starting point, together with the instructions from Casey's tutorial for a 1950's sundress (part one and part two). The tutorial worked fine for me, but if you are thinking of using it, I'd recommend reading both parts before you start. It isn't until part two that Casey advises you to use a sleeveless bodice block to make the sundress. A bodice block or pattern that's originally drafted with a sleeve (as mine is) will have more curve around the armhole. Luckily, I made a muslin first and eventually worked out why my armholes were so baggy!

Take my word for it, the neckline does lie flat when I don't have my hands on my hips!
I deviated slightly from the tutorial in a couple of areas. I lowered the neckline to slightly dip in the middle - the original straight-across design does look authentically 1950's, but it was cutting into my neck at exactly the wrong place. I also swapped the gathered skirt in the tutorial for an A-line skirt (I used the pattern from the Colette Peony dress). I reduced the A-line shape by about 1.5" at each side and added pleats rather than gathers at the top (as I did with my gingham Peony dress). The result is not as eye catching as a full, gathered skirt, but I made the dress with holidays in mind, so the less skirt to contend with, the better!


The fabric is a lovely quality, medium-weight cotton, which is a good match for a semi-structured dress as it's nice and crisp. The one I chose is Duck Egg Grid, which has now sold out unfortunately, but if you like the distinctive grid design, it does feature in the newest Hemingway Designs collection in some lovely pastel colours. I didn't even attempt to pattern match the grid design as it's so busy, but actually, when you look closely, the pattern is separated into grids by dividing white lines. By absolute FLUKE, the gridlines on the bodice and skirt match up perfectly, with no help from me whatsoever. What are the chances eh?!

Matching gridline! It's the same on the other side of the bodice too.
Making this dress wasn't without its trials and I did struggle a bit trying to draft the bodice. I always feel slightly out of my depth when it comes to drafting anything myself, I much prefer the safety net of ready drafted pattern pieces. I got there in the end though and the result is just what I was hoping for - a pretty, practical sundress with a bit of a nod to 1950's styles. I like the fact that simply adding white bias binding around the armholes results in a pair of splendid shoulder ties, such a lovely detail!


For some reason, I seemed to think that putting my hair in a pony tail and leaning ridiculously forward would show off the shoulder detail. Er no! I've included the photo anyway because it makes me laugh.

Bloody halfwit!
This dress will be perfect for my holidays and for all those hot, sunny days which I'm reliably informed are just around the corner!  x

EDIT: If you like the shoulder tie bodice, but don't fancy drafting your own, Maison Fleur have just released their Summer Blouse pattern which has a similar detail. Might be worth checking out.


Fabric was given to me free of charge for review. All views my own.


Friday, 14 February 2014

Emery dress - read all about it

I was lucky enough to be offered a pattern to review by Alice at Backstitch recently. It's a dirty job, but somebody's got to do it… Alice stocks an impressive array of independent pattern designers, but one pattern stood out for me - the Emery dress by Christine Haynes. With a neat, fitted bodice and plain lines, it's exactly what I like in a dress. It also has variations for a collar and, wait for it…. a bow!! Oh yes!

I think there are strong similarities between the Emery dress and the Colette Patterns Peony dress. I've made the Peony dress five times and wear all five versions regularly, but I'd be lying if I said it wasn't an absolute bugger to get the bodice to fit. In comparison, the fit on the Emery dress is spectacularly good, and it's not just me who thinks that - everybody who's made it seems to think so too.


Before I started work on the pattern, I pored over the reviews by other bloggers and decided to make two changes. I lengthened the bodice by an inch, influenced by the perfect fit on The Sew Convert's version, who made the same adjustment. A quick muslin (yes, you read that correctly - muslin) confirmed my instinct was right, it was a little short in its original state. I also changed the skirt from a gathered rectangle to a half circle skirt. This was after seeing The Nerdy Seamstress's version. I was impressed by how flattering the fit was on Kathy, especially as her body type is quite similar to mine. I used the By Hand London Circle Skirt App, which does all the maths for you - hoorah. They're the only changes I made though, I nearly cried when I saw what a perfect fit the bodice was!


This is the first Christine Haynes pattern I've used and I was mightily impressed. I faithfully followed the instructions for the invisible zip and it went in first time, without the slightest hint of a fight. There are also instructions for self lining the bodice to give a clean finish around the zip line. I've often struggled to work out how to finish lining around an invisible zip without resorting to hand sewing. Well this pattern shows you how in a beautifully simple way.  The sleeves also set in perfectly FIRST TIME. Just look at them?! Not a pucker or ripple in sight - these might be the best sleeves I've ever sewn, which is a massive confidence boost after the debacle of my raincoat sleeves.


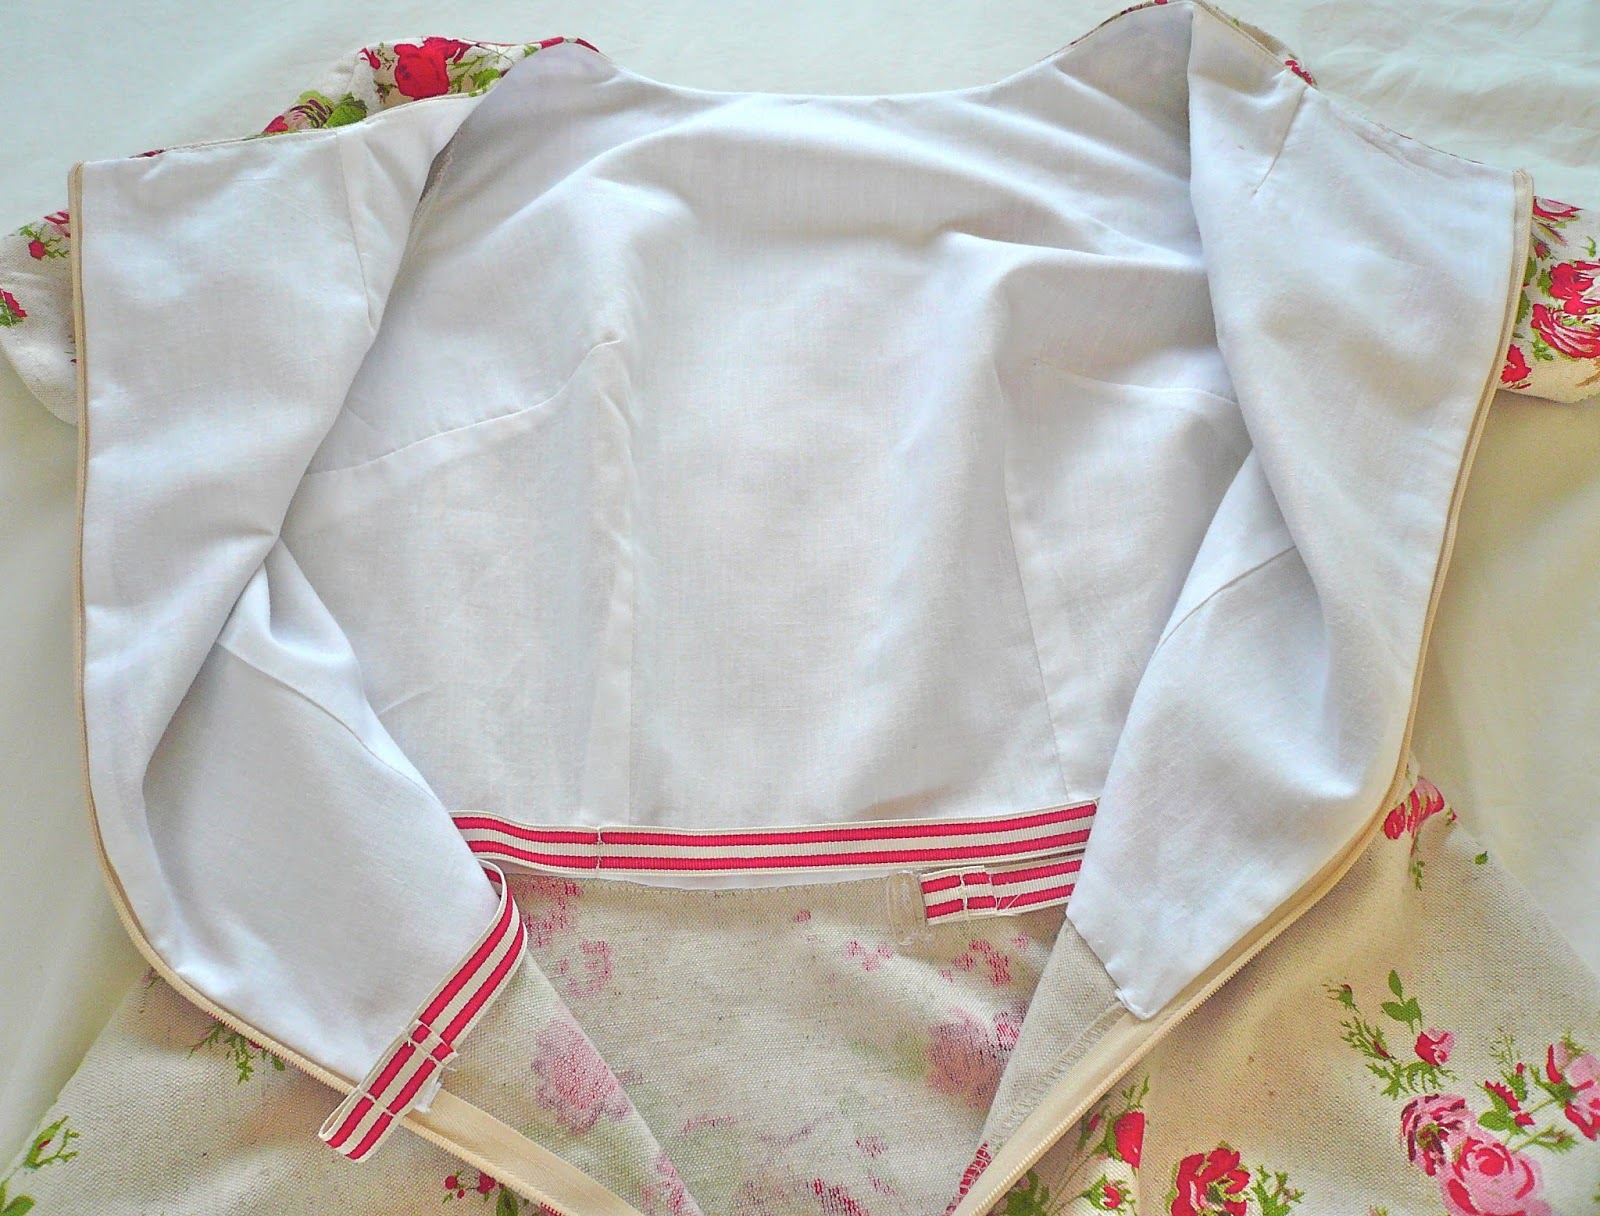
My fabric is linen - an unusual choice for a dress made in February you might think, but I couldn't resist it. I saw it on a recent Spoolettes visit to the Goldhawk Road but didn't buy it. I kept thinking about it though, (how sad am I?!), and had to make a second emergency visit to claim it as my own.  It's a biscuit coloured background with red and pink roses, probably not the best choice with my pale colouring but do I care? No. I did plan to self line the bodice but the rose print was clearly visible from the front, so settled for plain white cotton instead. I underlined the sleeves in the same fabric but left the skirt as it was. I added a waist stay to keep that lovely waistline anchored into place and I think this helps give the dress the neat, fitted look I like. Adding the waist stay was easy peasy by the way - look out for a tutorial soon!


Even though this dress is linen, it can be worn in colder months with tights and a cardigan and I can't wait to wear it in summer with wedges. It's a wonderful pattern and I'll definitely be making more versions, probably using a plain fabric and adding one of the embellishments next time. I don't think I've ever enjoyed making a dress as much as I enjoyed making this one!


Thank you Backstitch for sending me this wonderful pattern and thank you Christine Haynes, the Emery dress is a definite YES from me! x

The Emery pattern was given to me free of charge for review. All views my own.

Thursday, 12 December 2013

Little (almost) black party dress

It's party time!! Which is all the excuse I need to make a new dress. This year, I wanted to make my own version of a little black dress (or in my case, a little navy dress as black doesn't really suit me). Something classic and elegant, with sleeves and a bow on the front. I've been swooning over these two dresses on Pinterest for weeks, so I decided to see if I could combine the two similar styles into one dress.

Fitted navy party dress

Red party dress with bow

For fabric, I chose a beautiful stretch cotton sateen, which was kindly gifted to me by The Fabric Godmother. The slight stretch makes it super flattering (important if you plan to stuff your face with pies as I do this Christmas) and it has that subtle touch of shininess essential for party wear.


As I only had a week or so to make the dress, I thought it safer to go with a pattern that already fitted me well - the Colette Patterns Peony. When I initially made this dress here, I made a lot of changes to the back bodice, getting the fit pretty much spot on on my second version. My measurements are still the same, so I thought it would be a simple case of sewing the amended pattern up for a perfect fit. Wrong! What I failed to take into account was the stretchiness of the fabric. It actually has a lot more stretch than I realised, and when I sewed the dress up it was just way too big. I had to take the bodice side seams in by an inch each side, which sorted out the front, but still left the back flapping about. In a bit of an unorthodox move, I joined the back neck darts and the back waist darts together to make two giant darts/tucks down each side of the bodice.

Neck darts and waist darts joined together 

It sounds horrific but as you can see from the photo above, it looks absolutely fine - they actually look like princess seams and help give the back bodice a nice fitted look.


Other changes I made were to completely re-draft the neckline to become a round neck as the original bateau neckline was just too uncomfortable for me. I used the neckline from the Sewaholic Alma pattern as a guideline and then drew new facings to match the revised shape.  I also chopped six inches off the long sleeves and made them tighter as they looked far too baggy and shapeless for such a fitted bodice.  So quite a few last minute changes, but worth it in the end as I love the fit now.

To incorporate the bow detail, I decided to make a removable Tilly-style bow belt rather than just add one to the front. Tilly's tutorial is simple to follow and I'm really pleased with the resulting belt. It does involve the sewing on of two sets of hooks and eyes though, and you all know how I feel about those little buggers. My solution? I simply sewed on a set of bra fastenings, so much less fiddly and as they already come with different size options, you can still adjust to fit!


That's it for now, I'm all set to party. So if you'll excuse me, I have a date with an ambassador and a towering pyramid of chocolates…! x


Fabric was given to me free of charge for review. All views my own.

Monday, 11 February 2013

My fourth and final Peony dress

This is yet another variation on the Colette Patterns Peony dress.  Yes, this is now my fourth version (here are the first, second and third), but I love the shape, it suits me and I can get it to fit me well, so why not? 


It's made from navy sweatshirt knit fabric (Goldhawk Road, £4.50 a metre), with leftover red double knit scraps used for binding the neck and cuffs.  Sweatshirt knit isn't the most glamorous fabric in the world, but it's so cosy and warm, I love it. I sewed it in exactly the same way as my last knit Peony, the only difference being that this time I tried some extremely fine fusible knit stay tape from A Fashionable Stitch on the neckline and hem.  I'm still not entirely sure what I'm doing when I'm trying to stabilise a neckline, but it seemed to give a good, smooth finish. I can definitely tell the difference on the hem, it hangs perfectly. 


One big plus is that whenever I wear this dress, I get a distinct Star Trek vibe. If you reversed the colourways and shortened it by about a foot, it could almost be something Lieutenant Uhura would wear.  Sort of.


I think my cold weather sewing has now come to a bit of a natural end. My plan was to make a few dresses that I could wear during the arctic UK winter whilst still retaining a modicum of style, and I'm pretty pleased with the final tally.  You can layer them up with cardigans and tights and still be warm and stylish (well that's the theory anyway.) Now I know I've got enough knit dresses in my wardrobe to keep me warm, I can get on with what I love most - making pretty clothes for the summer. Live long and prosper my friends. x


Friday, 9 November 2012

Peony-esque knit dress


I'm pretty excited to share my latest sewing experiment with you as it's something I've put a lot of time and effort into. My standard approach with dressmaking is to start with a pattern (usually after seeing somebody else's version) and copy it faithfully, perhaps shortening a sleeve or adding a lining, nothing too risky. What I'm NOT good at is drafting anything of my own design or dramatically altering a pattern (apart from the length, which is a standard adjustment for shorties). I just don't have the patience, the mathematical application or the precision required. That's all absolutely fine and I've never lost sleep over this - there are more than enough perfect patterns in the world to keep me happy forever. With this latest project however, I just couldn't find a pattern that seemed to tick all my boxes. 

All I wanted to make was a fitted knit dress with long sleeves and an A-line skirt. Nothing too unreasonable you'd think, but I changed my mind on this project so many times I lost count.  Throughout the whole process, one pattern kept lurking at the back of my head - the Colette patterns Peony. I've made it twice now - here and here - and having made a few adjustments to the back bodice the first time I made it, I was happy with the fit.  I wasn't totally sold on the boat neck though, even after lowering it and shortening the width of it on my second version. My solution? I simply traced the neckline of the Alma blouse (which I love) and merged the two patterns together. So far so good. I now needed to see how it looked sewn up. 


I thought it was all going to be so easy… my plan was to simply go down one size to allow for the extra stretch and hey presto, I'd have a Peony in knit fabric. Yeah, right. Going down a size was never going to be enough. So I spent an entire day sitting at my machine, deshabille, trying the bodice on, pinning it, taking it off, resewing the darts, taking it off, slicing a bit off the side seams, taking it off, fiddling with the shoulder seams, taking it off…. you get the picture. Knit fabric is very forgiving and very compliant, so before long, through sheer dogged persistence, my bodice was the exact fit I was after. By this point however, any pretence of measuring and pattern adjustment had flown out of the window. I was totally making it up as I went along and I have no idea what size and shape the bodice ended up as. 

Ooh, it's so versatile, you can team it with a red cardigan....

.... or a green one...

.... or a big, mad necklace...

For the skirt, I simply laid out my second Peony on top of the fabric and drew around it, adding a tiny seam allowance for the overlocker. I did feel a bit out of control and VERY slapdash, a bit like the episode of the Supersizers, where Giles Coren just draws round Sue Perkins whilst she's lying on the floor, then cuts it out and sews up the sides to make a dress…

I sewed the whole dress on my overlocker, with the exception of the darts (which were sewn with a straight stitch and a jersey ballpoint needle) and the hems, which were sewn with a twin needle - my new favourite sewing toy.  I love the speed with which a dress can be made on an overlocker, especially as there were no zips or facings. I deliberately went for a plain grey as I wanted it to be a blank canvas dress that would go with any combo of shoes/tights/cardigans (see above). For fabric, I used a grey marl Roma jersey from The Fabric Godmother. I asked for a sample first, just to see how stretchy it was and was impressed by what great quality the fabric was - nice and thick but still retaining a good amount of flattering stretch.

So, what did I learn from all this? If ever there was a case of 'do as I say, not as I do" then this is it. And what I say, is, if you're inexperienced sewing with knits (as I am), it's NOT a good idea to try to convert patterns specifically designed for woven fabrics and hope for the best. Next time I will definitely be using a pattern that's specifically designed for knit fabrics, I'm sure it would take about a quarter of the time. Perhaps something from the Sew U Home Stretch book, or Kwik Sew 3659 which Winnie used for her lovely polka dot knit dress.  Actually if anybody has any pattern recommendations for knit fabrics please let me know. You know my tastes by now, nothing too flouncy and preferably quite fitted.

Despite the unnecessary fiddling about, I did end up with the exact dress that I had in my head, which is the main thing. It's so cosy and comfortable, I can see this being worn a lot over the coming months. Making this dress has also made me realise just how awesome knit fabric is, I can't wait to sew more with it.  x

Monday, 21 May 2012

Another Peony, this time in gingham....

I'm currently in a state of trauma and it's all because of The Bridge.  Two reasons: 1) the series has now finished so there's officially nothing good on telly any more and 2) the events at the end of the final episode completely finished me off emotionally.  Maybe you need to read point number four from this post to get a better idea of what I'm wittering on about, but basically I need cheering up, big time, which is where my new gingham dress comes to the rescue. 

This is my second version of the Colette Patterns Peony dress, which is in navy gingham.  If you've read this post and seen this board on Pinterest, then you'll know I've got a serious crush on gingham - it just lifts the spirits completely, which is why it's the perfect dress to photograph on my sad "end of The Bridge" day.
Sad face to start off with.....
...wahay, a big smile five minutes later 
The fabric is a cheap-as-chips poly cotton, which my local fabric shop was selling off for £1 a metre in a closing down sale.  The quality of the fabric was pretty shoddy and transparent, which is why I decided to underline it. Blimey, what a difference. From looking pretty sorry for itself and actually a bit grey around the edges, the gingham suddenly looks fresher, cleaner, whiter and quite frankly much more expensive, when coupled with a nice white muslin underlining.  I'd highly recommend underlining a cheap fabric -  as well as massively improving the appearance, it also gives the fabric much more structure and strength.  


When I made my first Peony, I made quite a few adjustments to the back bodice, which still came out baggy due to the stretchy nature of the cotton pique fabric I used.  This time though, my beautiful underlined gingham behaved itself and the bodice sewed up without a hitch - all my adjustments from the first time round working perfectly with a woven fabric.  Fit-wise, this second version is more or less spot on, but I still decided on  a few further tweaks to the overall pattern:

I reduced the width of the boat neck in order to hide my bra straps, and lowered the curve of the neckline by about an inch.

I added pleats to the skirt section rather than gathers, inspired by Beth's lovely version.


I eliminated facings in favour of gingham bias tape. This was used on the neckline and also on the sleeves. I blatantly copied this from Lauren whose own sleeveless gingham version of the Peony I adore.  Here's her tutorial for using bias tape as a facing. 


In a rare moment of forward planning, I also took a bit of time to try and cut the pattern pieces out to ensure the gingham lined up. It was MOSTLY a success and luckily it doesn't bother me too much if my makes aren't absolutely perfect.  Considering how slapdash my method was, I think the lining up of the checks is pretty damn miraculous.


This could well become my favourite dress of the summer - it's comfortable, fits well and feels fab to wear because of the lovely underlining.


It's also navy blue and white, so goes perfectly with most things, especially red accessories!  What's not to love? Hoorah for gingham, it definitely cheers you up! Happy Monday everybody. x


Sunday, 12 February 2012

Finished: Rosy Peony

When the Peony dress was first released by Colette patterns, it seemed to pass me by for some reason. I was only swayed into buying it because of all the delectable versions that kept popping up on sewing blogs.  But I'm SO glad I did - I can see myself making this perfect little dress over and over again.  I love the classic lines, the neat fit and the fact that it has a vintage 1960's vibe whilst still looking modern.  So without further ado, let me present my version: the Rosy Peony.  

It's made from a textured, almost waffley cotton fabric (I'd be interested to learn the official name for this type of fabric if anybody knows). The fabric is relatively thick, but also soft, which was important as I didn't want to end up with pointy darts as forewarned by Karen in this invaluable post.  Taking Karen's advice, I made a muslin of the bodice and by some miracle, didn't need to make any adjustments to the front.  The back was a different matter though and I encountered my usual problems of busty front versus narrow back.  The changes were still only minimal: I increased the top/shoulder darts and made a tuck across the back.  I was sporting quite a smug look on my face at this stage, which was soon wiped off once I'd sewn the bodice up in my fashion fabric.  Yes, I encountered the old chestnut of different fabrics behaving in different ways, grrr. I used a plain woven cotton for my muslin and failed to take note that the waffley fabric actually had quite a bit of stretch to it. You've guessed it, the fit was now too big, doh!  The overall shape was good though so it was quite easily rectified by simply taking in the side seams from just below the bust dart.  

Apart from the fitting of the bodice, the pattern was the usual delight to sew up and only  took a couple of hours to make.  I added black piping to the neckline, (gifted to me by Zoe and Claire when I couldn't make the Brighton De-Stash meet up, thanks ladies!)  This was my first time working with piping and I couldn't believe how easy it was!  It seemed to work like magic, I'll be piping everything that moves from now on.  
Admire my piping
...and my overlocking - couldn't resist a gratuitous inside shot
I also didn't bother with the cummerbund belt - if I need a belt, I'll add this little number instead.  

I've got a party to go to in a few week's time and I know this dress will be perfect.  I think it will also be good to wear with sandals and a cardigan in spring, so I'll definitely be making another version before the year is out.  I think the Year of the Dress has got off to a good start. x

Friday, 25 November 2011

Sewing conversations...

Earlier this week I weaved my way across London to visit the lovely, shiny new Ray Stitch shop.


After reading two great reviews of the shop here and here, I was desperate for a visit, so on the tube I hopped.  Straight away, I realised to my horror that I'd forgotten my book, so resorted to reading the instructions from a sewing pattern I just happened to have in my bag (Vogue 8409 if you're interested). This is not an unusual occurrence for me as I love reading sewing patterns. What was interesting though was the reaction of the two women sitting opposite me.  They stopped their conversation and watched me greedily as I worked my way through the instruction sheet.  Within minutes, we'd all started chatting and were soon swapping notes on fabric (of course), sewing machines and their respective feet, and the trials and errors of sewing on the bias.  We even managed to swing the conversation round to who we thought would win Strictly Come Dancing (Jason Donovan for me, Harry from McFly for my new pals).  When it was time for them to disembark, I bid them a cheery goodbye, along with detailed directions on how to get to the Goldhawk Road.

Now, I've lived in London since 1994 and not once, in all that time, have I ever had a conversation with a stranger on a tube before.  It could be any number of reasons but I like to think it was a mutual liking for sewing which brought about this happy exchange.  I've always found it pretty easy to chat to people, but I've noticed that having a passion for a hobby has made me even more likely to witter on.  By and large people seem to enjoy hearing about it too - if you're passionate about your subject, it makes for a more interesting conversation.  How about you?  Has your love of sewing opened up new friendships.  Is sewing like dog walking, in that it allows you to start up conversations with complete strangers?  I'd love to hear your views.

And what of Ray Stitch?  Well, after a quick coffee with Karen, who'd very generously used up her lunch hour to come and meet me, my purchases were remarkably restrained.  In a nutshell, Ray Stitch is a fine little hidden gem and I'll definitely be visiting again.  This is what I restricted myself to:


Pins for fine fabric, pricey but worth it to avoid unsightly holes on occasion.


A sewing gauge - I've wanted one of these for ages.


Colette patterns Peony.  How could I resist with so many gorgeous versions doing the rounds?


And a metre of this lovely print which I have plans for.....

Have a great weekend everybody. x

LinkWithin

Related Posts Plugin for WordPress, Blogger...