Tuesday 20 September 2016

The Handmade Fair

This past weekend saw craft enthusiasts flocking to Hampton Court for one of my favourite craft fairs - the Handmade Fair. Now in its third year, the fair is set up in a series of marquees on Hampton Court Green, which I think is far more convivial than a massive exhibition hall. There's a definite creative buzz about the place and the tents and quirky food stalls give the whole thing a bit of a festival vibe (further highlighted by the fact that it didn't stop raining the entire day!) 

I visited on the Friday, but was only able to stay until early afternoon as my children beckoned. I really wish I'd been able to stay longer though, as two afternoon delights I missed were talks by Cath Kidston and GBSB hottie Patrick Grant. Doh! I always say I'll book in for a workshop or class and always end up getting distracted by the shopping tents instead. This year was no exception and I spent hours browsing the eclectic mix of wonderful craft stalls. I've been on a bit of a fabric bender recently so I was pretty stern with myself about no fabric purchases. That didn't stop me treating myself to a couple of other special things…

I spent ages at Gizelle Renee's stand which sold a wonderful selection of handmade leather gloves. I've always wanted a pair of posh gloves and this red leather and cashmere pair had my name on them.


I have teeny tiny hands, so it was good to get them properly measured (I'm a size 6.5 if anybody's interested) and finally own a pair that fit me like a glove (boom boom!) Here's Gizelle shortly after completing the sale…


My other treat to myself was a new teapot. It wasn't exactly high on my wanted list, but when I saw this Art Deco-style ceramic and chrome pot just sitting quietly on one of the vintage stalls, I knew it was coming home with me. 


I actually have a small collection of coffee pots and milk jugs in this style, but no tea pot. See how perfectly it fits in on my shelf at home, it was obviously meant to be!


Other stands that caught my eye were Ladybird Likes - brimming with vintage sewing lady and pin up girl brooches.


Hannah Bass contemporary tapestries. These amazing map cushions almost made me want to take up cross stitch.


Beautiful, printed stationery from Cambridge Imprint


I also got to catch up with sewing friends old and new. 

Clockwise from bottom left: Tilly, Elisalex, Gabby and Mark
Next year I'll make a point of booking childcare well in advance so I can complement my shopping and eating with a sewing class or two. I'll also make a note of where I left my car, to avoid wandering round a field like an idiot for half an hour looking for it!  x


SaveSave

Saturday 17 September 2016

One Week, One Pattern 2016

The past week has seen me wearing different variations of New Look 6217 each day as part of OWOP (One Week, One Pattern) 2016. The challenge was run this year by Hannah at Cinderellis Sews and I had a lot of fun mixing and matching garments made from my current favourite pattern.

I cheated slightly as I've made both tops and skirts from the pattern, so it wasn't actually much of a stretch. But considering the pattern also includes trousers and a kimono jacket I think I was actually quite restrained! What I like about the top and skirt patterns is the fit: they have a fair amount of wearing ease but still skim the body to show off your curves. I already had three versions of the top and two of the skirt, but just managed to squeeze out another last minute top to give myself a bit more choice. Here's what I wore:

Day 1 - Red Swiss Dot NL6217 top and Gap jeans. I was visiting the Undressed exhibition at the V & A museum with Scruffy Badger


Day 2 - Denim NL6217 skirt and 1960's Shoulder Tie top (without shoulder ties!) I was at the allotment pretending to help, so this combo was actually really comfortable, although a white top probably wasn't the wisest choice for picking raspberries...


Day 3 - Liberty print NL6217 top and denim Arielle skirt. I hadn't tried this combo before now and was surprised how much I liked it.


Day 4 - Denim NL6217 skirt and Gingham Granville shirt. The Ginghamalong went live today so I wore my new gingham shirt with my New Look denim skirt. It's a bit of a polka dot/gingham clash but I think they look good together! This photo was taken outside my local boozer, complete with splendid old tiles.


Day 5 - Ivory Crepe NL6217 top and Liberty Carline Delphine skirt. This is a new, unblogged version of the top made from a 80cm remnant of prestige crepe from the Fabric Godmother sale. The drape is perfect for this pattern and I loved wearing it on its first outing. Being off white, it's also useful for pairing with garments that are difficult to match things to (like this skirt!) 


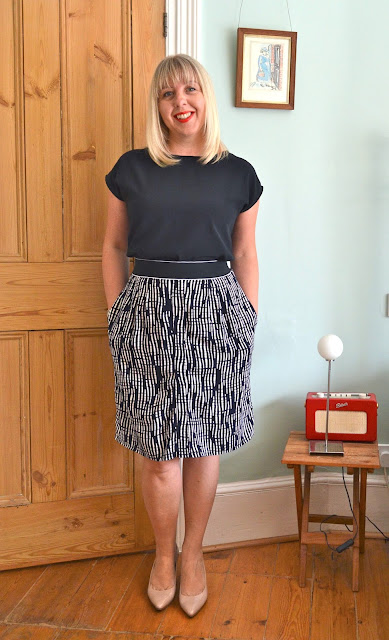
Day 6 - Black crepe NL6217 top and Bamboo skirt. Suitably smart attire for visiting the Buckingham Palace state rooms with my mother-in-law!


Day 7 - Black Crepe NL6217 top and Sew Over It Ultimate Trousers. Here I am meeting the lovely Mark from Girl Charlee UK at the Handmade Fair in Hampton Court (more on my visit in the next blog post).


A few reflections on the challenge:
  • I'm sooooo pleased I chose this pattern, everything I've made from it feels like such a natural part of my everyday wardrobe. 
  • The top is a simple shape and easy to make, but I think fabric choice and colour are key to wearing them often. The fact that I had three solid, neutral colours tops meant they could be paired with anything. Plus the lovely quality of the fabrics made them feel just a bit more special than a T shirt or cotton top in the same colours.
  • I love the slim silhouette of the skirt and the quirky little side split - I'll definitely be making more of them.
  • I'm still not very adventurous with accessories!

Thank you to Hannah for hosting the challenge and I'm looking forward to seeing what everybody else has been wearing for the past week! Have a great weekend. x


SaveSave

Tuesday 13 September 2016

Gingham Granville Shirt

Behold a new gingham shirt - my last minute entry into the Did You Make That? Ginghamalong. It's simple, classic and very wearable and I don't need a crystal ball to predict that this will be a much loved item in my wardrobe for its entire life. I made just the one gigantic error during construction (see below for the full blood and guts horror story), which I'm hoping will fade from my memory over time... Other than that, everything went to plan!


The gingham I used was 100% yarn dyed cotton which I snapped up for the bargain price of £6.50 a metre from this eBay seller. The seller advises a cool hand wash, which I promptly ignored (the only fabric that's ever hand washed in this house is silk) and it washed beautifully in the washing machine at 30 degrees. It presses well and is lovely to work with - a really nice quality cotton.


Because of school holidays I knew I wouldn't have long to make this shirt, so I used a pattern that's already been adjusted to fit me well - the Sewaholic Granville shirt (previous versions here and here). The thought of trying to pattern match the gingham didn't exactly fill me with joy, but I did want the checks on both sides of the bodice and the button bands to line up horizontally, so that's where I concentrated my efforts. It worked! I used a combination of Tasia's tutorial and just simply lining up all the underarm seams as shown here. The gingham on the collar seems to line up with the bodice gingham too, but I can't really take any credit for that one, pure fluke!


To further save time (and also because my buttonhole foot is still playing up), I used snaps on the front button band instead of buttons. If you have a pair of Prym pliers, snaps are super quick to apply, but I still find positioning them a little nerve wracking. They're almost impossible to remove without damaging the fabric, so if you get the position wrong you've well and truly pissed on your chips. The relief when they were all in (and the right way round!) was pretty huge. I do like the look of snaps on this shirt, they give it a cool, ready-to-wear feel.

Anyway, about that gigantic error… As per last time, I used this tutorial from Four Square Walls to attach the collar and under collar as I prefer the construction order Andrea uses to the pattern instructions. All was going swimmingly until I realised there was a massive amount of ease in the collar. Now I know there should be some ease in that area to allow the collar to be turned back easily, but this was ridiculous. I eventually resorted to easing the collar in with gathering stitches like a sleeve, but I wasn't happy and was gutted that my planned classy shirt was going to make me look like Harry Hill. Luckily, I had a sewing epiphany... in my sleep! I literally woke bolt upright one night after sub consciously working out what the problem was. Yes, your friendly neighbourhood sewing moron had only gone and attached the collar to the shirt upside down. Ahem. God I felt stupid, but at least I actually worked out what was wrong before wearing it out in public! I promptly cut out another set of collars/ under collars and attached them the right way round. It took about an hour to sew the collar and this time everything matched up perfectly, making me realise just how well drafted Sewaholic patterns actually are.


After all the eleventh hour drama, I couldn't be more pleased with my new gingham shirt. Yes, I know it's a sleeveless shirt and we're heading into autumn, but I can guarantee it will get plenty of outings underneath cardigans and jackets. In fact I think I'd like to wear it forever.


Thanks to Karen for hosting such a fun sew along. Let's face it, she was never going to have do much arm twisting to get me to join in, but I'm glad I did nevertheless. My gingham Granville is officially my new favourite thing! x


Thursday 8 September 2016

Get Into: Sewing

Good morning! Guess what's published today-hay?


My book, that's what!!!!!!! Yes, September 8th sees the publication of Get Into: Sewing by Jane Marland!!!! Get Into: Sewing is the first in a series of creative craft titles by Wayland Books designed to get kids interested in popular hobbies. The eleven projects in my book use simple hand sewing techniques and are fun, colourful and easy-to-follow. 

The book is aimed at 8-11 year olds and the projects are suitable for a range of abilities. Here's the complete Contents list.


I've included some absolute beginner projects such as Lavender Bags and simple Felt Flowers….


There are a few projects that are a bit more involved, such as brightly coloured Bunting…


 … and a smart Pencil Roll…


The shirt cushion project is a very simplified version of one of the tutorials on my blog, especially adapted for hand sewing. Once the front and back are cut out all that's required is some neat backstitching!


And my favourite project in the book is probably the Juggling Ball - fun to make and such a cool present!


I'm slightly biased, but I think it's a great introduction to sewing for children! And if you know of any little people who might enjoy it (or even big people!) it's available from Amazon as of today at £12.99! I've been told it's also being published in Australia around the same time and am awaiting details of availability in the US and Canada. I'll add an update to this post as soon as I know.

Have a great day! x

EVERYBODY in my family will be getting a copy for Christmas!


Sunday 4 September 2016

Bamboo Skirt


This skirt started life in a very different manner to what you see before you. I've had the fabric (a  drapey bamboo print viscose from Fabric Godmothernow sold out) squirrelled away for ages. If it looks familiar it's because I used the same fabric in red for my Sew Over It Pussybow Blouse. It worked perfectly for that project so I thought I'd use it to try out a shirtdress from Butterick (B6333). 

It turned out to be a very poor fabric choice for that particular pattern - the viscose was too drapey. Despite measuring all the pattern pieces carefully, the resulting dress was far too big and hung on me like a rag. Even after pinning it for a closer fit it felt like I was wearing some kind of glamorous dinner ladies overall! The dress was stuffed in a bag and forgotten about for most of the summer until I re-discovered it last week. I immediately knew I couldn't bear to waste such lovely fabric, so decided to see if I could hack it into something else instead.

The version of the shirtdress I originally intended to make was view C which has a narrow skirt with darts to the back, pleats to the front and inseam pockets. I really wanted to keep those skirt features so decided to turn the dress into a slim, drapey skirt instead. After removing the bodice and pinning the centre front together, I realised that I could actually get the skirt on and off without any openings. Aha! All I did then was to sew the front plackets closed and attach a wide elastic waistband to the top (I used my own Easy Elastic Waist Skirt tutorial for this). One finished skirt!


The only problem with the skirt is that you can't see any of the pleating details (or even the placket for that matter) amongst the bamboo print. I know it's there though! Because the print is so busy I can only really wear it with a plain top. Unless I'm feeling particularly brave of course, in which case I could pair it with my Pussy Bow Blouse and swan around in double bamboo! Needless to say I haven't tried this yet...


I think this skirt will be a great transitional garment for autumn: light and drapey for warm days yet smart enough to wear with tights and autumnal knitwear once the weather turns cooler. It's a shame the original pattern didn't work for me but sometimes it's easier to accept that and move on. I'm just pleased I managed to salvage such a chic little skirt out of the wreckage. Happy Sunday! x

LinkWithin

Related Posts Plugin for WordPress, Blogger...